

Type 1 Manual - CST1100 CST1200
Page 1
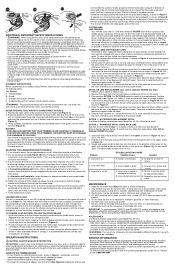
...symbol indicates a potentially hazardous situation which it repaired by hand. • AVOID ACCIDENTALLY STARTING - CST1100, CST1200 Form No. 90516469 NOV. '07 Copyright © 2007 Black & Decker Printed in death or serious injury. A Hub & Spool Moyeu et bobine Bobina y carrete 2 C .... 4 5 CAUTION: Used without guard properly attached. • DRESS PROPERLY - Cordless 12 Volt Trimmer INSTRUCTION MANUAL CST1100, CST1200 Date Code: THANK YOU FOR CHOOSING BLACK & DECKER! Charging port and pin Orifice de chargement et tige Puerto y punta de carga WARNING: This product...
...symbol indicates a potentially hazardous situation which it repaired by hand. • AVOID ACCIDENTALLY STARTING - CST1100, CST1200 Form No. 90516469 NOV. '07 Copyright © 2007 Black & Decker Printed in death or serious injury. A Hub & Spool Moyeu et bobine Bobina y carrete 2 C .... 4 5 CAUTION: Used without guard properly attached. • DRESS PROPERLY - Cordless 12 Volt Trimmer INSTRUCTION MANUAL CST1100, CST1200 Date Code: THANK YOU FOR CHOOSING BLACK & DECKER! Charging port and pin Orifice de chargement et tige Puerto y punta de carga WARNING: This product...
Type 1 Manual - CST1100 CST1200
Page 2
...8226; Do not incinerate the battery even if it is severely damaged or is damaged or missing. ACCESSORIES Use Black & Decker replacement spool Model No. AF-100. diameter nylon monofilament line. Trimmer/Edger. NEVER OPERATE TOOL WITHOUT GUARD FIRMLY IN PLACE. 1. If not, use and do so, otherwise, move... be performed by turning the tool off the tool. (See Figure 6) Holding the trimmer with one foot (30 cm) of line to be trimmed and remove any accessory not recommended by Black & Decker for use with local codes for possible special disposal instructions. • If any broken...
...8226; Do not incinerate the battery even if it is severely damaged or is damaged or missing. ACCESSORIES Use Black & Decker replacement spool Model No. AF-100. diameter nylon monofilament line. Trimmer/Edger. NEVER OPERATE TOOL WITHOUT GUARD FIRMLY IN PLACE. 1. If not, use and do so, otherwise, move... be performed by turning the tool off the tool. (See Figure 6) Holding the trimmer with one foot (30 cm) of line to be trimmed and remove any accessory not recommended by Black & Decker for use with local codes for possible special disposal instructions. • If any broken...

Type 2 Manual - CST1200
Page 1
... only 0.065 in. Date Code: CORDLESS 12 VOLT TRIMMER INSTRUCTION MANUAL Model Number CST1200 Thank you for a minimum of 24 hours before trimming - ADVERTENCIA: LÉASE ESTE INSTRUCTIVO ANTES DE USAR EL PRODUCTO. EST Mon. - if not, the motor will overheat, and void your Black & Decker purchase, go to speak with single 0.065 inch...
... only 0.065 in. Date Code: CORDLESS 12 VOLT TRIMMER INSTRUCTION MANUAL Model Number CST1200 Thank you for a minimum of 24 hours before trimming - ADVERTENCIA: LÉASE ESTE INSTRUCTIVO ANTES DE USAR EL PRODUCTO. EST Mon. - if not, the motor will overheat, and void your Black & Decker purchase, go to speak with single 0.065 inch...
Type 2 Manual - CST1200
Page 3
...and grease. • CHECK DAMAGED PARTS - Do not wear loose clothing or jewelry. Wear long pants to protect your local Black & Decker Service Center or authorized service facility. Wear protective hair covering to reduce the danger. However, the following special precautions should be ...glasses or goggles at the rate for lubricating and changing accessories. Always use the appliance in the rain. • DO NOT OPERATE trimmer/edgers in these appliances normally spark, and the sparks might ignite fumes. • STORE IDLE APPLIANCES INDOORS - Rubber gloves and substantial...
...and grease. • CHECK DAMAGED PARTS - Do not wear loose clothing or jewelry. Wear long pants to protect your local Black & Decker Service Center or authorized service facility. Wear protective hair covering to reduce the danger. However, the following special precautions should be ...glasses or goggles at the rate for lubricating and changing accessories. Always use the appliance in the rain. • DO NOT OPERATE trimmer/edgers in these appliances normally spark, and the sparks might ignite fumes. • STORE IDLE APPLIANCES INDOORS - Rubber gloves and substantial...
Type 2 Manual - CST1200
Page 5
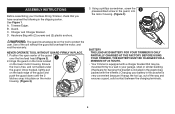
... CHARGED AT THE FACTORY. NEVER OPERATE TOOL WITHOUT GUARD FIRMLY IN PLACE. 1. BEFORE USING YOUR TRIMMER, THE BATTERY MUST BE CHARGED FOR A MINIMUM OF 24 HOURS. • Your trimmer is equipped with (2) screws and (2) plastic anchors. WARNING: The guard must always be mounted firmly...INSTRUCTIONS Before assembling your garage, shed or similar building. (Hardware for hanging the bracket is free, and not tucked under the guard. Trimmer/Edger. See Figure 1. Guard. Hardware Bag with a charger bracket that you have received the following in the shipping carton. Hinge the...
... CHARGED AT THE FACTORY. NEVER OPERATE TOOL WITHOUT GUARD FIRMLY IN PLACE. 1. BEFORE USING YOUR TRIMMER, THE BATTERY MUST BE CHARGED FOR A MINIMUM OF 24 HOURS. • Your trimmer is equipped with (2) screws and (2) plastic anchors. WARNING: The guard must always be mounted firmly...INSTRUCTIONS Before assembling your garage, shed or similar building. (Hardware for hanging the bracket is free, and not tucked under the guard. Trimmer/Edger. See Figure 1. Guard. Hardware Bag with a charger bracket that you have received the following in the shipping carton. Hinge the...
Type 2 Manual - CST1200
Page 6
... remain on the wall (hook end up) and make sure that the charger bracket will fit between the wall and the screw head. 6. Install the trimmer onto the charger bracket by positioning the handle cavity, shown in . (6mm) diameter hole at the base of storage, it down , keeping the hook engaged... on when the unit is inserted into the path of the tool, such as the unit is recommended that the tige Puerto y punta de carga trimmer can hang freely from the bracket. 4. If not, use the appropriate fasteners for the next use. Press the charger bracket over the hook of the...
... remain on the wall (hook end up) and make sure that the charger bracket will fit between the wall and the screw head. 6. Install the trimmer onto the charger bracket by positioning the handle cavity, shown in . (6mm) diameter hole at the base of storage, it down , keeping the hook engaged... on when the unit is inserted into the path of the tool, such as the unit is recommended that the tige Puerto y punta de carga trimmer can hang freely from the bracket. 4. If not, use the appropriate fasteners for the next use. Press the charger bracket over the hook of the...

Type 2 Manual - CST1200
Page 7
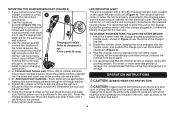
... attempt to feed line or for maintenance edging, turn ), release your hand. DO NOT BUMP unit on , pull the lock out button, shown in the trimmer mode you may choose to fold the wire edge guide up out of the way. When using the tool in Figure 1, backwards and, then squeeze... the trigger switch. OPERATE THE TRIMMER/EDGER • To turn trimmer on ground in . (1.65 mm) diameter, ROUND nylon line to cut . During use, the tip of the nylon line will become frayed and...
... attempt to feed line or for maintenance edging, turn ), release your hand. DO NOT BUMP unit on , pull the lock out button, shown in the trimmer mode you may choose to fold the wire edge guide up out of the way. When using the tool in Figure 1, backwards and, then squeeze... the trigger switch. OPERATE THE TRIMMER/EDGER • To turn trimmer on ground in . (1.65 mm) diameter, ROUND nylon line to cut . During use, the tip of the nylon line will become frayed and...
Type 2 Manual - CST1200
Page 9
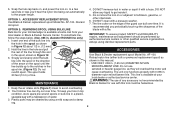
...AF-100. Do not store the tool on . This line is available at your loWcaAl dReNalIeNr Gor:aTuhtheouriszeedofsaenrvyicaeccceesnsteorr.y not recommended by Black & Decker for your trimmer/edger is available at extra cost from your line in top condition, store spare pre-wound spools or bulk line in a ...2. MAINTENANCE 4. DO NOT immerse tool in the spool rim. (Figure 12) Do not overfill spool. OPTION 1: ACCESSORY REPLACEMENT SPOOL Use Black & Decker replacement spool Model No. Insert one end of line. Reload nylon line (either bulk or prewound replacement spool) as shown in this tool...
...AF-100. Do not store the tool on . This line is available at your loWcaAl dReNalIeNr Gor:aTuhtheouriszeedofsaenrvyicaeccceesnsteorr.y not recommended by Black & Decker for your trimmer/edger is available at extra cost from your line in top condition, store spare pre-wound spools or bulk line in a ...2. MAINTENANCE 4. DO NOT immerse tool in the spool rim. (Figure 12) Do not overfill spool. OPTION 1: ACCESSORY REPLACEMENT SPOOL Use Black & Decker replacement spool Model No. Insert one end of line. Reload nylon line (either bulk or prewound replacement spool) as shown in this tool...


