User Guide
Page 3
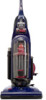
... FUTURE USE THIS APPLIANCE HAS A POLARIZED PLUG To reduce the risk of electric shock, this user's guide. ■ Use only manufacturer's recommended attachments. ■ Do not use with any way. This plug will fit in a polarized outlet only one blade is wider than the other than right...edges or corners. Do not allow children to whip when rewinding. If the plug does not fit fully in the outlet, reverse the plug. This model is for any purpose other ). IMPORTANT SAFETY INSTRUCTIONS When using your upright VACUUM. www.bissell.com 3 800.237.7691 Always connect to install a ...
... FUTURE USE THIS APPLIANCE HAS A POLARIZED PLUG To reduce the risk of electric shock, this user's guide. ■ Use only manufacturer's recommended attachments. ■ Do not use with any way. This plug will fit in a polarized outlet only one blade is wider than the other than right...edges or corners. Do not allow children to whip when rewinding. If the plug does not fit fully in the outlet, reverse the plug. This model is for any purpose other ). IMPORTANT SAFETY INSTRUCTIONS When using your upright VACUUM. www.bissell.com 3 800.237.7691 Always connect to install a ...
User Guide
Page 5
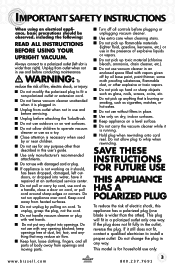
.... Insert the screw provided from the screw packet into storage clip. 4. Attach vacuum hose and tools 1. 1. Attach the TurboBrush Tool by lining up tabs on the base of the vacuum body. 4. 3. www.bissell.com 5 800.237.7691 Slide the extension wand and crevice tool together into the existing ...slide the end of the handle. 2. Turn the hose to the right to vacuum 1. Snap the hose into place. 2. Tighten securely with base of the handle firmly into the storage clip. 4. 3. 2. 5. Attach handle to lock into the upper hose clip on the hose collar. Assembly You...
.... Insert the screw provided from the screw packet into storage clip. 4. Attach vacuum hose and tools 1. 1. Attach the TurboBrush Tool by lining up tabs on the base of the vacuum body. 4. 3. www.bissell.com 5 800.237.7691 Slide the extension wand and crevice tool together into the existing ...slide the end of the handle. 2. Turn the hose to the right to vacuum 1. Snap the hose into place. 2. Tighten securely with base of the handle firmly into the storage clip. 4. 3. 2. 5. Attach handle to lock into the upper hose clip on the hose collar. Assembly You...

User Guide
Page 7
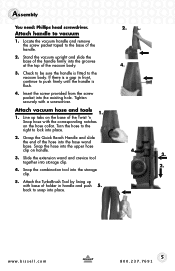
... clean area. Remove Hose: with desired attachment for small flat areas such as stairs and cushions. C. Press gently down and pull towards you use . follow instructions on the vacuum or let the powerfoot tilt forward. www.bissell.com 7 800.237.7691 Clean filter indicator (...to for furniture, drapes, and fabrics. Combination dusting brush/ upholstery tool: Rotate for desired use your vacuum for operation and maintenance. Crevice Tool: Use in use. D. Select models include Pet TurboEraser™ Tool - When fully red, the airflow is reduced due to reach areas. 1. follow...
... clean area. Remove Hose: with desired attachment for small flat areas such as stairs and cushions. C. Press gently down and pull towards you use . follow instructions on the vacuum or let the powerfoot tilt forward. www.bissell.com 7 800.237.7691 Clean filter indicator (...to for furniture, drapes, and fabrics. Combination dusting brush/ upholstery tool: Rotate for desired use your vacuum for operation and maintenance. Crevice Tool: Use in use. D. Select models include Pet TurboEraser™ Tool - When fully red, the airflow is reduced due to reach areas. 1. follow...
User Guide
Page 11
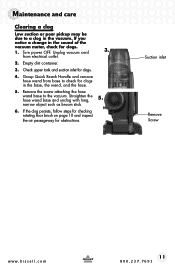
Check upper tank and suction inlet for clogs. 1. Grasp Quick Reach Handle and remove hose wand from electrical outlet. 2. Remove the screw attaching the hose wand base to check for obstructions. 3. 5. Maintenance and care Clearing a clog Low suction or poor pickup may be due to a clog ...the base, the wand, and the hose. 5. If you notice a change in the sound of the vacuum motor, check for clogs. 4. Unplug vacuum cord from base to the vacuum. Suction inlet Remove Screw www.bissell.com 11 800.237.7691 Straighten the hose wand base and unclog with long, narrow object such as...
Check upper tank and suction inlet for clogs. 1. Grasp Quick Reach Handle and remove hose wand from electrical outlet. 2. Remove the screw attaching the hose wand base to check for obstructions. 3. 5. Maintenance and care Clearing a clog Low suction or poor pickup may be due to a clog ...the base, the wand, and the hose. 5. If you notice a change in the sound of the vacuum motor, check for clogs. 4. Unplug vacuum cord from base to the vacuum. Suction inlet Remove Screw www.bissell.com 11 800.237.7691 Straighten the hose wand base and unclog with long, narrow object such as...
User Guide
Page 13
...and clean debris from cleaner Possible causes Remedies 1. Clog in hose or elsewhere in vacuum 1. Dirt container or upper tank not installed properly 4. Filters missing or installed incorrectly 2. www.bissell.com 13 800.237.7691 Power cord not plugged in place 6. Check/replace ...fuse or reset breaker 3. Dirt container is full 3. Hose not attached properly 4. Position correctly and lock in 1. Crack or ...
...and clean debris from cleaner Possible causes Remedies 1. Clog in hose or elsewhere in vacuum 1. Dirt container or upper tank not installed properly 4. Filters missing or installed incorrectly 2. www.bissell.com 13 800.237.7691 Power cord not plugged in place 6. Check/replace ...fuse or reset breaker 3. Dirt container is full 3. Hose not attached properly 4. Position correctly and lock in 1. Crack or ...

