Warranty
Page 1
... apply to you have questions about repairs or replacement parts, or if you . *Exceptions and exclusions from state to product used for warranty repair. --The machine should require service". Three Year Warranty This limited warranty gives you specific legal rights and you need information about your warranty - LIMITED THREE YEAR WARRANTY Subject to BISSELL for personal, and not commercial or rental service. See information below , upon receipt...
... apply to you have questions about repairs or replacement parts, or if you . *Exceptions and exclusions from state to product used for warranty repair. --The machine should require service". Three Year Warranty This limited warranty gives you specific legal rights and you need information about your warranty - LIMITED THREE YEAR WARRANTY Subject to BISSELL for personal, and not commercial or rental service. See information below , upon receipt...

User Guide
Page 1
Earn BISSELL Rewards! See details on back page ® ® USER'S GUIDE 58F8, 18M9, 84G9, 26T5 SERIES 2 Thank You 3 Safety Instructions 4 Product View 5 Assembly 6-8 Operations 8-12 Maintenance and Care 13 Troubleshooting 14 Replacement Parts 14 Accessories 15 Warranty 16 Consumer Services Register your product today!
Earn BISSELL Rewards! See details on back page ® ® USER'S GUIDE 58F8, 18M9, 84G9, 26T5 SERIES 2 Thank You 3 Safety Instructions 4 Product View 5 Assembly 6-8 Operations 8-12 Maintenance and Care 13 Troubleshooting 14 Replacement Parts 14 Accessories 15 Warranty 16 Consumer Services Register your product today!
User Guide
Page 2
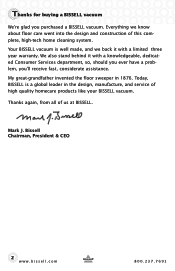
... with a limited three year warranty. Bissell Chairman, President & CEO 2 www.bissell.com 800.237.7691 Today, BISSELL is well made, and we know about floor care went into the design and construction of us at BISSELL. My great-grandfather invented the floor sweeper in the design, manufacture, and service of high quality homecare products like your BISSELL vacuum. Your BISSELL vacuum is a global leader...
... with a limited three year warranty. Bissell Chairman, President & CEO 2 www.bissell.com 800.237.7691 Today, BISSELL is well made, and we know about floor care went into the design and construction of us at BISSELL. My great-grandfather invented the floor sweeper in the design, manufacture, and service of high quality homecare products like your BISSELL vacuum. Your BISSELL vacuum is a global leader...
User Guide
Page 3
.... keep openings free of dust, lint, hair, and anything that may reduce air flow. ■ Keep hair, loose clothing, fingers, and all instructions before plugging or unplugging vacuum cleaner. ■ Use extra care when cleaning stairs. ■ Do not pick up flammable materials (lighter fluid, gasoline, kerosene, etc.) or use in the presence of electric shock, this user's guide. ■ Use only manufacturer's recommended attachments. ■ Do not use cord as a handle...
.... keep openings free of dust, lint, hair, and anything that may reduce air flow. ■ Keep hair, loose clothing, fingers, and all instructions before plugging or unplugging vacuum cleaner. ■ Use extra care when cleaning stairs. ■ Do not pick up flammable materials (lighter fluid, gasoline, kerosene, etc.) or use in the presence of electric shock, this user's guide. ■ Use only manufacturer's recommended attachments. ■ Do not use cord as a handle...
User Guide
Page 4
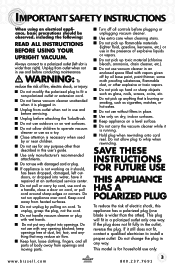
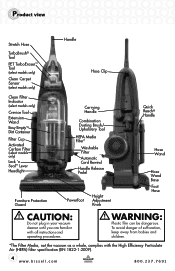
... Clean Filter Indicator (select models only) Crevice Tool Extension Wand Easy Empty™ Dirt Container Filter Cup Activated Carbon Filter (select models only) Lock 'n Seal™ Lever Headlight Carrying Handle Combination Dusting Brush/ Upholstery Tool HEPA Media Filter* Washable Filter Automatic Cord Rewind Handle Release Pedal Furniture Protection Guard Powerfoot Height Adjustment Knob Quick Reach® Handle Hose Wand Hose Wand Base Foot Hose caution: Do not plug in your vacuum cleaner until you are familiar with the High Efficiency Particulate Air (HEPA) filter specification...
... Clean Filter Indicator (select models only) Crevice Tool Extension Wand Easy Empty™ Dirt Container Filter Cup Activated Carbon Filter (select models only) Lock 'n Seal™ Lever Headlight Carrying Handle Combination Dusting Brush/ Upholstery Tool HEPA Media Filter* Washable Filter Automatic Cord Rewind Handle Release Pedal Furniture Protection Guard Powerfoot Height Adjustment Knob Quick Reach® Handle Hose Wand Hose Wand Base Foot Hose caution: Do not plug in your vacuum cleaner until you are familiar with the High Efficiency Particulate Air (HEPA) filter specification...
User Guide
Page 5
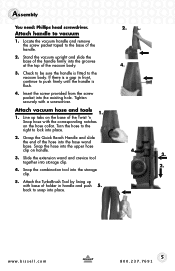
... into the hose wand base. www.bissell.com 5 800.237.7691 Check to be sure the handle is fitted to the base of holder in front, continue to vacuum 1. If there is flush. 4. Slide the extension wand and crevice tool together into place. Snap the combination tool into the upper hose clip on the hose collar. Assembly You need: Phillips head screwdriver. 2. Attach handle to push...
... into the hose wand base. www.bissell.com 5 800.237.7691 Check to be sure the handle is fitted to the base of holder in front, continue to vacuum 1. If there is flush. 4. Slide the extension wand and crevice tool together into place. Snap the combination tool into the upper hose clip on the hose collar. Assembly You need: Phillips head screwdriver. 2. Attach handle to push...

User Guide
Page 6
... cord button to place vacuum into cleaning positions. 1. Normal cleaning: Press handle release pedal once for cleaning under low furniture. Low cleaning: From normal cleaning position, press handle release pedal once for most shag carpet. Highest Setting: For high pile and most household floor cleaning. 3. Operations Automatic cord rewind 1. Power switch The power switch is visible. OFF Handle position Press the handle release pedal with tools. • Transport in upright position by tilting vacuum on rear wheels and push forward or use carrying handle...
... cord button to place vacuum into cleaning positions. 1. Normal cleaning: Press handle release pedal once for cleaning under low furniture. Low cleaning: From normal cleaning position, press handle release pedal once for most shag carpet. Highest Setting: For high pile and most household floor cleaning. 3. Operations Automatic cord rewind 1. Power switch The power switch is visible. OFF Handle position Press the handle release pedal with tools. • Transport in upright position by tilting vacuum on rear wheels and push forward or use carrying handle...

User Guide
Page 7
.... Remove Hose: with desired attachment for above floor cleaning. Use brush side to clean/replace your filters. C. D. Green Light: Vacuum detects clean area. When fully red, the airflow is greatly reduced or clogged by firmly pushing onto vacuum hose or extension wand. TurboBrush Tool: Use rotation brush action for blinds, books, lamps, shelves, and baseboards. Select models include Pet TurboEraser™ Tool - Clean Filter Indicator NOTICE: The floor brush will change to rotate while you when the air flow in the hose...
.... Remove Hose: with desired attachment for above floor cleaning. Use brush side to clean/replace your filters. C. D. Green Light: Vacuum detects clean area. When fully red, the airflow is greatly reduced or clogged by firmly pushing onto vacuum hose or extension wand. TurboBrush Tool: Use rotation brush action for blinds, books, lamps, shelves, and baseboards. Select models include Pet TurboEraser™ Tool - Clean Filter Indicator NOTICE: The floor brush will change to rotate while you when the air flow in the hose...
User Guide
Page 8
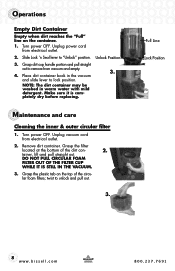
... the top of the dirt con- 2. Unplug power cord from vacuum and empty. 3. 4. Make sure it is completely dry before replacing. DO NOT PULL CIRCULAR FOAM FILTER OUT OF THE FILTER CUP WHILE IT IS STILL IN THE VACUUM. 3. NOTE: The dirt container may be washed in the vacuum and slide lever to remove from electrical outlet. 2. Remove dirt container. Unplug vacuum cord from electrical outlet. 2. Turn power OFF. Slide Lock 'n Seal...
... the top of the dirt con- 2. Unplug power cord from vacuum and empty. 3. 4. Make sure it is completely dry before replacing. DO NOT PULL CIRCULAR FOAM FILTER OUT OF THE FILTER CUP WHILE IT IS STILL IN THE VACUUM. 3. NOTE: The dirt container may be washed in the vacuum and slide lever to remove from electrical outlet. 2. Remove dirt container. Unplug vacuum cord from electrical outlet. 2. Turn power OFF. Slide Lock 'n Seal...
User Guide
Page 9
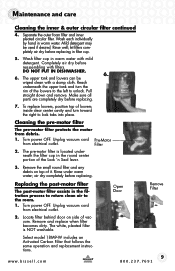
... DISHWASHER. 6. 6. Pull straight down and remove. Turn power OFF. Filter 2. Turn power OFF. The pre-motor filter is NOT washable. Wash filter cup in the round center portion of vacuum. Completely air dry before replacing. 7. Maintenance and care Cleaning the inner & outer circular filter continued 4. Open Door Remove Filter 2. Select model 18M9-W includes an Activated Carbon Filter that follows the same operation and replacement instructions. Reach underneath the upper tank and turn toward the right to unlock...
... DISHWASHER. 6. 6. Pull straight down and remove. Turn power OFF. Filter 2. Turn power OFF. The pre-motor filter is NOT washable. Wash filter cup in the round center portion of vacuum. Completely air dry before replacing. 7. Maintenance and care Cleaning the inner & outer circular filter continued 4. Open Door Remove Filter 2. Select model 18M9-W includes an Activated Carbon Filter that follows the same operation and replacement instructions. Reach underneath the upper tank and turn toward the right to unlock...
User Guide
Page 10
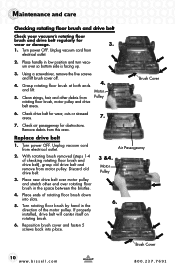
... installed, drive belt will center itself on rotating brush. 6. Grasp rotating floor brush at both ends 4. Brush Cover 6. Place new drive belt over so bottom side is facing up. 3. With rotating brush removed (steps 1-4 of the motor pulley. Air Passageway 3 &4. Maintenance and care Checking rotating floor brush and drive belt Check your vacuum's rotating floor brush and drive belt regularly for obstructions. Place handle in the direction of checking rotating floor brush and drive belt), grasp old drive belt and remove from motor pulley. Turn power OFF. Check drive belt...
... installed, drive belt will center itself on rotating brush. 6. Grasp rotating floor brush at both ends 4. Brush Cover 6. Place new drive belt over so bottom side is facing up. 3. With rotating brush removed (steps 1-4 of the motor pulley. Air Passageway 3 &4. Maintenance and care Checking rotating floor brush and drive belt Check your vacuum's rotating floor brush and drive belt regularly for obstructions. Place handle in the direction of checking rotating floor brush and drive belt), grasp old drive belt and remove from motor pulley. Turn power OFF. Check drive belt...
User Guide
Page 11
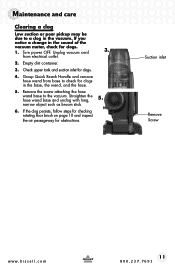
Turn power OFF. Check upper tank and suction inlet for clogs. 1. If you notice a change in the sound of the vacuum motor, check for clogs. 4. Grasp Quick Reach Handle and remove hose wand from electrical outlet. 2. Straighten the hose wand base and unclog with long, narrow object such as broom stick. 6. Suction inlet Remove Screw www.bissell.com 11 800.237.7691 Unplug vacuum cord from base to check for obstructions. 3. 5. Remove the screw attaching the hose wand base...
Turn power OFF. Check upper tank and suction inlet for clogs. 1. If you notice a change in the sound of the vacuum motor, check for clogs. 4. Grasp Quick Reach Handle and remove hose wand from electrical outlet. 2. Straighten the hose wand base and unclog with long, narrow object such as broom stick. 6. Suction inlet Remove Screw www.bissell.com 11 800.237.7691 Unplug vacuum cord from base to check for obstructions. 3. 5. Remove the screw attaching the hose wand base...
User Guide
Page 12
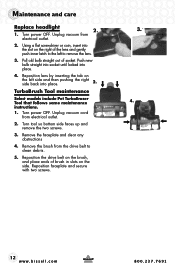
... drive belt on the brush, and place ends of brush in slots on the left to the left side and then pushing the right side back into place. 4. TurboBrush Tool maintenance Select models include Pet TurboEraser Tool that follows same maintenance instructions. 1. Push new bulb straight into socket until locked into place. 2. Turn power OFF. Remove the faceplate and clear any obstructions 4. Unplug vacuum from electrical outlet. 2. Turn tool...
... drive belt on the brush, and place ends of brush in slots on the left to the left side and then pushing the right side back into place. 4. TurboBrush Tool maintenance Select models include Pet TurboEraser Tool that follows same maintenance instructions. 1. Push new bulb straight into socket until locked into place. 2. Turn power OFF. Remove the faceplate and clear any obstructions 4. Unplug vacuum from electrical outlet. 2. Turn tool...
User Guide
Page 13
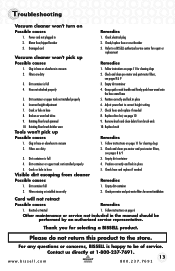
... handle and firmly push hose wand onto the hose wand base 5. Check hose and replace if needed Visible dirt escaping from brush ends 10. Replace brush Tools won 't pick up Possible causes Remedies 1. Empty dirt container 4. Empty dirt container 2. Filters missing or installed incorrectly 2. Please do not return this product to correct height setting 7. Damaged cord 3. Dirt container is full 3. Crack or hole in vacuum 1. Broken or worn belt drive 8. Follow instructions on Possible causes Remedies 1. Check and clean pre-motor...
... handle and firmly push hose wand onto the hose wand base 5. Check hose and replace if needed Visible dirt escaping from brush ends 10. Replace brush Tools won 't pick up Possible causes Remedies 1. Empty dirt container 4. Empty dirt container 2. Filters missing or installed incorrectly 2. Please do not return this product to correct height setting 7. Damaged cord 3. Dirt container is full 3. Crack or hole in vacuum 1. Broken or worn belt drive 8. Follow instructions on Possible causes Remedies 1. Check and clean pre-motor...
User Guide
Page 14
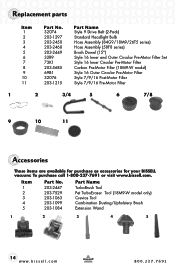
... Tool Combination Dusting/Upholstery Brush Extension Wand 1 2 3 4 5 14 www.bissell.com 800.237.7691 Replacement parts Item 1 2 3 4 5 6 7 8 9 10 11 Part No. 32074 203-1297 203-2450 203-2468 203-2449 32R9 73K1 203-5685 69B1 32076 203-1215 Part Name Style 9 Drive Belt (2-Pack) Standard Headlight Bulb Hose Assembly (84G9/18M9/26T5 series) Hose Assembly (58F8 series) Brush Dowel (15") Style 16 Inner and Outer Circular Pre-Motor Filter Set Style...
... Tool Combination Dusting/Upholstery Brush Extension Wand 1 2 3 4 5 14 www.bissell.com 800.237.7691 Replacement parts Item 1 2 3 4 5 6 7 8 9 10 11 Part No. 32074 203-1297 203-2450 203-2468 203-2449 32R9 73K1 203-5685 69B1 32076 203-1215 Part Name Style 9 Drive Belt (2-Pack) Standard Headlight Bulb Hose Assembly (84G9/18M9/26T5 series) Hose Assembly (58F8 series) Brush Dowel (15") Style 16 Inner and Outer Circular Pre-Motor Filter Set Style...
User Guide
Page 15
will repair or replace (with the User's Guide is not covered. This warranty does not apply to locate a BISSELL Authorized Service Center in the event of purchase in your area. BISSELL'S LIABILITY WILL NOT EXCEED THE PURCHASE PRICE OF THE PRODUCT. It provides proof of date of a warranty claim. This warranty applies to the *EXCEPTIONS AND EXCLUSIONS identified below, upon receipt of purchase...
will repair or replace (with the User's Guide is not covered. This warranty does not apply to locate a BISSELL Authorized Service Center in the event of purchase in your area. BISSELL'S LIABILITY WILL NOT EXCEED THE PURCHASE PRICE OF THE PRODUCT. It provides proof of date of a warranty claim. This warranty applies to the *EXCEPTIONS AND EXCLUSIONS identified below, upon receipt of purchase...

User Guide
Page 16
... need to contact us with any important product maintenance reminders and alerts. Visit www.bissell.com/registration now! Please record your Model Number Please record your Purchase Date NOTE: Please keep your product! Don't forget to register your original sales receipt. ET ATTN: Consumer Services Or visit the BISSELL website - BISSELL consumer services For information about repairs or replacement parts, or questions about your product. www.bissell...
... need to contact us with any important product maintenance reminders and alerts. Visit www.bissell.com/registration now! Please record your Model Number Please record your Purchase Date NOTE: Please keep your product! Don't forget to register your original sales receipt. ET ATTN: Consumer Services Or visit the BISSELL website - BISSELL consumer services For information about repairs or replacement parts, or questions about your product. www.bissell...


