Warranty
Page 1
... mail as filters, bags, belts, or brushes. IF YOUR BISSELL PRODUCT SHOULD REQUIRE SERVICE: Contact BISSELL Consumer Services to state. Some states do not send original.) If you need additional instructions regarding this product. OR CALL: BISSELL Consumer Services toll free Monday - If there are no authorized BISSELL Service Centers in your warranty - If you need information about your BISSELL product should be returned with the User's Guide is your area, a BISSELL representative may...
... mail as filters, bags, belts, or brushes. IF YOUR BISSELL PRODUCT SHOULD REQUIRE SERVICE: Contact BISSELL Consumer Services to state. Some states do not send original.) If you need additional instructions regarding this product. OR CALL: BISSELL Consumer Services toll free Monday - If there are no authorized BISSELL Service Centers in your warranty - If you need information about your BISSELL product should be returned with the User's Guide is your area, a BISSELL representative may...
User Guide
Page 1
Register your product today! Earn BISSELL Rewards! See details on back page USER'S GUIDE 3863 SERIES 2 Thank You 3 Safety Instructions 4 Product View 5 Assembly 6-8 Operations 9-12 Maintenance and Care 13 Troubleshooting 14 Replacement Parts 14 Accessories 15 Warranty 16 Consumer Care
Register your product today! Earn BISSELL Rewards! See details on back page USER'S GUIDE 3863 SERIES 2 Thank You 3 Safety Instructions 4 Product View 5 Assembly 6-8 Operations 9-12 Maintenance and Care 13 Troubleshooting 14 Replacement Parts 14 Accessories 15 Warranty 16 Consumer Care
User Guide
Page 2
Thanks for buying a BISSELL vacuum We're glad you 'll receive fast, considerate assistance. My great-grandfather invented the floor sweeper in the design, manufacture, and service of us at BISSELL. Bissell Chairman & CEO 2 w w w. Today, BISSELL is well made, and we know about floor care went into the design and construction of this complete, high-tech home cleaning system. Mark J. Your BISSELL vacuum is...
Thanks for buying a BISSELL vacuum We're glad you 'll receive fast, considerate assistance. My great-grandfather invented the floor sweeper in the design, manufacture, and service of us at BISSELL. Bissell Chairman & CEO 2 w w w. Today, BISSELL is well made, and we know about floor care went into the design and construction of this complete, high-tech home cleaning system. Mark J. Your BISSELL vacuum is...
User Guide
Page 3
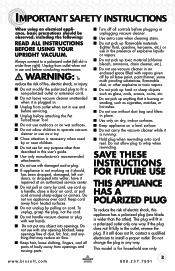
... not working as cigarettes, matches, or hot ashes. ■ Do not use without dust bag and filters in any purpose other than right). WARNING: To reduce the risk of electric shock, this user's guide. ■ Use only manufacturer's recommended attachments. ■ Do not use with wet hands. ■ Do not put any opening blocked; To unplug, grasp the plug, not the cord. ■ Do not handle vacuum cleaner or plug...
... not working as cigarettes, matches, or hot ashes. ■ Do not use without dust bag and filters in any purpose other than right). WARNING: To reduce the risk of electric shock, this user's guide. ■ Use only manufacturer's recommended attachments. ■ Do not use with wet hands. ■ Do not put any opening blocked; To unplug, grasp the plug, not the cord. ■ Do not handle vacuum cleaner or plug...
User Guide
Page 4
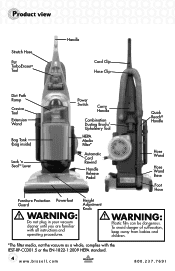
..., complies with all instructions and operating procedures. Height Adjustment Knob Warning: Plastic film can be dangerous. Product view Stretch Hose Pet TurboEraser® Tool Handle Cord Clip Hose Clip Dirt Path Ramp Crevice Tool Extension Wand Bag Tank (bag inside) Lock 'n Seal™ Lever Power Switch Carry Handle Combination Dusting Brush/ Upholstery Tool HEPA Media Filter* Automatic Cord Rewind Handle Release Pedal Quick Reach® Handle Hose Wand Hose Wand Base Foot Hose Furniture Protection Powerfoot Guard WARNING: Do not plug in your vacuum cleaner until you are familiar...
..., complies with all instructions and operating procedures. Height Adjustment Knob Warning: Plastic film can be dangerous. Product view Stretch Hose Pet TurboEraser® Tool Handle Cord Clip Hose Clip Dirt Path Ramp Crevice Tool Extension Wand Bag Tank (bag inside) Lock 'n Seal™ Lever Power Switch Carry Handle Combination Dusting Brush/ Upholstery Tool HEPA Media Filter* Automatic Cord Rewind Handle Release Pedal Quick Reach® Handle Hose Wand Hose Wand Base Foot Hose Furniture Protection Powerfoot Guard WARNING: Do not plug in your vacuum cleaner until you are familiar...
User Guide
Page 5
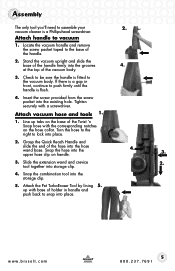
... to the base of the vacuum body. 3. at the top of the handle. 2. c o m 5 800.237.7691 w w w. vacuum cleaner is fitted to assemble your 2. If there is a gap in handle and push back to be sure the handle is a Phillips-head screwdriver. Snap the combination tool into place. 2. Snap the hose into the hose wand base. Assembly The only tool you'll need to the vacuum body.
... to the base of the vacuum body. 3. at the top of the handle. 2. c o m 5 800.237.7691 w w w. vacuum cleaner is fitted to assemble your 2. If there is a gap in handle and push back to be sure the handle is a Phillips-head screwdriver. Snap the combination tool into place. 2. Snap the hose into the hose wand base. Assembly The only tool you'll need to the vacuum body.
User Guide
Page 6
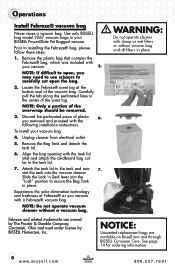
... into the vacuum cleaner. you removed and proceed with a Febreze® vacuum bag. Unplug cleaner from electrical outlet. 5. sert the tank into the "Lock" position to carefully cut open , you vacuum with the following installation instructions. c o m 800.237.7691 Use only BISSELL bag model 3267 vacuum bags in place. Locate the Febreze® scent tag at the bottom seal of the scent tag. b i s s e l l . Attach the tank lid to installing the Febreze® bag, please...
... into the vacuum cleaner. you removed and proceed with a Febreze® vacuum bag. Unplug cleaner from electrical outlet. 5. sert the tank into the "Lock" position to carefully cut open , you vacuum with the following installation instructions. c o m 800.237.7691 Use only BISSELL bag model 3267 vacuum bags in place. Locate the Febreze® scent tag at the bottom seal of the scent tag. b i s s e l l . Attach the tank lid to installing the Febreze® bag, please...
User Guide
Page 7
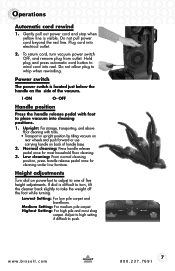
... difficult to turn vacuum power switch OFF, and remove plug from outlet. Adjust to high setting if difficult to wind cord into reel. Operations Automatic cord rewind 1. Gently pull out power cord and stop when yellow line is located just below the handle on the side of the vacuum. Do not pull power cord beyond the red line. Plug cord into cleaning positions. 1. Hold plug and press automatic cord button to push. Low cleaning: From normal cleaning position, press handle release pedal once...
... difficult to turn vacuum power switch OFF, and remove plug from outlet. Adjust to high setting if difficult to wind cord into reel. Operations Automatic cord rewind 1. Gently pull out power cord and stop when yellow line is located just below the handle on the side of the vacuum. Do not pull power cord beyond the red line. Plug cord into cleaning positions. 1. Hold plug and press automatic cord button to push. Low cleaning: From normal cleaning position, press handle release pedal once...
User Guide
Page 8
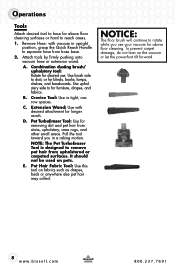
.... Extension Wand: Use with vacuum in upright position, grasp the Quick Reach Handle to reach areas. 1. b i s s e l l . Attach tools by firmly pushing onto vacuum hose or extension wand. Use upholstery side to dust, or for blinds, books, lamps, shelves, and baseboards. Pull the tool toward you use your vacuum for desired use. E. c o m 800.237.7691 Crevice Tool: Use in a raking motion. Pet TurboEraser Tool: Use for longer reach. Combination dusting brush/ upholstery tool: Rotate for above floor cleaning surfaces...
.... Extension Wand: Use with vacuum in upright position, grasp the Quick Reach Handle to reach areas. 1. b i s s e l l . Attach tools by firmly pushing onto vacuum hose or extension wand. Use upholstery side to dust, or for blinds, books, lamps, shelves, and baseboards. Pull the tool toward you use your vacuum for desired use. E. c o m 800.237.7691 Crevice Tool: Use in a raking motion. Pet TurboEraser Tool: Use for longer reach. Combination dusting brush/ upholstery tool: Rotate for above floor cleaning surfaces...
User Guide
Page 9
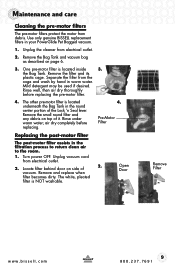
... and vacuum bag as described on side of it. Separate the filter from debris. Open Door Remove Filter w w w. c o m 9 800.237.7691 Maintenance and care Cleaning the pre-motor filters The pre-motor filters protect the motor from the cage and wash by hand in warm water. Use only genuine BISSELL replacement filters in the filtration process to return clean air to the room. 1. The white, pleated filter is located inside 3. Unplug the cleaner from electrical outlet. 2. air dry...
... and vacuum bag as described on side of it. Separate the filter from debris. Open Door Remove Filter w w w. c o m 9 800.237.7691 Maintenance and care Cleaning the pre-motor filters The pre-motor filters protect the motor from the cage and wash by hand in warm water. Use only genuine BISSELL replacement filters in the filtration process to return clean air to the room. 1. The white, pleated filter is located inside 3. Unplug the cleaner from electrical outlet. 2. air dry...

User Guide
Page 10
... handle in low position and turn vacuum over rotating floor brush in the direction of the motor pulley. Grasp rotating floor brush at both ends 4. and lift. Unplug vacuum cord from electrical outlet. 2. Clean strings, hair and other end over so bottom side is facing up. 3. With rotating brush removed (steps 1-4 of rotating floor brush down into place. b i s s e l l . Motor 5. Replace drive belt 1. Place new drive belt over motor pulley and stretch other debris from rotating floor brush, motor pulley...
... handle in low position and turn vacuum over rotating floor brush in the direction of the motor pulley. Grasp rotating floor brush at both ends 4. and lift. Unplug vacuum cord from electrical outlet. 2. Clean strings, hair and other end over so bottom side is facing up. 3. With rotating brush removed (steps 1-4 of rotating floor brush down into place. b i s s e l l . Motor 5. Replace drive belt 1. Place new drive belt over motor pulley and stretch other debris from rotating floor brush, motor pulley...
User Guide
Page 11
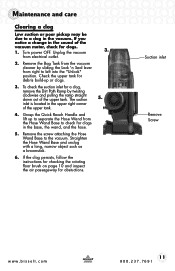
... screw attaching the Hose Wand Base to left into the "Unlock" position. b i s s e l l . Grasp the Quick Reach Handle and lift up or clogs. 3. If the clog persists, follow the instructions for checking the rotating floor brush on page 10 and inspect the air passageway for clogs in the vacuum. Suction inlet Remove Screw w w w. Turn power OFF. To check the suction inlet for clogs. 1. Unplug the vacuum from right to the vacuum. If you notice a change...
... screw attaching the Hose Wand Base to left into the "Unlock" position. b i s s e l l . Grasp the Quick Reach Handle and lift up or clogs. 3. If the clog persists, follow the instructions for checking the rotating floor brush on page 10 and inspect the air passageway for clogs in the vacuum. Suction inlet Remove Screw w w w. Turn power OFF. To check the suction inlet for clogs. 1. Unplug the vacuum from right to the vacuum. If you notice a change...
User Guide
Page 12
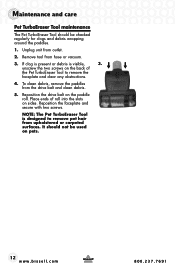
... used on the paddle roll. c o m 800.237.7691 Maintenance and care Pet TurboEraser Tool maintenance The Pet TurboEraser Tool should not be checked regularly for clogs and debris wrapping around the paddles. 1. b i s s e l l . Place ends of the Pet TurboEraser Tool to remove pet hair from hose or vacuum. 3. Unplug unit from the drive belt and clean debris. 5. To clean debris, remove the paddles from outlet. 2. Remove tool from upholstered or carpeted surfaces. NOTE: The Pet TurboEraser Tool...
... used on the paddle roll. c o m 800.237.7691 Maintenance and care Pet TurboEraser Tool maintenance The Pet TurboEraser Tool should not be checked regularly for clogs and debris wrapping around the paddles. 1. b i s s e l l . Place ends of the Pet TurboEraser Tool to remove pet hair from hose or vacuum. 3. Unplug unit from the drive belt and clean debris. 5. To clean debris, remove the paddles from outlet. 2. Remove tool from upholstered or carpeted surfaces. NOTE: The Pet TurboEraser Tool...
User Guide
Page 13
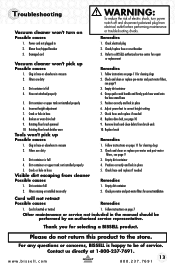
....237.7691 Power cord not plugged in vacuum 1. Damaged cord 3. Empty dirt container 2. Follow instructions on page 7 Other maintenance or service not included in place 6. Remedies 1. Check hose and replace if needed Visible dirt escaping from brush ends 10. Blown fuse/tripped breaker 2. Dirt container is happy to the store. Follow instructions on page 11 for selecting a BISSELL product. Hose not attached properly 4. Broken or worn drive belt 8. Rotating floor brush jammed 9. Filters are dirty 2. Troubleshooting Vacuum cleaner won't turn on Possible...
....237.7691 Power cord not plugged in vacuum 1. Damaged cord 3. Empty dirt container 2. Follow instructions on page 7 Other maintenance or service not included in place 6. Remedies 1. Check hose and replace if needed Visible dirt escaping from brush ends 10. Blown fuse/tripped breaker 2. Dirt container is happy to the store. Follow instructions on page 11 for selecting a BISSELL product. Hose not attached properly 4. Broken or worn drive belt 8. Rotating floor brush jammed 9. Filters are dirty 2. Troubleshooting Vacuum cleaner won't turn on Possible...
User Guide
Page 14
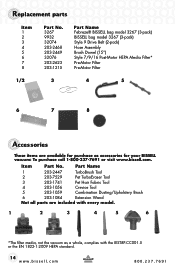
... Part Name Febreze® BISSELL bag model 3267 (3-pack) BISSELL bag model 3267 (3-pack) Style 9 Drive Belt (2-pack) Hose Assembly Brush Dowel (15") Style 7/9/16 Post-Motor HEPA Media Filter* Pre-Motor Filter Pre-Motor Filter 1/2 3 4 5 6 7 8 Accessories These items are included with every model. 1 2 3 4 5 6 *The filter media, not the vacuum as accessories for your BISSELL vacuum: To purchase call 1-800-237-7691 or visit www.bissell.com. b i s s e l l . Part Name 1 203-2447 TurboBrush Tool 2 203-7529 Pet TurboEraser Tool 3 203-1741 Pet...
... Part Name Febreze® BISSELL bag model 3267 (3-pack) BISSELL bag model 3267 (3-pack) Style 9 Drive Belt (2-pack) Hose Assembly Brush Dowel (15") Style 7/9/16 Post-Motor HEPA Media Filter* Pre-Motor Filter Pre-Motor Filter 1/2 3 4 5 6 7 8 Accessories These items are included with every model. 1 2 3 4 5 6 *The filter media, not the vacuum as accessories for your BISSELL vacuum: To purchase call 1-800-237-7691 or visit www.bissell.com. b i s s e l l . Part Name 1 203-2447 TurboBrush Tool 2 203-7529 Pet TurboEraser Tool 3 203-1741 Pet...

User Guide
Page 15
... apply to you need additional instruction regarding this warranty or have questions about repairs or replacement parts, or if you . *EXCEPTIONS AND EXCLUSIONS FROM THE TERMS OF THE LIMITED WARRANTY THIS WARRANTY IS EXCLUSIVE AND IN LIEU OF ANY OTHER WARRANTIES EITHER ORAL OR WRITTEN. Damage or malfunction caused by E-mail, telephone, or regular mail as filters, belts, or brushes. Friday 8 am...
... apply to you need additional instruction regarding this warranty or have questions about repairs or replacement parts, or if you . *EXCEPTIONS AND EXCLUSIONS FROM THE TERMS OF THE LIMITED WARRANTY THIS WARRANTY IS EXCLUSIVE AND IN LIEU OF ANY OTHER WARRANTIES EITHER ORAL OR WRITTEN. Damage or malfunction caused by E-mail, telephone, or regular mail as filters, belts, or brushes. Friday 8 am...

User Guide
Page 16
... your Model Number Please record your Purchase Date NOTE: Please keep your warranty, call: BISSELL Consumer Care 1-800-237-7691 Monday - b i s s e l l . You'll receive: BISSELL Rewards Points Automatically earn points for details. 16 w w w. Product Support Reminders and Alerts We'll contact you benefits over the lifetime of offers, contests, cleaning tips and more! BISSELL Consumer Care For information about repairs or replacement parts...
... your Model Number Please record your Purchase Date NOTE: Please keep your warranty, call: BISSELL Consumer Care 1-800-237-7691 Monday - b i s s e l l . You'll receive: BISSELL Rewards Points Automatically earn points for details. 16 w w w. Product Support Reminders and Alerts We'll contact you benefits over the lifetime of offers, contests, cleaning tips and more! BISSELL Consumer Care For information about repairs or replacement parts...


