Warranty
Page 1
..., or regular mail as filters, bags, belts, or brushes. This warranty applies to the *EXCEPTIONS AND EXCLUSIONS identified below, upon receipt of the product. Damage or malfunction caused by the original purchaser, for personal, and not commercial or rental service. will not exceed the purchase price of the product BISSELL Homecare, Inc. BISSELL's liability will repair or replace (with the User's Guide is not covered...
..., or regular mail as filters, bags, belts, or brushes. This warranty applies to the *EXCEPTIONS AND EXCLUSIONS identified below, upon receipt of the product. Damage or malfunction caused by the original purchaser, for personal, and not commercial or rental service. will not exceed the purchase price of the product BISSELL Homecare, Inc. BISSELL's liability will repair or replace (with the User's Guide is not covered...

User Guide - English
Page 1
Register your product today! See details on back page USER'S GUIDE 82G7 SERIES 2 Thank You 3 Safety Instructions 4 Product View 5-6 Assembly 6-9 Operations 10-16 Maintenance and Care 17 Troubleshooting 18 Replacement Parts 19 Warranty 20 Product Registration 20 Consumer Services Earn BISSELL Rewards!
Register your product today! See details on back page USER'S GUIDE 82G7 SERIES 2 Thank You 3 Safety Instructions 4 Product View 5-6 Assembly 6-9 Operations 10-16 Maintenance and Care 17 Troubleshooting 18 Replacement Parts 19 Warranty 20 Product Registration 20 Consumer Services Earn BISSELL Rewards!
User Guide - English
Page 3
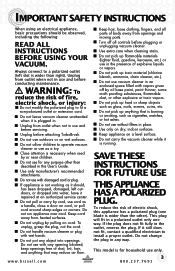
... the plug. This model is running. IMPORTANT SAFETY INSTRUCTIONS When using your VACUUM. Keep cord away from outlet when not in use and before servicing. ■ Unplug before plugging or unplugging vacuum cleaner. ■ Use extra care when cleaning stairs. ■ Do not pick up flammable materials (lighter fluid, gasoline, kerosene, etc.) or use in the presence of dust, lint, hair, and anything that may reduce air flow. keep openings free of...
... the plug. This model is running. IMPORTANT SAFETY INSTRUCTIONS When using your VACUUM. Keep cord away from outlet when not in use and before servicing. ■ Unplug before plugging or unplugging vacuum cleaner. ■ Use extra care when cleaning stairs. ■ Do not pick up flammable materials (lighter fluid, gasoline, kerosene, etc.) or use in the presence of dust, lint, hair, and anything that may reduce air flow. keep openings free of...
User Guide - English
Page 4
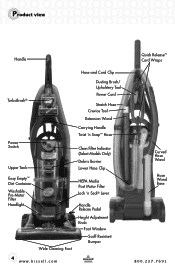
Product view Handle Hose and Cord Clip TurboBrush® Power Switch Upper Tank Dusting Brush/ Upholstery Tool Power Cord Stretch Hose Crevice Tool Extension Wand Carrying Handle Twist 'n Snap™ Hose Clean Filter Indicator (Select Models Only) Debris Barrier Lower Hose Clip Easy Empty™ Dirt Container Washable Pre-Motor Filter Headlight HEPA Media Post Motor Filter Lock 'n Seal® Lever Wide Cleaning Foot Handle Release Pedal Height Adjustment Knob Foot Window Scuff Resistant Bumper 4 www.bissell.com Quick Release™ Cord Wraps Curved Hose Wand Hose Wand Base 800.237...
Product view Handle Hose and Cord Clip TurboBrush® Power Switch Upper Tank Dusting Brush/ Upholstery Tool Power Cord Stretch Hose Crevice Tool Extension Wand Carrying Handle Twist 'n Snap™ Hose Clean Filter Indicator (Select Models Only) Debris Barrier Lower Hose Clip Easy Empty™ Dirt Container Washable Pre-Motor Filter Headlight HEPA Media Post Motor Filter Lock 'n Seal® Lever Wide Cleaning Foot Handle Release Pedal Height Adjustment Knob Foot Window Scuff Resistant Bumper 4 www.bissell.com Quick Release™ Cord Wraps Curved Hose Wand Hose Wand Base 800.237...
User Guide - English
Page 5
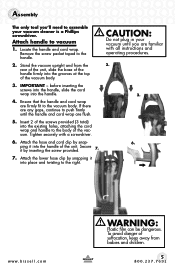
..., keep away from the rear of the unit, slide the base of the vacuum body. 3. Attach the hose and cord clip by snap- Stand the vacuum upright and from babies and children. 5 800.237.7691 Remove the screw packet taped to the vacuum body. Assembly The only tool you are familiar with a screwdriver. 6. IMPORTANT - Attach handle to the body of the unit. Locate the handle...
..., keep away from the rear of the unit, slide the base of the vacuum body. 3. Attach the hose and cord clip by snap- Stand the vacuum upright and from babies and children. 5 800.237.7691 Remove the screw packet taped to the vacuum body. Assembly The only tool you are familiar with a screwdriver. 6. IMPORTANT - Attach handle to the body of the unit. Locate the handle...
User Guide - English
Page 6
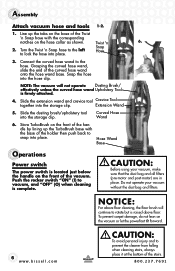
... the Twist 'n Snap hose with the base of the vacuum. Do not operate your vacuum, make sure that the dust bag and all filters (pre-motor and post-motor) are in place. Twist 'n 6. 2. Snap Hose 3. Snap the hose into place. Hose Wand Base Operations Power switch The power switch is raised above floor cleaning, the floor brush will not operate Dusting Brush/ effectively unless the curved hose wand Upholstery Tool is complete. NOTICE: For above floor. Line up the...
... the Twist 'n Snap hose with the base of the vacuum. Do not operate your vacuum, make sure that the dust bag and all filters (pre-motor and post-motor) are in place. Twist 'n 6. 2. Snap Hose 3. Snap the hose into place. Hose Wand Base Operations Power switch The power switch is raised above floor cleaning, the floor brush will not operate Dusting Brush/ effectively unless the curved hose wand Upholstery Tool is complete. NOTICE: For above floor. Line up the...
User Guide - English
Page 7
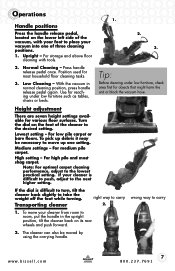
Operations 1. Handle positions Press the handle release pedal, located on the lower left side of the vacuum, with tools. 2. 3. 2. Tip: Before cleaning under low furniture such as tables, chairs or beds. For low pile carpet or bare floors. www.bissell.com 7 800.237.7691 Low Cleaning - Lowest setting - For medium pile carpet. Note: For optimal carpet cleaning performance, adjust to carry 2. 1. Transporting cleaner right way to carry wrong way to the...
Operations 1. Handle positions Press the handle release pedal, located on the lower left side of the vacuum, with tools. 2. 3. 2. Tip: Before cleaning under low furniture such as tables, chairs or beds. For low pile carpet or bare floors. www.bissell.com 7 800.237.7691 Low Cleaning - Lowest setting - For medium pile carpet. Note: For optimal carpet cleaning performance, adjust to carry 2. 1. Transporting cleaner right way to carry wrong way to the...

User Guide - English
Page 8
... main power supply. To check and remove the clog, follow instructions on cushions, draperies and fabrics. 8 www.bissell.com 800.237.7691 Grasp the curved hose wand handle to the upright position. 2. Clean Filter Indicator NOTICE: While vacuuming, certain carpets and low humidity conditions may generate small static discharges. The discharges are entirely harmless and are a friction fit, so be cleaned or replaced when the clean filter indicator turns red. Special...
... main power supply. To check and remove the clog, follow instructions on cushions, draperies and fabrics. 8 www.bissell.com 800.237.7691 Grasp the curved hose wand handle to the upright position. 2. Clean Filter Indicator NOTICE: While vacuuming, certain carpets and low humidity conditions may generate small static discharges. The discharges are entirely harmless and are a friction fit, so be cleaned or replaced when the clean filter indicator turns red. Special...
User Guide - English
Page 9
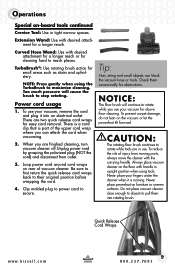
... Power cord usage 1. When you are two quick release cord wraps for above floor cleaning. Clip molded plug to power cord to their original position before wrapping the cord. 4. Never place your fingers under the cleaner when it into rotating brush. Curved Hose Wand: Use with the carrying handle. Check them into an electrical outlet. To prevent carpet damage, do not lean on -board tools continued Crevice Tool: Use in use your vacuum for easy cord removal. Operations...
... Power cord usage 1. When you are two quick release cord wraps for above floor cleaning. Clip molded plug to power cord to their original position before wrapping the cord. 4. Never place your fingers under the cleaner when it into rotating brush. Curved Hose Wand: Use with the carrying handle. Check them into an electrical outlet. To prevent carpet damage, do not lean on -board tools continued Crevice Tool: Use in use your vacuum for easy cord removal. Operations...
User Guide - English
Page 10
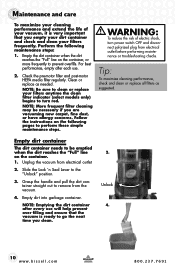
... the life of electric shock, turn red. Check the pre-motor filter and post-motor HEPA media filter regularly. Empty the dirt container when the dirt reaches the "Full" line on the container, or more frequently to turn power switch OFF and disconnect polarized plug from electrical outlet before performing maintenance or troubleshooting checks. NOTE: Be sure to clean or replace your filters frequently. Grasp the handle and pull the dirt container straight out...
... the life of electric shock, turn red. Check the pre-motor filter and post-motor HEPA media filter regularly. Empty the dirt container when the dirt reaches the "Full" line on the container, or more frequently to turn power switch OFF and disconnect polarized plug from electrical outlet before performing maintenance or troubleshooting checks. NOTE: Be sure to clean or replace your filters frequently. Grasp the handle and pull the dirt container straight out...
User Guide - English
Page 11
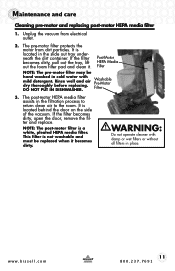
... vacuum from dirt particles. www.bissell.com 11 800.237.7691 The post-motor HEPA media filter assists in place. It is not washable and must be hand washed in cold water with damp or wet filters or without all filters in the filtration process to return clean air to the room. It is a white, pleated HEPA media filter. Rinse well and air dry thoroughly before replacing. Washable Pre-Motor Filter...
... vacuum from dirt particles. www.bissell.com 11 800.237.7691 The post-motor HEPA media filter assists in place. It is not washable and must be hand washed in cold water with damp or wet filters or without all filters in the filtration process to return clean air to the room. It is a white, pleated HEPA media filter. Rinse well and air dry thoroughly before replacing. Washable Pre-Motor Filter...
User Guide - English
Page 12
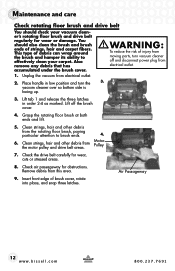
... electrical outlet. Also remove any debris that has accumulated under the brush cover. 1. Motor Pulley 7. Air Passageway 9. Place handle in order 2-4 as marked. Check the drive belt carefully for obstructions. You should check your carpet. vacuum cleaner over so bottom side is facing up. 3. Lift tab 1 and release the three latches in low position and turn vacuum cleaner off the brush cover. 4. Maintenance and care Check rotating floor brush and drive belt You should also clean...
... electrical outlet. Also remove any debris that has accumulated under the brush cover. 1. Motor Pulley 7. Air Passageway 9. Place handle in order 2-4 as marked. Check the drive belt carefully for obstructions. You should check your carpet. vacuum cleaner over so bottom side is facing up. 3. Lift tab 1 and release the three latches in low position and turn vacuum cleaner off the brush cover. 4. Maintenance and care Check rotating floor brush and drive belt You should also clean...
User Guide - English
Page 13
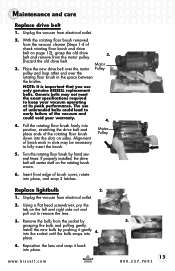
... vacuum from electrical outlet. 2. Place the new drive belt over the motor Pulley pulley and loop other end over the rotating floor brush in slots may not meet the exact specifications required to early failure of brush cover, rotate into place. The use only genuine BISSELL replacement belts. Insert front edge of the vacuum and could lead to keep your warranty. 4. 4. Remove the bulb from the vacuum cleaner (Steps 1-4 of brush...
... vacuum from electrical outlet. 2. Place the new drive belt over the motor Pulley pulley and loop other end over the rotating floor brush in slots may not meet the exact specifications required to early failure of brush cover, rotate into place. The use only genuine BISSELL replacement belts. Insert front edge of the vacuum and could lead to keep your warranty. 4. 4. Remove the bulb from the vacuum cleaner (Steps 1-4 of brush...
User Guide - English
Page 14
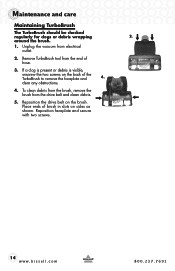
... the vacuum from the end of hose. 3. clear any obstructions. 4. Maintenance and care Maintaining TurboBrush The TurboBrush should be checked regularly for clogs or debris wrapping 2. Reposition the drive belt on sides as shown. Reposition faceplate and secure with two screws. 14 www.bissell.com 800.237.7691 Remove TurboBrush tool from electrical outlet. 2. around the brush. 1. To clean debris from the brush, remove the brush...
... the vacuum from the end of hose. 3. clear any obstructions. 4. Maintenance and care Maintaining TurboBrush The TurboBrush should be checked regularly for clogs or debris wrapping 2. Reposition the drive belt on sides as shown. Reposition faceplate and secure with two screws. 14 www.bissell.com 800.237.7691 Remove TurboBrush tool from electrical outlet. 2. around the brush. 1. To clean debris from the brush, remove the brush...
User Guide - English
Page 15
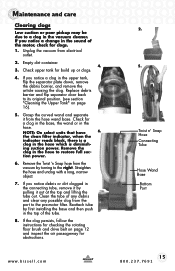
... hose wand base. If the clog persists, follow the instructions for checking the rotating floor brush and drive belt on page 16). 5. Empty dirt container. 4. 3. NOTE: On select units that have 6. ing suction power. Remove the Twist 'n Snap hose from electrical outlet. 2. Reattach tube by turning to the pre-motor filter. Check for clogs. 1. the clean filter indicator, when the indicator reads black, there is a clog in the hose. www.bissell.com 2. 5. Unplug the vacuum from the vacuum...
... hose wand base. If the clog persists, follow the instructions for checking the rotating floor brush and drive belt on page 16). 5. Empty dirt container. 4. 3. NOTE: On select units that have 6. ing suction power. Remove the Twist 'n Snap hose from electrical outlet. 2. Reattach tube by turning to the pre-motor filter. Check for clogs. 1. the clean filter indicator, when the indicator reads black, there is a clog in the hose. www.bissell.com 2. 5. Unplug the vacuum from the vacuum...
User Guide - English
Page 16
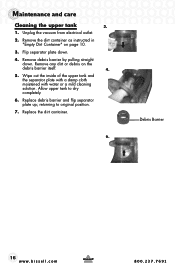
...; Remove the dirt container as instructed in "Empty Dirt Container" on the debris barrier itself. 4. 5. Flip separator plate down . Remove debris barrier by pulling straight down . 4. Remove any dirt or debris on page 10. 3. returning to dry completely. 6. Allow upper tank to original position. 7. Replace the dirt container. 6. Maintenance and care Cleaning the upper tank 3. 1. Unplug the vacuum from electrical outlet. 2. Debris Barrier 16 www.bissell...
...; Remove the dirt container as instructed in "Empty Dirt Container" on the debris barrier itself. 4. 5. Flip separator plate down . Remove debris barrier by pulling straight down . 4. Remove any dirt or debris on page 10. 3. returning to dry completely. 6. Allow upper tank to original position. 7. Replace the dirt container. 6. Maintenance and care Cleaning the upper tank 3. 1. Unplug the vacuum from electrical outlet. 2. Debris Barrier 16 www.bissell...
User Guide - English
Page 17
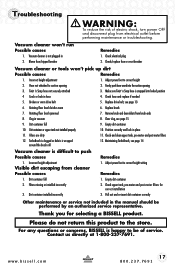
Vacuum cleaner won 't pick up dirt Possible causes Remedies 1. Adjust powerfoot to correct height setting Remedies 1. Broken or worn drive belt 5. Clear clog, see page 13 6. Adjust powerfoot to correct height 2. Blown fuse/tripped breaker Remedies 1. Check hose and replace if needed 5. Replace brush 7. Rotating floor brush jammed 7. Check and clean upper tank, pre-motor and post-motor filters 12. Check upper tank, pre-motor and post-motor filters for selecting a BISSELL product. Thank you for correct installation 3. Please do not...
Vacuum cleaner won 't pick up dirt Possible causes Remedies 1. Adjust powerfoot to correct height setting Remedies 1. Broken or worn drive belt 5. Clear clog, see page 13 6. Adjust powerfoot to correct height 2. Blown fuse/tripped breaker Remedies 1. Check hose and replace if needed 5. Replace brush 7. Rotating floor brush jammed 7. Check and clean upper tank, pre-motor and post-motor filters 12. Check upper tank, pre-motor and post-motor filters for selecting a BISSELL product. Thank you for correct installation 3. Please do not...

User Guide - English
Page 18
... Item 1 Part No. 32074 Part Name Style 7/9/10/12/14 Drive Belt (2-Pack) 2 203-1297 Headlight Bulb 3 203-1063 Crevice Tool 4 203-1228 Dusting Brush/Upholstery Tool 5 203-2302 TurboBrush, clear top with your retailer, by calling BISSELL Consumer Services or by visiting our website. While not all attachments may purchase parts from your specific model, they are available for purchase if desired. Replacement parts - BISSELL vacuum You...
... Item 1 Part No. 32074 Part Name Style 7/9/10/12/14 Drive Belt (2-Pack) 2 203-1297 Headlight Bulb 3 203-1063 Crevice Tool 4 203-1228 Dusting Brush/Upholstery Tool 5 203-2302 TurboBrush, clear top with your retailer, by calling BISSELL Consumer Services or by visiting our website. While not all attachments may purchase parts from your specific model, they are available for purchase if desired. Replacement parts - BISSELL vacuum You...
User Guide - English
Page 19
... you have other use not in your BISSELL product should require service". Damage or malfunction caused by E-mail, telephone, or regular mail as filters, belts, or brushes. ET Saturday 9 a.m. - 8 p.m. BISSELL'S LIABILITY WILL NOT EXCEED THE PURCHASE PRICE OF THE PRODUCT. Warranty - will repair or replace (with the User's Guide is not covered. Friday 8 a.m. - 10 p.m. ET Or Write: BISSELL Homecare, Inc. BISSELL Momentum® Cyclonic Vacuum This warranty gives you specific legal rights...
... you have other use not in your BISSELL product should require service". Damage or malfunction caused by E-mail, telephone, or regular mail as filters, belts, or brushes. ET Saturday 9 a.m. - 8 p.m. BISSELL'S LIABILITY WILL NOT EXCEED THE PURCHASE PRICE OF THE PRODUCT. Warranty - will repair or replace (with the User's Guide is not covered. Friday 8 a.m. - 10 p.m. ET Or Write: BISSELL Homecare, Inc. BISSELL Momentum® Cyclonic Vacuum This warranty gives you specific legal rights...

User Guide - English
Page 20
... regarding your product. Visit www.bissell.com/registration now! Friday 8 a.m. - 10 p.m. BISSELL consumer services For information about repairs or replacement parts, or questions about your original sales receipt. PO Box 3606 Grand Rapids MI 49501 8 p.m. Printed in the event of cleaner available. www.bissell.com When contacting BISSELL, have model number of a warranty claim. Don't forget to receive notice of offers, contests, cleaning tips...
... regarding your product. Visit www.bissell.com/registration now! Friday 8 a.m. - 10 p.m. BISSELL consumer services For information about repairs or replacement parts, or questions about your original sales receipt. PO Box 3606 Grand Rapids MI 49501 8 p.m. Printed in the event of cleaner available. www.bissell.com When contacting BISSELL, have model number of a warranty claim. Don't forget to receive notice of offers, contests, cleaning tips...

