
M7NCG 400 user's manual
Page 11
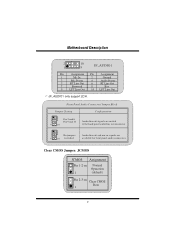
...: JCMOS JCMOS Assignment Pin 1-2 on Normal Operation 1 (default) Pin 2-3 on Clear CMOS Data 1 9 Front Panel Audio Connector/ Jumper Block Jumper Setting 12 3 5 7 4 6 Pin 5 and 6 Pin 9 and 10 9 10 1 3 5 7 9 246 No jumpers 10 installed Configuration Audio line out ...
...: JCMOS JCMOS Assignment Pin 1-2 on Normal Operation 1 (default) Pin 2-3 on Clear CMOS Data 1 9 Front Panel Audio Connector/ Jumper Block Jumper Setting 12 3 5 7 4 6 Pin 5 and 6 Pin 9 and 10 9 10 1 3 5 7 9 246 No jumpers 10 installed Configuration Audio line out ...
M7NCG 400 user's manual
Page 12
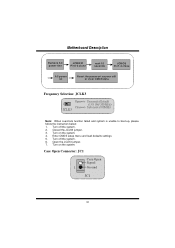
... menu and load defaults settings. 5. Case Open Connector: JC1 Case Open Signal 1 Ground JC1 10 Turn on Reset the passwort as your will or clear CMOS data Frequency Selection: JCLK3 Open==> User mode (Default) 1 ((D1e3f3a/u1lt6)6/ 200 MHz) Close==> SSaaffeemmooddeeo(r100MHz) JCLK3 CPU Clock 100MHz Note: When overclock function failed and...
... menu and load defaults settings. 5. Case Open Connector: JC1 Case Open Signal 1 Ground JC1 10 Turn on Reset the passwort as your will or clear CMOS data Frequency Selection: JCLK3 Open==> User mode (Default) 1 ((D1e3f3a/u1lt6)6/ 200 MHz) Close==> SSaaffeemmooddeeo(r100MHz) JCLK3 CPU Clock 100MHz Note: When overclock function failed and...

M7NCG 400 user's manual
Page 42
... key to start the boot-up process. 40 Press "Enter" to select the boot devices. 4. Press "F9" after powering on the system. 3. Forget about entering CMOS, rebooting activities. The easiest way is NICE TOUCH [9th Touch] means users could enjoy the speed, safety & convenience when respective booting requirement. In addition, at...
... key to start the boot-up process. 40 Press "Enter" to select the boot devices. 4. Press "F9" after powering on the system. 3. Forget about entering CMOS, rebooting activities. The easiest way is NICE TOUCH [9th Touch] means users could enjoy the speed, safety & convenience when respective booting requirement. In addition, at...

M7NCG 400 user's manual
Page 43
Unfortunately, there is users do it takes time to enter CMOS setup. 5. Flasher Step by Step 1. Press [DEL] to prepare the right flash utility and make a Bootable Floppy Disk if necessary. Power ON the computer. 4. Moreover, ...™] technology integrates flash utility function onto BIOS firmware. Download the latest BIOS file from the BIOSTAR website to be followed. Just simply enter CMOS and do not need neither to enter DOS nor to update the BIOS. MMootthheerrbbooaarrdd DDeessccrriippttiioonn BIOS STAR -[ FLASHER™ ] Regularly, when users want to update ...
Unfortunately, there is users do it takes time to enter CMOS setup. 5. Flasher Step by Step 1. Press [DEL] to prepare the right flash utility and make a Bootable Floppy Disk if necessary. Power ON the computer. 4. Moreover, ...™] technology integrates flash utility function onto BIOS firmware. Download the latest BIOS file from the BIOSTAR website to be followed. Just simply enter CMOS and do not need neither to enter DOS nor to update the BIOS. MMootthheerrbbooaarrdd DDeessccrriippttiioonn BIOS STAR -[ FLASHER™ ] Regularly, when users want to update ...
M7NCG 400 user's manual
Page 47
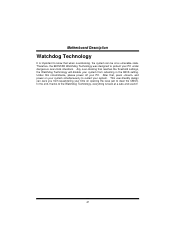
... simultaneously to know that reaches the threshold settings, the Watchdog Technology will disable your PC under dangerous over-clock situations. Therefore, the BIOSTAR Watchdog Technology was designed to clear the CMOS. Any over-clocking that when overclocking, the system can save you from rebooting in the BIOS setting. MMootthheerrbbooaarrdd DDeessccrriippttiioonn Watchdog Technology...
... simultaneously to know that reaches the threshold settings, the Watchdog Technology will disable your PC under dangerous over-clock situations. Therefore, the BIOSTAR Watchdog Technology was designed to clear the CMOS. Any over-clocking that when overclocking, the system can save you from rebooting in the BIOS setting. MMootthheerrbbooaarrdd DDeessccrriippttiioonn Watchdog Technology...
M7NCG 400 user's manual
Page 48
...* Run SETUP program and select correct drive types. DIMM, press down at all Power light don't * Make sure power cable is in the standard CMOS setup. * Backing up data and applications files. Reformat be read and applications can be * Check cable running from disk to the system at any time... not on turn * Replace cable * Contact technical support PROBABLE SOLUTION System inoperative. Re-install applications and data from CD-ROM. Make sure "CMOS Failure." Keyboard lights are on, power * Using even pressure on both ends are lit, hard drive is extremely important.
...* Run SETUP program and select correct drive types. DIMM, press down at all Power light don't * Make sure power cable is in the standard CMOS setup. * Backing up data and applications files. Reformat be read and applications can be * Check cable running from disk to the system at any time... not on turn * Replace cable * Contact technical support PROBABLE SOLUTION System inoperative. Re-install applications and data from CD-ROM. Make sure "CMOS Failure." Keyboard lights are on, power * Using even pressure on both ends are lit, hard drive is extremely important.