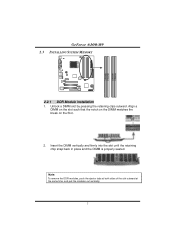
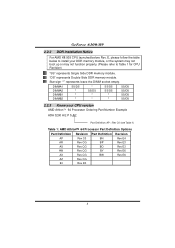
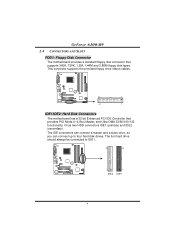
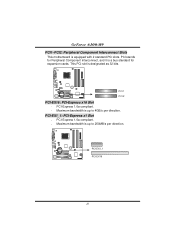
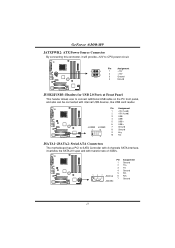
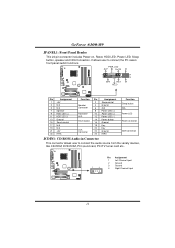
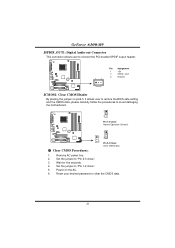
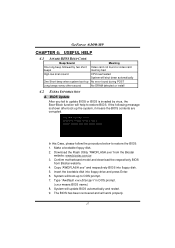
GeForce 6100-M9 user's manual
Page 1
... companies. This equipment generates, uses and can radiate radio frequency energy and, if not installed and used in accordance with respect to notify any purpose. GeForce 6100-M9 FCC Information and Copyright This equipment has been tested and found in this publication and to make changes to the contents here without first obtaining...
GeForce 6100-M9 user's manual
Page 3
... Form Factor: 24.5cm (L) x 24.45cm (W) Operating System Supporting Supports Windows 2000 and Windows XP. Provides the most commonly used legacy Super I /O Chip: ITE IT8712F. GeForce 6100-M9 CHAPTER 1: INTRODUCTION 1.1 MOTHERBOARD FEATURES CPU Supports Socket 939. AMD 64 architecture enables simultaneous 32 and 64 bit computing. Supports HyperTransport Technology up to 2000MT/s. Supports...
GeForce 6100-M9 user's manual
Page 4
... RAID 0 and RAID 1 functions. Compliant with SATA Version 2.0 specification. 10/100 LAN PHY PHY: RTL8201BL/RTL8201CL. Onboard AC'97 Sound Codec Chip: ALC655 Support 6 channels. GeForce 6100-M9 System Memory Supports Dual Channel DDR.. Onboard Serial ATA Integrated in total. Supports 2 serial ATA (SATA) ports. -
GeForce 6100-M9 user's manual
Page 5
... Mic In 1/ Bass/Center 3 Back Panel I /O Connectors and Headers 1 front panel header supports front panel facilities. 1 CD-in connector supports 1 CD-ROM audio-in connector. GeForce 6100-M9 Internal On-board I /O Connectors 4 USB 2.0 ports. 1 VGA port. 1 Serial port. 1 Printer port. 1 RJ-45 LAN jack. 1 PS/2 Mouse port. 1 PS/2 Keyboard port. 1 Vertical audio port...
GeForce 6100-M9 user's manual
Page 6
EX 1 6 PCI1 JUSBV2 JUSB2 JUSB3 Super I - GeForce 6100-M9 1.2 LAYOUT AND COMPONENTS JKBMS1 JKBV1 JCFAN1 CPU1 JATXPWR1 JCOM1 JPRNT1 DIMM B1 DIMMB2 DIMM A1 DIMMA2 JVGA1 JUSB1 JUSBV1 JATXPWR2 JUSBLAN1 JAUDIO1 JAUDIO2 LAN PHY PCI-EX1_1 JCDIN1 Codec JSPDIF_OUT1 GeForce 6100 BAT1 PC I /O PCI2 FDD1 BIOS Note: ■ represents the 1st pin. JSFAN1 nForce 410 JSATA2 JSATA1 JCI1 JCMOS1 JPANEL1 IDE2 IDE1 4
GeForce 6100-M9 user's manual
Page 7
GeForce 6100-M9 CHAPTER 2: HARDWARE INSTALLATION 2.1 INSTALLING CENTRAL PROCESSING UNIT (CPU) Step 1: Remove the socket protection cap. The CPU will fit only in the correct orientation. 5 Step 2: Pull the lever toward direction A from the socket and then raise the lever up to a 90-degree angle. 90 A Step 3: Look for the white triangle on socket, and the gold triangle on CPU should point forwards this white triangle.
GeForce 6100-M9 user's manual
Page 8
... Note: The JCFAN1 and JSFAN1 support 3-pin head connector. This completes the installation. 2.2 FAN HEADERS These fan headers support cooling-fans built in the computer. GeForce 6100-M9 Step 4: Hold the CPU down firmly, and then close the lever toward direct B to the JCFAN1. Connect the fan cable to the connector while matching...
GeForce 6100-M9 user's manual
Page 9
Align a DIMM on the slot such that the notch on the DIMM matches the break on the Slot. 2. Insert the DIMM vertically and firmly into the slot until the retaining chip snap back in place and the DIMM is properly seated. Note: To remove the DDR modules, push the ejector tabs at both sides of the slot outward at the same time, and pull the modules out vertically. 7 Unlock a DIMM slot by pressing the retaining clips outward. DIMMB1 DIMMB2 DIMMA1 DIMMA 2 GeForce 6100-M9 2.3 INSTALLING SYSTEM MEMORY 2.2.1 DDR Module installation 1.
GeForce 6100-M9 user's manual
Page 10
"DS" represents Double Side DDR memory module. GeForce 6100-M9 2.2.2 DDR Installation Notice For AMD K8 939 CPU launched before Rev. DIMMA1 DIMMA2 DIMMB1 DIMMB2 SS/DS * * * * SS/DS * * SS/DS SS/DS * * SS/DS ...
GeForce 6100-M9 user's manual
Page 11
... 2 IDE1/IDE2: Hard Disk Connectors The motherboard has a 32-bit Enhanced PCI IDE Controller that supports 360K, 720K, 1.2M, 1.44M and 2.88M floppy disk types. GeForce 6100-M9 2.4 CONNECTORS AND SLOTS FDD1: Floppy Disk Connector The motherboard provides a standard floppy disk connector that provides PIO Mode 0~4, Bus Master, and Ultra DMA 33/66...
GeForce 6100-M9 user's manual
Page 12
PCI-Express 1.0a compliant. - PCI1 PCI2 PCI-EX16: PCI-Express x16 Slot - PCI-Express 1.0a compliant. - PCI-EX1_1 PCI-EX16 10 PCI stands for expansion cards. Maximum bandwidth is a bus standard for Peripheral Component Interconnect, and it is up to 4GB/s per direction. Maximum bandwidth is equipped with 2 standard PCI slots. GeForce 6100-M9 PCI1~PCI2: Peripheral Component Interconnect Slots This motherboard is up to 250MB/s per direction. PCI-EX1_1: PCI-Express x1 Slot - This PCI slot is designated as 32 bits.
GeForce 6100-M9 user's manual
Page 13
JUSBV2: USB ports at JUSB1 and JUSBLAN1 are powered by +5V standby voltage. GeForce 6100-M9 CHAPTER 3: HEADERS & JUMPERS SETUP 3.1 HOW TO SETUP JUMPERS The illustration shows how to support this function "Power-On system via USB device," "JUSBV1/ JUSBV2" jumper ...
GeForce 6100-M9 user's manual
Page 14
... Ground 19 Ground 20 -5V 21 +5V 22 +5V 23 +5V 24 Ground 12 Note: In order to connect 24-pin power connector on Pin 2-3. GeForce 6100-M9 JKBV1: Power Source Header for PS/2 Keyboard and Mouse 13 1 3 Pin 1-2 Close +5V for PS/2 keyboard and mouse. 1 3 Pin 2-3 close PS/2 keyboard and mouse are...
GeForce 6100-M9 user's manual
Page 15
GeForce 6100-M9 JATXPWR2: ATX Power Source Connector By connecting this connector, it satisfies the SATA 2.0 spec and with internal USB devices, like USB card reader. Pin Assignment 1 +...
GeForce 6100-M9 user's manual
Page 16
... Ground 24 IRRX Function Sleep button N/A Power LED Power-on , Reset, HDD LED, Power LED, Sleep button, speaker and IrDA Connection. PWR_LED SLP On/Off ++ 2 1 +- GeForce 6100-M9 JPANEL1: Front Panel Header This 24-pin connector includes Power-on button IrDA Connector JCDIN1: CD-ROM Audio-in Connector This connector allows user to...
GeForce 6100-M9 user's manual
Page 17
... on back panel audio connectors. If the signal has been triggered, it will disable the output on next boot-up. Pin Assignment 1 Case open status. GeForce 6100-M9 JAUDIO2: Front Panel Audio Header This header allows user to monitor PC case open signal 2 Ground 1 2 15 Pin Assignment 1 Mic-in/Stereo MIC-in R 2 Ground...
GeForce 6100-M9 user's manual
Page 18
... five seconds. 4. Set the jumper to avoid damaging the motherboard. 1 3 Pin 1-2 Close: Normal Operation (Default). 1 13 3 Pin 2-3 Close: Clear CMOS data. ※ Clear CMOS Procedures: 1. GeForce 6100-M9 JSPDIF_OUT1: Digital Audio-out Connector This connector allows user to connect the PCI bracket SPDIF output header. 1 3 Pin Assignment 1 +5V 2 SPDIF_OUT 3 Ground JCMOS1: Clear CMOS...
GeForce 6100-M9 user's manual
Page 19
...boot-up the system, it means the BIOS contents are corrupted. System will work properly. 17 Download the Flash Utility "AWDFLASH.exe" from Biostar website. 4. The BIOS has been recovered and will update BIOS automatically and restart. 9. If the following message is invaded by two short beeps...Case, please follow the procedure below to DOS prompt. 7. Type "Awdflash xxxx.bf/sn/py/r" in DOS prompt. (xxxx means BIOS name.) 8. GeForce 6100-M9 CHAPTER 4: USEFUL HELP 4.1 AWARD BIOS BEEP CODE Beep Sound One long beep followed by virus, the Boot-Block function will help to restore BIOS....
GeForce 6100-M9 user's manual
Page 20
... case, please double check: 1. Or you can: 1. Remove the power cord from power supply for seconds. 3. CPU fan speed is rotated normally. 3. Wait for seconds. 2. GeForce 6100-M9 B. Power on system for seconds. 3. Plug in the power cord and boot up the system. Wait for seconds, that means the CPU protection function has...
GeForce 6100-M9 user's manual
Page 21
... jumpers correctly. 2. Keyboard lights are on . Check cable running from disk to the system at any time. Screen message says "Invalid Configuration" or "CMOS Failure." GeForce 6100-M9 4.3 TROUBLESHOOTING Problem Solution 1. Contact technical support. 2. Indicator light on . 3. Backing up data and applications files. Cannot boot system after installing second hard drive. 1.