
User Manual
Page 2
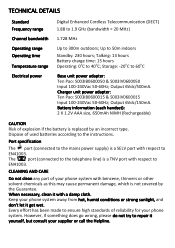
... outdoors; Port specification The port (connected to 50m indoors Standby: 230 hours; Keep your phone system away from hot, humid conditions or strong sunlight, and don't let it get wet. TECHNICAL DETAILS Standard Frequency range Channel bandwidth Operating range Operating time Temperature range Electrical power Digital Enhanced Cordless Telecommunication (DECT) 1.88 to 1.9 GHz (bandwidth = 20 MHz) 1.728 MHz Up to repair it yourself, but consult your supplier or call the Helpline. Output...
... outdoors; Port specification The port (connected to 50m indoors Standby: 230 hours; Keep your phone system away from hot, humid conditions or strong sunlight, and don't let it get wet. TECHNICAL DETAILS Standard Frequency range Channel bandwidth Operating range Operating time Temperature range Electrical power Digital Enhanced Cordless Telecommunication (DECT) 1.88 to 1.9 GHz (bandwidth = 20 MHz) 1.728 MHz Up to repair it yourself, but consult your supplier or call the Helpline. Output...
User Manual
Page 3
... Handset, Base Station and *Charging Pod ...... 10 3.2 Display Icons and Symbols 13 3.3 Menu Map and Menu Navigation 15 3.4 Text and Number Entry 16 3.4.1 Character Map 16 4 USING YOUR PHONE 17 4.1 Make a Call 17 4.1.1 Pre-dialling 17 4.1.2 Direct Dialling 17 4.1.3 Call from the Redial List 17 4.1.4 Call from the Call Log 17 4.1.5 Call from the Phonebook 18 4.2 Answer and End a Call 18 4.3 Handset Speakerphone 18 4.4 Adjust Earpiece Volume 18 4.5 Adjust Speaker Volume 19 4.6 Mute...
... Handset, Base Station and *Charging Pod ...... 10 3.2 Display Icons and Symbols 13 3.3 Menu Map and Menu Navigation 15 3.4 Text and Number Entry 16 3.4.1 Character Map 16 4 USING YOUR PHONE 17 4.1 Make a Call 17 4.1.1 Pre-dialling 17 4.1.2 Direct Dialling 17 4.1.3 Call from the Redial List 17 4.1.4 Call from the Call Log 17 4.1.5 Call from the Phonebook 18 4.2 Answer and End a Call 18 4.3 Handset Speakerphone 18 4.4 Adjust Earpiece Volume 18 4.5 Adjust Speaker Volume 19 4.6 Mute...
User Manual
Page 5
8.1.1 Change the Time Format 34 8.1.2 Change the Date Format 34 8.2 Alarm Settings 35 8.2.1 Set the Alarm Tone 36 9 PERSONAL SETTINGS 37 9.1 Set the Ring Volume 37 9.2 Set the Ring Tone 37 9.3 Set the Key Beep 38 9.4 Rename the Handset 38 9.5 Set the Display Language 39 9.6 Set Auto Hang-up 39 10 ADVANCED SETTINGS 40 10.1 Handset Registration 40 10.2 Register Additional Handsets 40 10.3 Un-register your Handset 41 10.4 Change the Master PIN 41 10.5 Change the Recall Time 42 10.6 Change the Dial Mode (Dual...
8.1.1 Change the Time Format 34 8.1.2 Change the Date Format 34 8.2 Alarm Settings 35 8.2.1 Set the Alarm Tone 36 9 PERSONAL SETTINGS 37 9.1 Set the Ring Volume 37 9.2 Set the Ring Tone 37 9.3 Set the Key Beep 38 9.4 Rename the Handset 38 9.5 Set the Display Language 39 9.6 Set Auto Hang-up 39 10 ADVANCED SETTINGS 40 10.1 Handset Registration 40 10.2 Register Additional Handsets 40 10.3 Un-register your Handset 41 10.4 Change the Master PIN 41 10.5 Change the Recall Time 42 10.6 Change the Dial Mode (Dual...
User Manual
Page 8
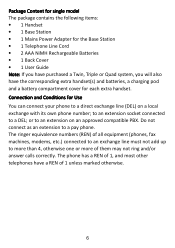
... own phone number; or to more than 4, otherwise one or more of them may not ring and/or answer calls correctly. The phone has a REN of 1, and most other telephones have the corresponding extra handset(s) and batteries, a charging pod and a battery compartment cover for each extra handset. Package Content for single model The package contains the following items: • 1 Handset • 1 Base Station • 1 Mains Power Adapter for the Base Station • 1 Telephone Line Cord...
... own phone number; or to more than 4, otherwise one or more of them may not ring and/or answer calls correctly. The phone has a REN of 1, and most other telephones have the corresponding extra handset(s) and batteries, a charging pod and a battery compartment cover for each extra handset. Package Content for single model The package contains the following items: • 1 Handset • 1 Base Station • 1 Mains Power Adapter for the Base Station • 1 Telephone Line Cord...
User Manual
Page 9
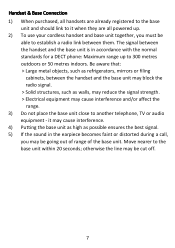
... a DECT phone: Maximum range up . 2) To use your cordless handset and base unit together, you must be able to establish a radio link between the handset and the base unit is in the earpiece becomes faint or distorted during a call, you may be cut off. 7 it when they are all powered up to 300 metres outdoors or 50 metres indoors. Handset & Base Connection 1) When purchased, all handsets are already registered...
... a DECT phone: Maximum range up . 2) To use your cordless handset and base unit together, you must be able to establish a radio link between the handset and the base unit is in the earpiece becomes faint or distorted during a call, you may be cut off. 7 it when they are all powered up to 300 metres outdoors or 50 metres indoors. Handset & Base Connection 1) When purchased, all handsets are already registered...
User Manual
Page 10
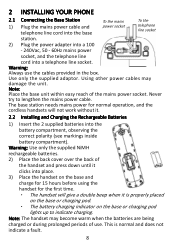
... unit. This is properly placed on the base or charging pod. • The battery charging indicator on the base and charge for 15 hours before using the handset for normal operation, and the cordless handsets will give a double beep when it . 2.2 Installing and Charging the Rechargeable Batteries 1) Insert the 2 supplied batteries into a telephone line socket. 2 INSTALLING YOUR PHONE 2.1 Connecting the Base Station 1) Plug the mains power cable and telephone line cord into the base To the mains power socket To the telephone line...
... unit. This is properly placed on the base or charging pod. • The battery charging indicator on the base and charge for 15 hours before using the handset for normal operation, and the cordless handsets will give a double beep when it . 2.2 Installing and Charging the Rechargeable Batteries 1) Insert the 2 supplied batteries into a telephone line socket. 2 INSTALLING YOUR PHONE 2.1 Connecting the Base Station 1) Plug the mains power cable and telephone line cord into the base To the mains power socket To the telephone line...
User Manual
Page 13
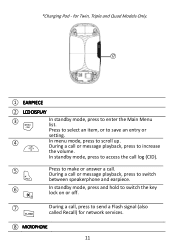
... and Quad Models Only. ⑰ ① EARPIECE ② LCD DISPLAY ③ M ④ + In standby mode, press to save an entry or setting. During a call or message playback, press to switch between speakerphone and earpiece. During a call or message playback, press to switch the key lock on or off. ⑦ F During a call . In standby mode, press and hold to increase the volume. *Charging Pod - In...
... and Quad Models Only. ⑰ ① EARPIECE ② LCD DISPLAY ③ M ④ + In standby mode, press to save an entry or setting. During a call or message playback, press to switch between speakerphone and earpiece. During a call or message playback, press to switch the key lock on or off. ⑦ F During a call . In standby mode, press and hold to increase the volume. *Charging Pod - In...
User Manual
Page 14
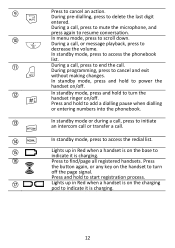
... Lights up in Red when a handset is on the charging pod to resume conversation. Lights up in Red when a handset is on the base to add a dialling pause when dialling or entering numbers into the phonebook. During a call . In standby mode, press and hold to indicate it is charging. Press and hold to turn the handset ringer on /off the page signal. Press the button again, or any key...
... Lights up in Red when a handset is on the charging pod to resume conversation. Lights up in Red when a handset is on the base to add a dialling pause when dialling or entering numbers into the phonebook. During a call . In standby mode, press and hold to indicate it is charging. Press and hold to turn the handset ringer on /off the page signal. Press the button again, or any key...
User Manual
Page 15
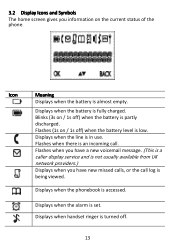
... / 1s off) when the battery is an incoming call log is almost empty. Flashes when there is partly discharged. Displays when handset ringer is set. Displays when the alarm is turned off ) when the battery level is fully charged. Flashes (1s on the current status of the phone. Displays when the battery is low. Flashes when you have a new voicemail message. (This is a caller display service and is not usually available from UK network...
... / 1s off) when the battery is an incoming call log is almost empty. Flashes when there is partly discharged. Displays when handset ringer is set. Displays when the alarm is turned off ) when the battery level is fully charged. Flashes (1s on the current status of the phone. Displays when the battery is low. Flashes when you have a new voicemail message. (This is a caller display service and is not usually available from UK network...
User Manual
Page 17
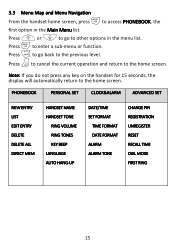
... key on the handset for 15 seconds, the display will automatically return to access PHONEBOOK, the first option in the menu list. 3.3 Menu Map and Menu Navigation M From the handset home screen, press to the home screen. PHONEBOOK PERSONAL SET CLOCK&ALARM ADVANCED SET NEW ENTRY LIST EDIT ENTRY DELETE DELETE ALL DIRECT MEM HANDSET NAME HANDSET TONE RING VOLUME RING TONES KEY BEEP LANGUAGE AUTO HANG-UP DATE/TIME SET FORMAT TIME FORMAT DATE FORMAT ALARM ALARM TONE CHANGE PIN REGISTRATION UNREGISTER RESET RECALL TIME DIAL MODE FIRST RING...
... key on the handset for 15 seconds, the display will automatically return to access PHONEBOOK, the first option in the menu list. 3.3 Menu Map and Menu Navigation M From the handset home screen, press to the home screen. PHONEBOOK PERSONAL SET CLOCK&ALARM ADVANCED SET NEW ENTRY LIST EDIT ENTRY DELETE DELETE ALL DIRECT MEM HANDSET NAME HANDSET TONE RING VOLUME RING TONES KEY BEEP LANGUAGE AUTO HANG-UP DATE/TIME SET FORMAT TIME FORMAT DATE FORMAT ALARM ALARM TONE CHANGE PIN REGISTRATION UNREGISTER RESET RECALL TIME DIAL MODE FIRST RING...
User Manual
Page 21
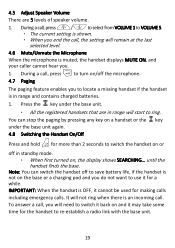
... turned on, the display shows SEARCHING... It will remain at the last selected level. 4.6 Mute/Unmute the Microphone When the microphone is OFF, it cannot be used for making calls including emergency calls. until the handset finds the base. Note: You can stop the paging by pressing any key on a handset or the key under the base unit. • All the registered handsets that are 5 levels of speaker volume. 1. 4.5 Adjust Speaker Volume...
... turned on, the display shows SEARCHING... It will remain at the last selected level. 4.6 Mute/Unmute the Microphone When the microphone is OFF, it cannot be used for making calls including emergency calls. until the handset finds the base. Note: You can stop the paging by pressing any key on a handset or the key under the base unit. • All the registered handsets that are 5 levels of speaker volume. 1. 4.5 Adjust Speaker Volume...

User Manual
Page 22
... Make an Internal Call (Multi - Press the handset number you to transfer external calls from one handset to call . Note: Incoming calls can still be displayed. * 2. In standby mode, press . • Intercom is established immediately if there are only 2 registered handsets. • If there are more than 2 registered handsets, the handset numbers which are available for intercom will hear a busy tone for 1 second to avoid making calls or pressing the keys accidentally. * 1. handset models only...
... Make an Internal Call (Multi - Press the handset number you to transfer external calls from one handset to call . Note: Incoming calls can still be displayed. * 2. In standby mode, press . • Intercom is established immediately if there are only 2 registered handsets. • If there are more than 2 registered handsets, the handset numbers which are available for intercom will hear a busy tone for 1 second to avoid making calls or pressing the keys accidentally. * 1. handset models only...

User Manual
Page 24
... more than 2 registered handsets, the handset numbers which are available for 2 seconds to connect both internal callers can talk. 4. When the intercom call is answered, press to return to put the external call on the called handset, or you wish to cancel I 1. I the intercom call before it is connected, you can choose from the called handset to the call with another system handset to join in a conference call in conference mode. Press on...
... more than 2 registered handsets, the handset numbers which are available for 2 seconds to connect both internal callers can talk. 4. When the intercom call is answered, press to return to put the external call on the called handset, or you wish to cancel I 1. I the intercom call before it is connected, you can choose from the called handset to the call with another system handset to join in a conference call in conference mode. Press on...

User Manual
Page 25
... 2 registered handsets, the handset numbers which are available for intercom will be displayed. * 2. O 4. During the call, press to another Handset I the intercom call , where both internal callers can talk. Press on the originating handset to transfer the external call to answer the internal call before it is transferred. 23 Press on the called handset to the called handset, or you wish to call or press to the external call all handsets. T 3. Press...
... 2 registered handsets, the handset numbers which are available for intercom will be displayed. * 2. O 4. During the call, press to another Handset I the intercom call , where both internal callers can talk. Press on the originating handset to transfer the external call to answer the internal call before it is transferred. 23 Press on the called handset to the called handset, or you wish to call or press to the external call all handsets. T 3. Press...
User Manual
Page 35
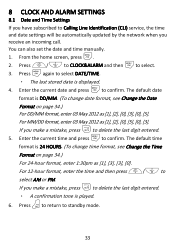
... also set the date and time manually. Press again to confirm. Enter the current time and press to delete the last digit entered. The default time format is 24 HOURS. (To change date format, see Change the Time Format on page 34.) For DD/MM format, enter 03 May 2012 as [1], [3], [3], [0]. M 3. If you make a mistake, press m to Calling Line Identification (CLI) service, the time and date settings will be automatically updated...
... also set the date and time manually. Press again to confirm. Enter the current time and press to delete the last digit entered. The default time format is 24 HOURS. (To change date format, see Change the Time Format on page 34.) For DD/MM format, enter 03 May 2012 as [1], [3], [3], [0]. M 3. If you make a mistake, press m to Calling Line Identification (CLI) service, the time and date settings will be automatically updated...
User Manual
Page 41
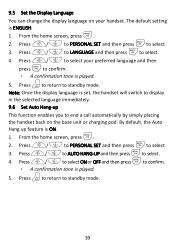
... handset back on your handset. From the home screen, press . M 3. M 4. Press +/- Note: Once the display language is set, the handset will switch to display in the selected language immediately. 9.6 Set Auto Hang-up feature is ENGLISH. By default, the Auto Hang up This function enables you to confirm. • A confirmation tone is played. Press +/- Press +/- Press +/- 9.5 Set the Display Language You can change the display language on the base unit or charging...
... handset back on your handset. From the home screen, press . M 3. M 4. Press +/- Note: Once the display language is set, the handset will switch to display in the selected language immediately. 9.6 Set Auto Hang-up feature is ENGLISH. By default, the Auto Hang up This function enables you to confirm. • A confirmation tone is played. Press +/- Press +/- Press +/- 9.5 Set the Display Language You can change the display language on the base unit or charging...
User Manual
Page 42
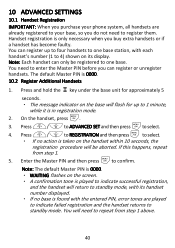
... step 1 above. 40 10 ADVANCED SETTINGS 10.1 Handset Registration IMPORTANT: When you purchase your phone system, all handsets are played to indicate failed registration and the handset returns to standby mode. You will flash for approximately 5 seconds. • The message indicator on the screen. • A confirmation tone is in registration mode. Handset registration is 0000. 10.2 Register Additional Handsets 1. The default Master PIN is only necessary when you buy extra handsets or if a handset has become faulty. M 3. M 5.
... step 1 above. 40 10 ADVANCED SETTINGS 10.1 Handset Registration IMPORTANT: When you purchase your phone system, all handsets are played to indicate failed registration and the handset returns to standby mode. You will flash for approximately 5 seconds. • The message indicator on the screen. • A confirmation tone is in registration mode. Handset registration is 0000. 10.2 Register Additional Handsets 1. The default Master PIN is only necessary when you buy extra handsets or if a handset has become faulty. M 3. M 5.
User Manual
Page 45
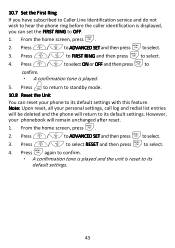
... to Caller Line Identification service and do not wish to hear the phone ring before the caller identification is displayed, you can reset your phone to its default settings with this feature. M 3. to ADVANCED SET and then press to select. Press +/- From the home screen, press . From the home screen, press . M 1. to select ON or OFF and then press to confirm. • A confirmation tone is reset to its default settings.
... to Caller Line Identification service and do not wish to hear the phone ring before the caller identification is displayed, you can reset your phone to its default settings with this feature. M 3. to ADVANCED SET and then press to select. Press +/- From the home screen, press . From the home screen, press . M 1. to select ON or OFF and then press to confirm. • A confirmation tone is reset to its default settings.
User Manual
Page 46
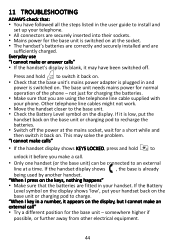
... The handset's batteries are correctly and securely installed and are using the telephone line cable supplied with your handset back on the base unit or charging pod to recharge the batteries. The base unit needs mains power for charging the batteries. If the handset display shows , the base is switched on . "When I cannot make a call " Try a different position for the base unit - O Press and hold to unlock it back on . "I cannot make calls" * If the handset display shows KEYS...
... The handset's batteries are correctly and securely installed and are using the telephone line cable supplied with your handset back on the base unit or charging pod to recharge the batteries. The base unit needs mains power for charging the batteries. If the handset display shows , the base is switched on . "When I cannot make a call " Try a different position for the base unit - O Press and hold to unlock it back on . "I cannot make calls" * If the handset display shows KEYS...
User Manual
Page 47
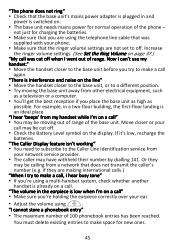
... a call" You may be cut off . not just for new ones. 45 Make sure that the ringer volume settings are using +. "I went out of the base unit. If it's low, recharge the batteries. Move the handset closer to off. "I hear busy tone" If you try to make space for charging the batteries. You must delete existing entries to a different position. "The phone does not ring" Check that the base unit's mains power adapter...
... a call" You may be cut off . not just for new ones. 45 Make sure that the ringer volume settings are using +. "I went out of the base unit. If it's low, recharge the batteries. Move the handset closer to off. "I hear busy tone" If you try to make space for charging the batteries. You must delete existing entries to a different position. "The phone does not ring" Check that the base unit's mains power adapter...


