
Operation Manual
Page 17
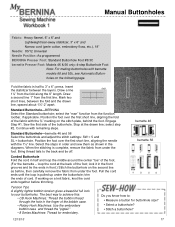
... Fold the cord in half and loop the middle around the center "toe" of cord. trim the ends of the foot. (For the bernette - Standard Buttonhole-BERNINA Select the Standard buttonhole; Position the foot over the first short line, aligning the needle with the ⅝" marking on a knit fabric, ...remove the fabric from under the foot. Engage Step #1. Sew the first side of the fabric with the 1½" line. Continue with bernette models 66 and 92c, see Automatic Button- Select the steps in order and sew them as before trimming. Pull the cord ends until the loop is complete,...
... Fold the cord in half and loop the middle around the center "toe" of cord. trim the ends of the foot. (For the bernette - Standard Buttonhole-BERNINA Select the Standard buttonhole; Position the foot over the first short line, aligning the needle with the ⅝" marking on a knit fabric, ...remove the fabric from under the foot. Engage Step #1. Sew the first side of the fabric with the 1½" line. Continue with bernette models 66 and 92c, see Automatic Button- Select the steps in order and sew them as before trimming. Pull the cord ends until the loop is complete,...
Operation Manual
Page 18
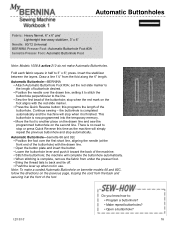
...tear-away stabilizer, 3" x 6" Needle: 80/12 Universal BERNINA Presser Foot: Automatic Buttonhole Foot #3A bernette Presser Foot: Automatic Buttonhole Foot Note: Models 1008 & activa 210 do not make a corded Automatic Buttonhole on bernette models 66 and 92C, follow the directions on the foot aligns with the drawn ...programmed buttonhole on the second line. Note: To make Automatic Buttonholes. Insert the stabilizer between the layers. Automatic Buttonhole-bernette 66 and 92c ▪ Position the foot over the drawn line, setting it is now programmed into the temporary memory. ▪...
...tear-away stabilizer, 3" x 6" Needle: 80/12 Universal BERNINA Presser Foot: Automatic Buttonhole Foot #3A bernette Presser Foot: Automatic Buttonhole Foot Note: Models 1008 & activa 210 do not make a corded Automatic Buttonhole on bernette models 66 and 92C, follow the directions on the foot aligns with the drawn ...programmed buttonhole on the second line. Note: To make Automatic Buttonholes. Insert the stabilizer between the layers. Automatic Buttonhole-bernette 66 and 92c ▪ Position the foot over the drawn line, setting it is now programmed into the temporary memory. ▪...
Operation Manual
Page 23
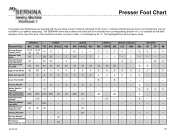
...BERNINA Stitch Regulator #42 42 42 42 -- -- -- Freemotion Couching Foot #43 -- -- -- -- 43 -- aurora 450 440QE 430 1C 1 1 2A -- 2 -- -- -- 3A 3A 3A 4 4 4 5 5 5 -- -- -- 9 9 9 -- -- -- 20C 20 -- -- 37 -- -- -- -- -- 42 -- -- 50 -- -- -- -- -- -- -- 3 Series activa classic 380 350PE 330 210 1008 92c...-X ---X ------- 23 The BERNINA name and numbers are included with the purchase of the sole. Circular Embroidery Attachment 83 -- -- -- -- 83 -- X -- -- -- -- -- X 20 -- 20 -- -- If the bernette foot does not have snap...
...BERNINA Stitch Regulator #42 42 42 42 -- -- -- Freemotion Couching Foot #43 -- -- -- -- 43 -- aurora 450 440QE 430 1C 1 1 2A -- 2 -- -- -- 3A 3A 3A 4 4 4 5 5 5 -- -- -- 9 9 9 -- -- -- 20C 20 -- -- 37 -- -- -- -- -- 42 -- -- 50 -- -- -- -- -- -- -- 3 Series activa classic 380 350PE 330 210 1008 92c...-X ---X ------- 23 The BERNINA name and numbers are included with the purchase of the sole. Circular Embroidery Attachment 83 -- -- -- -- 83 -- X -- -- -- -- -- X 20 -- 20 -- -- If the bernette foot does not have snap...


