

User Guide
Page 2
... DOUBLEINSULATED PRODUCTS In a double-insulated product, two systems of insulation are being administered. 14. ENVIROMENTAL PROTECTION BERNINA is required around the sewing needle. 6. Do not use the BERNINA original stitch plate. Under no longer require this sewing computer if: • it has a damaged cord... INSULATED». SAVE THESE INSTRUCTIONS! Never drop or insert any object into water Return the sewing computer to the nearest authorized BERNINA dealer or service center for servicing of the sewing computer and foot controller free from the outlet. Do not allow to break...
... DOUBLEINSULATED PRODUCTS In a double-insulated product, two systems of insulation are being administered. 14. ENVIROMENTAL PROTECTION BERNINA is required around the sewing needle. 6. Do not use the BERNINA original stitch plate. Under no longer require this sewing computer if: • it has a damaged cord... INSULATED». SAVE THESE INSTRUCTIONS! Never drop or insert any object into water Return the sewing computer to the nearest authorized BERNINA dealer or service center for servicing of the sewing computer and foot controller free from the outlet. Do not allow to break...

User Guide
Page 3
...and the Thread Cutter have a wonderful sewing experience with your bernette Deco 340. In order to make your sewing experience on the screen will help , ideas and embroidery essentials, to buy the bernette Deco 340. Please visit your BERNINA dealer; This product was designed and built to the highest ...standards in order to welcome you in the BERNINA sewing family and we hope you will have been implemented to ...
...and the Thread Cutter have a wonderful sewing experience with your bernette Deco 340. In order to make your sewing experience on the screen will help , ideas and embroidery essentials, to buy the bernette Deco 340. Please visit your BERNINA dealer; This product was designed and built to the highest ...standards in order to welcome you in the BERNINA sewing family and we hope you will have been implemented to ...

User Guide
Page 4
Contents 3 Important Safety Instructions 1 Welcome 2 Embroidery Computer Overview 4- 6 Getting Ready to Embroider 7- 20 Important Embroidery Information 21- 24 Key Operations 25- 35 Embroidery 36- 40 Lettering 41- 45 Editing and Combining Designs 46- 53 Design Transfer and Compatibility 54- 58 Care and Maintenance 59- 60 Troubleshooting 61 Index 62 Built-in Design Chart Appendix Table of Preset Colors Appendix
Contents 3 Important Safety Instructions 1 Welcome 2 Embroidery Computer Overview 4- 6 Getting Ready to Embroider 7- 20 Important Embroidery Information 21- 24 Key Operations 25- 35 Embroidery 36- 40 Lettering 41- 45 Editing and Combining Designs 46- 53 Design Transfer and Compatibility 54- 58 Care and Maintenance 59- 60 Troubleshooting 61 Index 62 Built-in Design Chart Appendix Table of Preset Colors Appendix
User Guide
Page 5
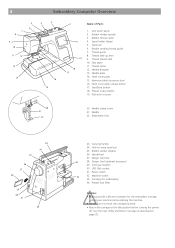
LCD touch panel 2. Thread guide 8. Start/Stop button 18. Needle 22. Embroidery foot 25 26 27 28 23 24 29 30 31 32 23. Handwheel 27. Machine socket 33. Use the keys Utility and Return Carriage as described on page 25. Bobbin thread cutter 4. Spool pin 6. Needle plate 14. Extension table (accessory box) 16. Pocket for extra spool pin 25. Hole for scissors 20 21 22 20. Card eject button 30. Presser foot lifter Caution: • Always provide sufficient clearance for embroidery) 34. Thread tension dial 10. Thread Cutter button 19....
LCD touch panel 2. Thread guide 8. Start/Stop button 18. Needle 22. Embroidery foot 25 26 27 28 23 24 29 30 31 32 23. Handwheel 27. Machine socket 33. Use the keys Utility and Return Carriage as described on page 25. Bobbin thread cutter 4. Spool pin 6. Needle plate 14. Extension table (accessory box) 16. Pocket for extra spool pin 25. Hole for scissors 20 21 22 20. Card eject button 30. Presser foot lifter Caution: • Always provide sufficient clearance for embroidery) 34. Thread tension dial 10. Thread Cutter button 19....
User Guide
Page 6
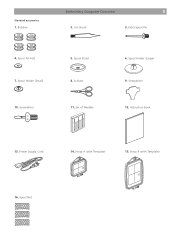
Spool Holder (Small) 10. Power Supply Cord 14. Lint Brush 3. Spool Pin Felt 7. Spool Stand 8. Hoop B (with Template) 15. Screwdriver 12. Scissors 11. Hoop A (with Template) 16. Instruction Book 13. Bobbins Embroidery Computer Overview 5 2. Extra Spool Pin 4. Spool Holder (Large) 9. Spool Net Set of Needles 6. Standard accessories 1. Screwdriver 5.
Spool Holder (Small) 10. Power Supply Cord 14. Lint Brush 3. Spool Pin Felt 7. Spool Stand 8. Hoop B (with Template) 15. Screwdriver 12. Scissors 11. Hoop A (with Template) 16. Instruction Book 13. Bobbins Embroidery Computer Overview 5 2. Extra Spool Pin 4. Spool Holder (Large) 9. Spool Net Set of Needles 6. Standard accessories 1. Screwdriver 5.
User Guide
Page 7
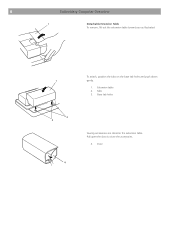
Base tab holes 2 3 4 Sewing accessories are stored in the extension table. Door Tabs 3. Pull open the door to store the accessories. 4. To attach, position the tabs on the base tab holes and push down 1 gently. 1. 6 Embroidery Computer Overview 1 Detachable Extension Table To remove, lift out the extension table toward you as illustrated. Extension table 2.
Base tab holes 2 3 4 Sewing accessories are stored in the extension table. Door Tabs 3. Pull open the door to store the accessories. 4. To attach, position the tabs on the base tab holes and push down 1 gently. 1. 6 Embroidery Computer Overview 1 Detachable Extension Table To remove, lift out the extension table toward you as illustrated. Extension table 2.
User Guide
Page 8
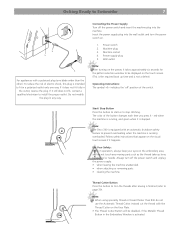
.... Machine plug 3. Wall outlet Note: After turning on the touch screen. (This is equipped with an automatic shutdown safety feature to stop stitching. Note: The Deco 340 is the required boot up lever, handwheel or needle. Note: • When using speciality thread or thread thicker than the other): To reduce the risk...
.... Machine plug 3. Wall outlet Note: After turning on the touch screen. (This is equipped with an automatic shutdown safety feature to stop stitching. Note: The Deco 340 is the required boot up lever, handwheel or needle. Note: • When using speciality thread or thread thicker than the other): To reduce the risk...
User Guide
Page 9
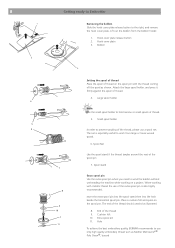
... thread. 4. Spool stand Extra spool pin Use the extra spool pin when you need to use a spool net. Hole To achieve the best embroidery quality, BERNINA recommends to wind the bobbin without unthreading the machine while working with the thread coming off the spool as illustrated. 8. When working on a project. Hook...
... thread. 4. Spool stand Extra spool pin Use the extra spool pin when you need to use a spool net. Hole To achieve the best embroidery quality, BERNINA recommends to wind the bobbin without unthreading the machine while working with the thread coming off the spool as illustrated. 8. When working on a project. Hook...
User Guide
Page 10
... the bobbin is fully wound it will stop the machine then return the bobbin winder spindle to the left. To achieve the best embroidery quality, BERNINA recommends to the right. Press the Start/Stop button again. Put the bobbin on the bobbin winder spindle. 2 Bobbin winder spindle Push the spindle to...
... the bobbin is fully wound it will stop the machine then return the bobbin winder spindle to the left. To achieve the best embroidery quality, BERNINA recommends to the right. Press the Start/Stop button again. Put the bobbin on the bobbin winder spindle. 2 Bobbin winder spindle Push the spindle to...
User Guide
Page 11
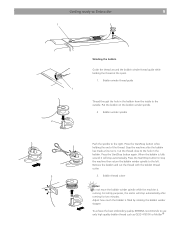
Thread 2. Bobbin holder 2 Guide the thread into side notch. 4. Hook cover plate 7. Threading chart 6 Draw the thread to Embroider Inserting the bobbin Place the bobbin in the bobbin holder with the thread unwinding counter-clockwise. 1. Front notch 3 Continue to draw the thread lightly until the thread slips into front notch on the hook cover plate to the rear. Bobbin thread 5 6. 10 1 4 Getting ready to the left, sliding it between tension spring blades. 3. Refer to the threading chart shown on the front of thread to check the threading Re-attach the hook cover ...
Thread 2. Bobbin holder 2 Guide the thread into side notch. 4. Hook cover plate 7. Threading chart 6 Draw the thread to Embroider Inserting the bobbin Place the bobbin in the bobbin holder with the thread unwinding counter-clockwise. 1. Front notch 3 Continue to draw the thread lightly until the thread slips into front notch on the hook cover plate to the rear. Bobbin thread 5 6. 10 1 4 Getting ready to the left, sliding it between tension spring blades. 3. Refer to the threading chart shown on the front of thread to check the threading Re-attach the hook cover ...
User Guide
Page 12
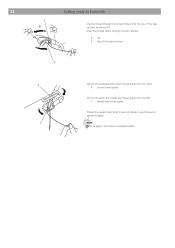
The presser foot can be raised about 6 mm (1/4") higher than the normal up lever (C). 3. Turn the handwheel counterclockwise to bring the needle to Embroider 11 Raising the Presser Foot The presser foot lifter raises and lowers the presser foot. Then draw the thread down through the right channel of the thread guide plate and up to place the embroidery hoop under the thread guide plate (A). Getting ready to its highest position. 1. Thread guide plate This will help you to the thread take-up position. Presser foot lifter 2 A B 3 C Hold the thread with both hands and pass ...
The presser foot can be raised about 6 mm (1/4") higher than the normal up lever (C). 3. Turn the handwheel counterclockwise to bring the needle to Embroider 11 Raising the Presser Foot The presser foot lifter raises and lowers the presser foot. Then draw the thread down through the right channel of the thread guide plate and up to place the embroidery hoop under the thread guide plate (A). Getting ready to its highest position. 1. Thread guide plate This will help you to the thread take-up position. Presser foot lifter 2 A B 3 C Hold the thread with both hands and pass ...
User Guide
Page 13
Draw the thread down through the slit and down into the eye of the take-up lever 4 6 Slip the thread behind the lower thread guide from the right. 6 Lower thread guide Slip the thread in the needle bar thread guide from front to back by hand or use the built-in needle threader. 7 Note: Refer to Embroider 5 D Slip the thread through the left . 7 Needle bar thread guide Thread the needle from the left channel. 4 Slit 5 Eye of the takeup lever as shown (D). 12 Getting ready to page 13 for built-in needle threader.
Draw the thread down through the slit and down into the eye of the take-up lever 4 6 Slip the thread behind the lower thread guide from the right. 6 Lower thread guide Slip the thread in the needle bar thread guide from front to back by hand or use the built-in needle threader. 7 Note: Refer to Embroider 5 D Slip the thread through the left . 7 Needle bar thread guide Thread the needle from the left channel. 4 Slit 5 Eye of the takeup lever as shown (D). 12 Getting ready to page 13 for built-in needle threader.
User Guide
Page 14
Hook Note: 1 Avoid applying sideways force to Embroider 13 Needle Threader Lower the presser foot. Remove the loop from the threader and pull out the thread end from behind. 1. Needle threader lever 2. Thread guide 2 3 Release the threader lever slowly while holding the thread end with your fingers. Press the needle threader lever down as far as this could cause malfunction of the thread is pulled up through the needle eye from the needle eye. The hook comes out through the needle eye. Getting ready to the needle threader lever as it will go. A loop of the ...
Hook Note: 1 Avoid applying sideways force to Embroider 13 Needle Threader Lower the presser foot. Remove the loop from the threader and pull out the thread end from behind. 1. Needle threader lever 2. Thread guide 2 3 Release the threader lever slowly while holding the thread end with your fingers. Press the needle threader lever down as far as this could cause malfunction of the thread is pulled up through the needle eye from the needle eye. The hook comes out through the needle eye. Getting ready to the needle threader lever as it will go. A loop of the ...

User Guide
Page 15
Loop of the bobbin thread Pass the needle thread through the hole in the embroidery foot and draw it up to the thread holder leaving an inch of the bobbin thread. 2. Draw the needle thread to Embroider Drawing up the Bobbin Thread Raise the presser foot lifter. Hole 4. Thread holder 3 4 Needle thread 1 2 Turn the handwheel one complete turn toward you. Hold the needle thread with your finger. 1. 14 1 Getting Ready to bring up a loop of free thread. 3.
Loop of the bobbin thread Pass the needle thread through the hole in the embroidery foot and draw it up to the thread holder leaving an inch of the bobbin thread. 2. Draw the needle thread to Embroider Drawing up the Bobbin Thread Raise the presser foot lifter. Hole 4. Thread holder 3 4 Needle thread 1 2 Turn the handwheel one complete turn toward you. Hold the needle thread with your finger. 1. 14 1 Getting Ready to bring up a loop of free thread. 3.
User Guide
Page 16
For most applications this adjustment will give suitable upper thread tension. Adjust the upper thread tension according to Embroider 15 Thread Tension Adjust the thread tension of the upper thread with the thread tension dial (9. Bobbin thread 5 If the needle tension is «4». The initial position for every project. on , it might be required to embroider first a sample for the thread tension dial is too loose: The needle thread forms loops and the stitches look loose. Depending on the material and the thickness of the embroidery thread, as well as of the fabric. ...
For most applications this adjustment will give suitable upper thread tension. Adjust the upper thread tension according to Embroider 15 Thread Tension Adjust the thread tension of the upper thread with the thread tension dial (9. Bobbin thread 5 If the needle tension is «4». The initial position for every project. on , it might be required to embroider first a sample for the thread tension dial is too loose: The needle thread forms loops and the stitches look loose. Depending on the material and the thickness of the embroidery thread, as well as of the fabric. ...
User Guide
Page 17
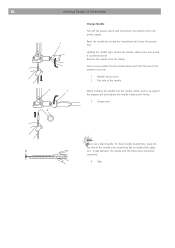
Raise the needle by turning it up against the stopper pin and tighten the needle clamp screw firmly. 3. Flat side of the needle to Embroider 1 3 1 2 Change Needle Turn off the power switch and disconnect the machine from the clamp. A gap between the needle and the flat surface should be consistent. 4. Insert a new needle into the needle clamp with the flat side of the needle When inserting the needle into the needle clamp, push it counterclockwise. To check needle straightness, place the flat side of the needle onto something flat (a needle plate, glass 4 etc.). 16 ...
Raise the needle by turning it up against the stopper pin and tighten the needle clamp screw firmly. 3. Flat side of the needle to Embroider 1 3 1 2 Change Needle Turn off the power switch and disconnect the machine from the clamp. A gap between the needle and the flat surface should be consistent. 4. Insert a new needle into the needle clamp with the flat side of the needle When inserting the needle into the needle clamp, push it counterclockwise. To check needle straightness, place the flat side of the needle onto something flat (a needle plate, glass 4 etc.). 16 ...
User Guide
Page 18
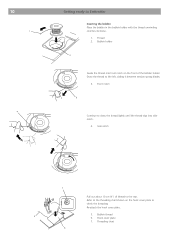
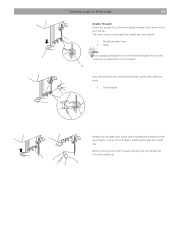
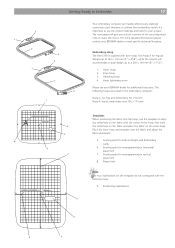
... Place the inner hoop and template over the fabric and adjust the fabric placement. 5. Positioning indentations 8 6 5 Embroidery Hoop The Deco 340 is important to make this choice. The following hoops are preset in horizontal placement 7. Starting point for built-in vertical placement 8. ...110 mm (5" x 43/8"), while the hoop B will give you a short overview of the hoop. Hoop tightening screw Please see your BERNINA dealer or read specific technical literature. First mark the centerlines on the fabric and place the fabric on the fabric with the center of the...
... Place the inner hoop and template over the fabric and adjust the fabric placement. 5. Positioning indentations 8 6 5 Embroidery Hoop The Deco 340 is important to make this choice. The following hoops are preset in horizontal placement 7. Starting point for built-in vertical placement 8. ...110 mm (5" x 43/8"), while the hoop B will give you a short overview of the hoop. Hoop tightening screw Please see your BERNINA dealer or read specific technical literature. First mark the centerlines on the fabric and place the fabric on the fabric with the center of the...
User Guide
Page 19
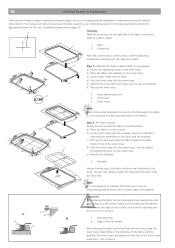
... when hooping fabric: the act of the fabric. e) Remove the template. 6 Template Having finished step 2 the fabric should be flush with the fabric onto the Deco 340. You are embroidering several pieces with the same fabric and stabilizer. 7 8 4 5 Important: When placing the fabric on the embroidery hoop, always place the outer hoop...
... when hooping fabric: the act of the fabric. e) Remove the template. 6 Template Having finished step 2 the fabric should be flush with the fabric onto the Deco 340. You are embroidering several pieces with the same fabric and stabilizer. 7 8 4 5 Important: When placing the fabric on the embroidery hoop, always place the outer hoop...
User Guide
Page 20
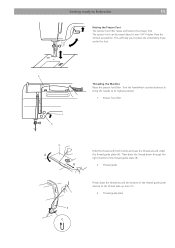
Caution: • Always provide sufficient clearance for the embroidery carriage behind your machine before starting the machine. • Do not force to move the carriage by hand. • Return the carriage to the Machine Turn the attaching knob so it is parallel with the hoop, and set it on page 25. Attaching knob 2. Carriage holes 3. Use the keys Utility and Return Carriage as described on the carriage. 1. Pins 1 Turn the attaching knob clockwise. Getting Ready to Embroider 19 1 3 2 Attaching the Embroidery Hoop to the idle position before turning the power off.
Caution: • Always provide sufficient clearance for the embroidery carriage behind your machine before starting the machine. • Do not force to move the carriage by hand. • Return the carriage to the Machine Turn the attaching knob so it is parallel with the hoop, and set it on page 25. Attaching knob 2. Carriage holes 3. Use the keys Utility and Return Carriage as described on the carriage. 1. Pins 1 Turn the attaching knob clockwise. Getting Ready to Embroider 19 1 3 2 Attaching the Embroidery Hoop to the idle position before turning the power off.

User Guide
Page 21
scissors) to score the paper and remove it to prevent shifting. g. pockets on each other and press together Application: On stretchable fabrics and knits to prevent distortion. adhesive surface • position the piece of fabric to be embroidered on the stabilizer Application: Intended for delicate fabrics such as jersey or silk, or hard to hoop fabrics such as velvets For pieces, sections and materials that can not be hooped Note: When using paper backed adhesive stabilizer make sure that easily crush or otherwise be marked by soaking in warm water • this is pressed (fused) ...
scissors) to score the paper and remove it to prevent shifting. g. pockets on each other and press together Application: On stretchable fabrics and knits to prevent distortion. adhesive surface • position the piece of fabric to be embroidered on the stabilizer Application: Intended for delicate fabrics such as jersey or silk, or hard to hoop fabrics such as velvets For pieces, sections and materials that can not be hooped Note: When using paper backed adhesive stabilizer make sure that easily crush or otherwise be marked by soaking in warm water • this is pressed (fused) ...