

Instruction Manual
Page 1
my my world bernette Instruction Manual 502020.75.28_021H2D0101_1010_IM_bernette 20 25_EN
my my world bernette Instruction Manual 502020.75.28_021H2D0101_1010_IM_bernette 20 25_EN

Instruction Manual
Page 2
DANGER To reduce the risk of burns, fire, electric shock, or injury to the off ("O") when making any opening. 14. Use only attachments recommended by a person responsible for its intended use as contained in this manual. Always use of the appliance by the manufacturer as described in the instruction manual (pull power plug). 13. Never drop or insert any object into water. Always unplug this appliance from the electric outlet immediately after using this appliance only for their safety. 2. Use this sewing machine. The wrong plate can cause the needle to ...
DANGER To reduce the risk of burns, fire, electric shock, or injury to the off ("O") when making any opening. 14. Use only attachments recommended by a person responsible for its intended use as contained in this manual. Always use of the appliance by the manufacturer as described in the instruction manual (pull power plug). 13. Never drop or insert any object into water. Always unplug this appliance from the electric outlet immediately after using this appliance only for their safety. 2. Use this sewing machine. The wrong plate can cause the needle to ...

Instruction Manual
Page 3
ENVIRONMENTAL PROTECTION BERNINA is provided on the product. Do not dispose of grounding. If electrical appliances are provided instead of electrical appliances as unsorted municipal waste, use only. ...
ENVIRONMENTAL PROTECTION BERNINA is provided on the product. Do not dispose of grounding. If electrical appliances are provided instead of electrical appliances as unsorted municipal waste, use only. ...

Instruction Manual
Page 4
Signs of wear and tear owing to intensive or commercial use only. All rights reserved For technical and product improvement reasons, the sewing computer's features, parts and accessory are not covered automatically, even if they occur within the warranty period. The decision on how to deal with the local authorised servicing staff. The accessory included can differ from country to country. 502020.75.28_021H2D0101_1010_IM_bernette 20 25_EN If used intensively or commercially, regular cleaning and especially attentive care is intended for household use are subject to unannounced ...
Signs of wear and tear owing to intensive or commercial use only. All rights reserved For technical and product improvement reasons, the sewing computer's features, parts and accessory are not covered automatically, even if they occur within the warranty period. The decision on how to deal with the local authorised servicing staff. The accessory included can differ from country to country. 502020.75.28_021H2D0101_1010_IM_bernette 20 25_EN If used intensively or commercially, regular cleaning and especially attentive care is intended for household use are subject to unannounced ...
Instruction Manual
Page 5
... 20 Needle, Fabric, Thread Selection Guide 20 Presser Foot Application Chart-model 20 21 Presser Foot Application Chart-model 25 22 Display Explanation 23 Information on the LED Display 23 Operating Instructions 26 Buttons Explanation 26 Function Buttons 27 Stitches... Foot 60 Special Functions 61 Mirror Stitch Pattern - model 25 61 Twin Needle Sewing - model 25 62 Memory - 4 Contents Safety Instructions 1 Contents 4 Machine Overview 5 Detail of the Machine 5 Accessories - model 25 64 Warning Functions 75 Maintenance 76 Cleaning 76 Replacing the LED...
... 20 Needle, Fabric, Thread Selection Guide 20 Presser Foot Application Chart-model 20 21 Presser Foot Application Chart-model 25 22 Display Explanation 23 Information on the LED Display 23 Operating Instructions 26 Buttons Explanation 26 Function Buttons 27 Stitches... Foot 60 Special Functions 61 Mirror Stitch Pattern - model 25 61 Twin Needle Sewing - model 25 62 Memory - 4 Contents Safety Instructions 1 Contents 4 Machine Overview 5 Detail of the Machine 5 Accessories - model 25 64 Warning Functions 75 Maintenance 76 Cleaning 76 Replacing the LED...
Instruction Manual
Page 6
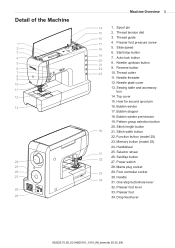
...down button 21 22 9. Pattern group selection button 20. Handwheel 31 25. Mains plug socket 33 29. Detail of the Machine 1 2 3 4 5 6 7 8 9 10 11 12 13 24 25 26 27 28 29 Machine Overview 5 14 1. Memory button (model 25) 24. Selector wheel 26. Thread tension dial 16 3. Slide speed... 16. Bobbin winder 17. Bobbin stopper 18. Bobbin winder pre-tension 19. Stitch width button 22. Function button (model 25) 23. Set/disp button 32 27. Power switch 28. Foot controller socket 30. One step buttonhole lever 32. Presser foot lever 33.
...down button 21 22 9. Pattern group selection button 20. Handwheel 31 25. Mains plug socket 33 29. Detail of the Machine 1 2 3 4 5 6 7 8 9 10 11 12 13 24 25 26 27 28 29 Machine Overview 5 14 1. Memory button (model 25) 24. Selector wheel 26. Thread tension dial 16 3. Slide speed... 16. Bobbin winder 17. Bobbin stopper 18. Bobbin winder pre-tension 19. Stitch width button 22. Function button (model 25) 23. Set/disp button 32 27. Power switch 28. Foot controller socket 30. One step buttonhole lever 32. Presser foot lever 33.

Instruction Manual
Page 7
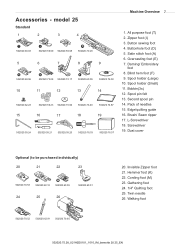
Spool holder (Large) 8. Pack of needles 13. Darning/ Embroidery foot 20. Gathering foot 24. 1/4" Quilting foot 25. Button sewing foot 3. Buttonhole foot (D) 4. Overcasting foot (E) 6. Spool holder (Small) 9. Bobbin(3x) 10. Edge/quilting guide 14. Brush/ Seam ripper 15. Hemmer foot (K) 22. Blind ...hem foot (F) 7. Spool pin felt 11. Zipper foot (I 502020.59.99 502020.72.17 502020.70.53 K 502020.60.10 M 502020.60.05 23 24 25 26 502020.60.01 502020.70.52 502020.62.91 502020.70.65 18. Cording foot (M) 23. Satin stitch foot (A) 5. Dust cover 502020.59.21...
Spool holder (Large) 8. Pack of needles 13. Darning/ Embroidery foot 20. Gathering foot 24. 1/4" Quilting foot 25. Button sewing foot 3. Buttonhole foot (D) 4. Overcasting foot (E) 6. Spool holder (Small) 9. Bobbin(3x) 10. Edge/quilting guide 14. Brush/ Seam ripper 15. Hemmer foot (K) 22. Blind ...hem foot (F) 7. Spool pin felt 11. Zipper foot (I 502020.59.99 502020.72.17 502020.70.53 K 502020.60.10 M 502020.60.05 23 24 25 26 502020.60.01 502020.70.52 502020.62.91 502020.70.65 18. Cording foot (M) 23. Satin stitch foot (A) 5. Dust cover 502020.59.21...
Instruction Manual
Page 8
... pin felt 13. Screwdriver 19. Walking foot 502020.75.28_021H2D0101_1010_IM_bernette 20 25_EN Buttonhole foot (D) 5. Cording foot (M) 23. model 25 Standard 1 2 3 4 T 502020.69.03 I ) 3. Second spool pin 14. Gathering foot 24. 1/4" Quilting foot 25. Bobbin(3x) 12. All purpose foot (T) 2. Invisible Zipper foot 21. Twin needle 26. Dust cover Optional (to be purchased...
... pin felt 13. Screwdriver 19. Walking foot 502020.75.28_021H2D0101_1010_IM_bernette 20 25_EN Buttonhole foot (D) 5. Cording foot (M) 23. model 25 Standard 1 2 3 4 T 502020.69.03 I ) 3. Second spool pin 14. Gathering foot 24. 1/4" Quilting foot 25. Bobbin(3x) 12. All purpose foot (T) 2. Invisible Zipper foot 21. Twin needle 26. Dust cover Optional (to be purchased...

Instruction Manual
Page 9
... on "O". Caution: Always make sure that the machine is unplugged from power source and the main switch is conforming with sewing machine model 20 and 25. 502020.75.28_021H2D0101_1010_IM_bernette 20 25_EN If it still does not fit, contact a qualified electrician to stop the sewing machine. Connect the power line plug to...
... on "O". Caution: Always make sure that the machine is unplugged from power source and the main switch is conforming with sewing machine model 20 and 25. 502020.75.28_021H2D0101_1010_IM_bernette 20 25_EN If it still does not fit, contact a qualified electrician to stop the sewing machine. Connect the power line plug to...
Instruction Manual
Page 10
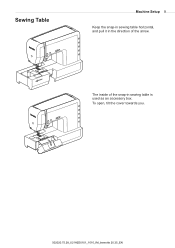
Sewing Table Machine Setup 9 Keep the snap-in sewing table horizontal, and pull it in the direction of the snap-in sewing table is used as an accessory box. The inside of the arrow. To open, tilt the cover towards you. 502020.75.28_021H2D0101_1010_IM_bernette 20 25_EN
Sewing Table Machine Setup 9 Keep the snap-in sewing table horizontal, and pull it in the direction of the snap-in sewing table is used as an accessory box. The inside of the arrow. To open, tilt the cover towards you. 502020.75.28_021H2D0101_1010_IM_bernette 20 25_EN

Instruction Manual
Page 11
Push the bobbin to the spool or use the small spool holder. 2. Wind the thread clockwise around the bobbin winder tension discs. 4. Place the thread end through one of thread, place spool holder with the small side next to right. 502020.75.28_021H2D0101_1010_IM_bernette 20 25_EN For smaller spools of the inner holes in the bobbin as illustrated and place empty bobbin on the spindle. 5. Snap the thread into the upper thread guide . 3. Place the thread and spool holder onto the spool pin. 10 Machine Setup Winding the Bobbin 2 1 43 1.
Push the bobbin to the spool or use the small spool holder. 2. Wind the thread clockwise around the bobbin winder tension discs. 4. Place the thread end through one of thread, place spool holder with the small side next to right. 502020.75.28_021H2D0101_1010_IM_bernette 20 25_EN For smaller spools of the inner holes in the bobbin as illustrated and place empty bobbin on the spindle. 5. Snap the thread into the upper thread guide . 3. Place the thread and spool holder onto the spool pin. 10 Machine Setup Winding the Bobbin 2 1 43 1.
Instruction Manual
Page 12
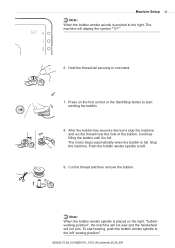
Hold the thread tail securely in one hand. 7. After the bobbin has wound a few turns stop the machine and cut the thread near the hole of the bobbin. Continue filling the bobbin until it is full. Push the bobbin winder spindle to left "sewing position". 502020.75.28_021H2D0101_1010_IM_bernette 20 25_EN Stop the machine. To start winding the bobbin. 8. The motor stops automatically when the bobbin is full. Press on the right, "bobbin winding position", the machine will not sew and the handwheel will display the symbol " " 6. Cut the thread and then remove the bobbin. Note:...
Hold the thread tail securely in one hand. 7. After the bobbin has wound a few turns stop the machine and cut the thread near the hole of the bobbin. Continue filling the bobbin until it is full. Push the bobbin winder spindle to left "sewing position". 502020.75.28_021H2D0101_1010_IM_bernette 20 25_EN Stop the machine. To start winding the bobbin. 8. The motor stops automatically when the bobbin is full. Press on the right, "bobbin winding position", the machine will not sew and the handwheel will display the symbol " " 6. Cut the thread and then remove the bobbin. Note:...

Instruction Manual
Page 13
The thread take-up lever must feel a resistance in can cause damages to the back. 502020.75.28_021H2D0101_1010_IM_bernette 20 25_EN To open the bobbin cover, slide it to the machine! Turn power switch to (C). Inserting the bobbin in the highest position when threading. - As a check you . Pull the thread along the arrow marking through the slit under the finger (A) as far as the pulley (B). Pull the thread at point (C). A wrong threading in the thread feed. 12 Machine Setup Inserting the Bobbin Attention: - To make sure that the thread is pulled into the stitch plate ...
The thread take-up lever must feel a resistance in can cause damages to the back. 502020.75.28_021H2D0101_1010_IM_bernette 20 25_EN To open the bobbin cover, slide it to the machine! Turn power switch to (C). Inserting the bobbin in the highest position when threading. - As a check you . Pull the thread along the arrow marking through the slit under the finger (A) as far as the pulley (B). Pull the thread at point (C). A wrong threading in the thread feed. 12 Machine Setup Inserting the Bobbin Attention: - To make sure that the thread is pulled into the stitch plate ...
Instruction Manual
Page 14
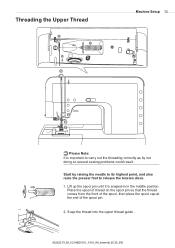
Snap the thread into the upper thread guide . 502020.75.28_021H2D0101_1010_IM_bernette 20 25_EN Lift up the spool pin until it is important to release the tension discs. 1. Place the spool of thread on the spool pin so that the thread comes from the front of the spool, then place the spool cap at the end of the spool pin. 2. Threading the Upper Thread 2 1 3 3 5 Machine Setup 13 4 6 7 Please Note: It is snaped-in in the middle position. Start by raising the needle to its highest point, and also raise the presser foot to carry out the threading correctly as by not doing so several ...
Snap the thread into the upper thread guide . 502020.75.28_021H2D0101_1010_IM_bernette 20 25_EN Lift up the spool pin until it is important to release the tension discs. 1. Place the spool of thread on the spool pin so that the thread comes from the front of the spool, then place the spool cap at the end of the spool pin. 2. Threading the Upper Thread 2 1 3 3 5 Machine Setup 13 4 6 7 Please Note: It is snaped-in in the middle position. Start by raising the needle to its highest point, and also raise the presser foot to carry out the threading correctly as by not doing so several ...

Instruction Manual
Page 15
This operation pulls the thread into the thread tension. 4. Guide the thread through the slotted eye of the take up lever and then downwards again. 6. Then further down . Pull the end of the thread through the needle from right to rear, and pull out about 10 cm of the take -up lever cover. 5. At the top of this movement, pass the thread from front to the left through the wire loop. 7. Use the face plate thread cutter to next page for instruction). 502020.75.28_021H2D0101_1010_IM_bernette 20 25_EN Pull the thread forward and down and around the bottom part of thread. 14 ...
This operation pulls the thread into the thread tension. 4. Guide the thread through the slotted eye of the take up lever and then downwards again. 6. Then further down . Pull the end of the thread through the needle from right to rear, and pull out about 10 cm of the take -up lever cover. 5. At the top of this movement, pass the thread from front to the left through the wire loop. 7. Use the face plate thread cutter to next page for instruction). 502020.75.28_021H2D0101_1010_IM_bernette 20 25_EN Pull the thread forward and down and around the bottom part of thread. 14 ...

Instruction Manual
Page 16
Pull the thread to the right, guiding it to its highest position and lower the presser foot. Pull the thread through the needle eye forming a loop. Needle Threader Machine Setup 15 Raise the needle to the front of the needle Hold the thread loosely and release the lever slowly. Lower the needle threader lever slowly and draw the thread through the needle eye. Attention: Turn power switch to the right. The hook will turn and pass the thread through the needle eye. 502020.75.28_021H2D0101_1010_IM_bernette 20 25_EN The needle threader automatically turns to the threading ...
Pull the thread to the right, guiding it to its highest position and lower the presser foot. Pull the thread through the needle eye forming a loop. Needle Threader Machine Setup 15 Raise the needle to the front of the needle Hold the thread loosely and release the lever slowly. Lower the needle threader lever slowly and draw the thread through the needle eye. Attention: Turn power switch to the right. The hook will turn and pass the thread through the needle eye. 502020.75.28_021H2D0101_1010_IM_bernette 20 25_EN The needle threader automatically turns to the threading ...

Instruction Manual
Page 17
A. Problems can occur with: - Cut the thread after inserting the new needle. The flat side of the shaft should be in perfect condition. Insert the needle as far up as it is showing signs of the face cover and cut at the proper length to start the next seam. 502020.75.28_021H2D0101_1010_IM_bernette 20 25_EN Loosen the needle clamp screw and tighten again after threading the needle 2. To cut the thread after finishing a seam. Change the needle regularly, especially if it will go. B. Bent needles - Damaged points Thread Cutter The thread cutter serves two purposes...
A. Problems can occur with: - Cut the thread after inserting the new needle. The flat side of the shaft should be in perfect condition. Insert the needle as far up as it is showing signs of the face cover and cut at the proper length to start the next seam. 502020.75.28_021H2D0101_1010_IM_bernette 20 25_EN Loosen the needle clamp screw and tighten again after threading the needle 2. To cut the thread after finishing a seam. Change the needle regularly, especially if it will go. B. Bent needles - Damaged points Thread Cutter The thread cutter serves two purposes...
Instruction Manual
Page 18
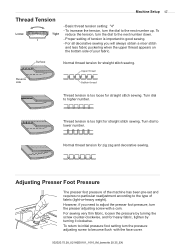
Machine Setup 17 Thread Tension Loose Tight - Proper setting of fabric (light-or-heavy weight). However, if you will always obtain a nicer stitch and less fabric puckering when the upper thread appears on the bottom side of your fabric. For sewing very thin fabric, loosen the pressure by turning it clockwise. To increase the tension, turn the dial to the type of tension is too tight for straight stitch sewing. Turn dial to lower number. Normal thread tension for heavy fabric, tighten by turning the screw counter-clockwise, and for zig zag and decorative sewing. Upper ...
Machine Setup 17 Thread Tension Loose Tight - Proper setting of fabric (light-or-heavy weight). However, if you will always obtain a nicer stitch and less fabric puckering when the upper thread appears on the bottom side of your fabric. For sewing very thin fabric, loosen the pressure by turning it clockwise. To increase the tension, turn the dial to the type of tension is too tight for straight stitch sewing. Turn dial to lower number. Normal thread tension for heavy fabric, tighten by turning the screw counter-clockwise, and for zig zag and decorative sewing. Upper ...

Instruction Manual
Page 19
Press the black lever (e). a Attaching the presser foot holder Raise the presser foot bar (a). 18 Machine Setup Changing the Presser Foot Attention: Turn power switch to need for hems, pleats, etc. 502020.75.28_021H2D0101_1010_IM_bernette 20 25_EN Lower the presser foot holder (b) and the presser foot (f) will disengages. d Removing the presser foot Raise the presser foot. Attach the presser foot holder (b) as illustrated. b e c d f Attaching the presser foot Lower the presser foot holder (b) until the cut-out (c) is directly above the pin (d). Adjust according to ...
Press the black lever (e). a Attaching the presser foot holder Raise the presser foot bar (a). 18 Machine Setup Changing the Presser Foot Attention: Turn power switch to need for hems, pleats, etc. 502020.75.28_021H2D0101_1010_IM_bernette 20 25_EN Lower the presser foot holder (b) and the presser foot (f) will disengages. d Removing the presser foot Raise the presser foot. Attach the presser foot holder (b) as illustrated. b e c d f Attaching the presser foot Lower the presser foot holder (b) until the cut-out (c) is directly above the pin (d). Adjust according to ...
Instruction Manual
Page 20
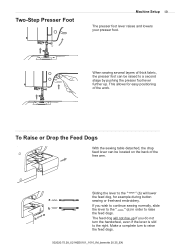
The feed dog will lower the feed dog, for easy positioning of the work. If you do not turn to raise the feed dogs. This allows for example during button sewing or freehand embroidery. Two-Step Presser Foot Machine Setup 19 The presser foot lever raises and lowers your presser foot. To Raise or Drop the Feed Dogs With the sewing table detached, the drop feed lever can be located on the back of thick fabric, the presser foot can be raised to a second stage by pushing the presser foot lever further up if you wish to continue sewing normally, slide the lever to the " " (a) ...
The feed dog will lower the feed dog, for easy positioning of the work. If you do not turn to raise the feed dogs. This allows for example during button sewing or freehand embroidery. Two-Step Presser Foot Machine Setup 19 The presser foot lever raises and lowers your presser foot. To Raise or Drop the Feed Dogs With the sewing table detached, the drop feed lever can be located on the back of thick fabric, the presser foot can be raised to a second stage by pushing the presser foot lever further up if you wish to continue sewing normally, slide the lever to the " " (a) ...