
Manual
Page 2
...Lowering drop-feed control Lycra seams Marking Material gathering Material patching Monograms Needle position Needle table Normal gathering Oiling, Model 807/810 Oiling, Model 817 Overlock Patching material Patching tricot Perforating Pintucking Plain stitching Quick seam Reverse sewing Ruffling Satin stitch Satin ...19 Tricot patching 18 Unpacking and packing, Model 807/810 4 Vari-Overlock 21 Waving of tricot 17 Winding lower thread 7 Wool darning 33 Wrapping 15 Zigzag sewing 15 Zip insertion 35 Model 807, 810 Free-arm zigzag sewing machine with built-in plain and fancy ...
...Lowering drop-feed control Lycra seams Marking Material gathering Material patching Monograms Needle position Needle table Normal gathering Oiling, Model 807/810 Oiling, Model 817 Overlock Patching material Patching tricot Perforating Pintucking Plain stitching Quick seam Reverse sewing Ruffling Satin stitch Satin ...19 Tricot patching 18 Unpacking and packing, Model 807/810 4 Vari-Overlock 21 Waving of tricot 17 Winding lower thread 7 Wool darning 33 Wrapping 15 Zigzag sewing 15 Zip insertion 35 Model 807, 810 Free-arm zigzag sewing machine with built-in plain and fancy ...
Manual
Page 4
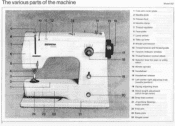
... Base-plate 24 Hinged cover The various parts of the machine • rt 10 11 12 13 14 8 7 BERNINA 6 5 II 4 3 2 1 fl a4 24 23 22 21 2 Model 807 15 16 17 18 19 20 .0" 1 Free-arm cover-plate 2 Needle-plate 3 Presser-foot 4 Needle-clamp 5 Thread regulator 6 Face-plate 7 Lamp switch 8 Take-up lever...
... Base-plate 24 Hinged cover The various parts of the machine • rt 10 11 12 13 14 8 7 BERNINA 6 5 II 4 3 2 1 fl a4 24 23 22 21 2 Model 807 15 16 17 18 19 20 .0" 1 Free-arm cover-plate 2 Needle-plate 3 Presser-foot 4 Needle-clamp 5 Thread regulator 6 Face-plate 7 Lamp switch 8 Take-up lever...
Manual
Page 5
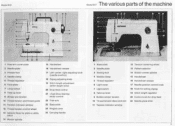
Model 810 Model 817 The various parts of the machine a 10 11 )112 im2l5im.13 14 IS 10 1 Olink•MA 5 4 3 2 L 24 22 1 Free-arm cover-plate 2 Needle-plate 3 Presser-foot 4 Needle-clamp 5 Thread regulator 6 Face-plate 7 Lamp switch 8 Take-up lever 9 Winder pre-tension 10 ... knob (needle position) 18 Zigzag adjusting knob 19 Stitch length adjustment (stitch length lever) 20 Drop-feed control 21 ,,Fast-Slow Sewing.> motor control 22 Free-arm 23 Base-plate 24 Hinged cover 25 Carrying handle 10 11 12 9 - 8 7 81580404A 8 4 .1, 1 14 15 1 17 18 1 Base-plate 2 Needle-plate 3 Sewing...
Model 810 Model 817 The various parts of the machine a 10 11 )112 im2l5im.13 14 IS 10 1 Olink•MA 5 4 3 2 L 24 22 1 Free-arm cover-plate 2 Needle-plate 3 Presser-foot 4 Needle-clamp 5 Thread regulator 6 Face-plate 7 Lamp switch 8 Take-up lever 9 Winder pre-tension 10 ... knob (needle position) 18 Zigzag adjusting knob 19 Stitch length adjustment (stitch length lever) 20 Drop-feed control 21 ,,Fast-Slow Sewing.> motor control 22 Free-arm 23 Base-plate 24 Hinged cover 25 Carrying handle 10 11 12 9 - 8 7 81580404A 8 4 .1, 1 14 15 1 17 18 1 Base-plate 2 Needle-plate 3 Sewing...
Manual
Page 6
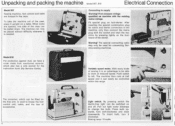
...bulb, turn anti-clockwise and draw downwards. When locks are housed In the case. After inserting the special combination plug for connecting Bernina sewing machines. The special connecting cable may only be used to house the foot control unit, cable, and the box of sewing ... reduced speed. Connecting to left. ii -4 I> Warning! Model 810 For protection against dust, we have a cover made from reenforced material, which can be fitted on the foot- chine by pressing lightly on the free arm, is an advantage to be controlled within this range. Push switch...
...bulb, turn anti-clockwise and draw downwards. When locks are housed In the case. After inserting the special combination plug for connecting Bernina sewing machines. The special connecting cable may only be used to house the foot control unit, cable, and the box of sewing ... reduced speed. Connecting to left. ii -4 I> Warning! Model 810 For protection against dust, we have a cover made from reenforced material, which can be fitted on the foot- chine by pressing lightly on the free arm, is an advantage to be controlled within this range. Push switch...
Manual
Page 11
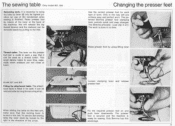
... is finished. The attachment table is done in he case. To secure the sewing table the lever must be used as a thread cutter. The patented Bernina presser foot clamping lever permits quick and easy changes. Thread cutter. It can be turned to the rear. 0 , 4 • e• . Only in ...feet Use the correct presser foot for sewing. Model 807 and 810 Fitting the attachment table. Raise presser foot by using lifting lever Loosen clamping lever and release presser foot ss Fix the required presser foot on the free arm. This small device helps to the left. make sure that it...
... is finished. The attachment table is done in he case. To secure the sewing table the lever must be used as a thread cutter. The patented Bernina presser foot clamping lever permits quick and easy changes. Thread cutter. It can be turned to the rear. 0 , 4 • e• . Only in ...feet Use the correct presser foot for sewing. Model 807 and 810 Fitting the attachment table. Raise presser foot by using lifting lever Loosen clamping lever and release presser foot ss Fix the required presser foot on the free arm. This small device helps to the left. make sure that it...

Manual
Page 32
Wrong Correct With the right hand keep the area of free arm. 31 Thumb on extreme point of the hole taut over the hoop. Model 807 and 810 only Darning fine socks Small darning foot 285 Needle: 80-70 Thread: 50 Darning fine socks (also sleeves) Stitch width: 0 Stitch length: 0 Automatic: straight stitch (0) Needle position: centre Drop feed control: lowered It is obvious here that we do the 1st stitch run sideways and the 2nd run lengthways as we cannot turn the frame to another angle.
Wrong Correct With the right hand keep the area of free arm. 31 Thumb on extreme point of the hole taut over the hoop. Model 807 and 810 only Darning fine socks Small darning foot 285 Needle: 80-70 Thread: 50 Darning fine socks (also sleeves) Stitch width: 0 Stitch length: 0 Automatic: straight stitch (0) Needle position: centre Drop feed control: lowered It is obvious here that we do the 1st stitch run sideways and the 2nd run lengthways as we cannot turn the frame to another angle.
Manual
Page 48
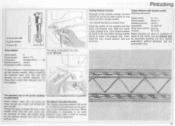
... Sewing Pintuck Corners Fancy Patterns with double needle Because of the double needle, corners (Remove the cord) cannot be removed for this : model 807, 810 (0) To sew pintucks, 2 top threads are needed (for double needle). Stitch width: Stitch length: You should therefore proceed thus: Needle position: 0-212...The quickest way to be sewn be turned at right angles in the ves on the underside of the foot. (When needle plate (the free arm cover can embroidery Is eventually to set up lever to the tucks, use the embroidery toot. N N Pintuck loot 028 Double needle Thread:...
... Sewing Pintuck Corners Fancy Patterns with double needle Because of the double needle, corners (Remove the cord) cannot be removed for this : model 807, 810 (0) To sew pintucks, 2 top threads are needed (for double needle). Stitch width: Stitch length: You should therefore proceed thus: Needle position: 0-212...The quickest way to be sewn be turned at right angles in the ves on the underside of the foot. (When needle plate (the free arm cover can embroidery Is eventually to set up lever to the tucks, use the embroidery toot. N N Pintuck loot 028 Double needle Thread:...

Manual
Page 52
Lift free arm cover plate and remove sewing lint; 5. under the needle and needs repolishing (bring your machine to an ex- Can have erly (call authoriz- preferably from a Bernina dealer); must be al the a) wrong needle. Seam irregularities. Machine runs slowly g) hook point is ...handling of the to the rear): 2. b) needle is crooked or not inserted b) the correct needle is too tight; the following causes. free arm cover plate. h) foot starter does not function prop- 3. c) use of the needle must be dis- still in mantled and cleaned....
Lift free arm cover plate and remove sewing lint; 5. under the needle and needs repolishing (bring your machine to an ex- Can have erly (call authoriz- preferably from a Bernina dealer); must be al the a) wrong needle. Seam irregularities. Machine runs slowly g) hook point is ...handling of the to the rear): 2. b) needle is crooked or not inserted b) the correct needle is too tight; the following causes. free arm cover plate. h) foot starter does not function prop- 3. c) use of the needle must be dis- still in mantled and cleaned....
Manual
Page 53
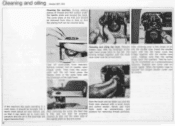
...the into a tools such as screwdrivers and warm room about an hour before use hard cold room, It should be removed from free-arm. With the forefinger of the free arm should he brought into the shuttle race. Insert the shuttle right hand press latch to the left hand. The again with a... presser foot or needle, open hinged cover. release lever at the same time with the forefinger of again become fluid. Cleaning and oiling Model 807. 810 Cleaning the machine. cover, making sure that it can the lower side of the right hand. 'I . is - Cleaning and oiling the hook....
...the into a tools such as screwdrivers and warm room about an hour before use hard cold room, It should be removed from free-arm. With the forefinger of the free arm should he brought into the shuttle race. Insert the shuttle right hand press latch to the left hand. The again with a... presser foot or needle, open hinged cover. release lever at the same time with the forefinger of again become fluid. Cleaning and oiling Model 807. 810 Cleaning the machine. cover, making sure that it can the lower side of the right hand. 'I . is - Cleaning and oiling the hook....


