
Manual
Page 9
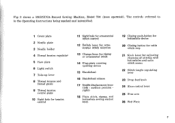
... in the Operating Instructions being marked and indentified. 1 Cover plate 2 Needle plate 3 Needle holder 4 Thread tension regulator 5 Face plate 6 Light switch 7 Take-up lever 8 Thread tension and thread guide 9 Thread tension control plate 10 Sight hole for tension control 11 Sight hole for ornamental stitch control 12 Switch lever for ornamental stitch selection 13... Stitch lenght regulating lever 23 Drop feed knob 24 Knee control lever 25 Free arm 26 Bed Plate 7 Fig. 2 shows a l3ERNINA-Record Sewing Machine, Model 730 (knee operated).
... in the Operating Instructions being marked and indentified. 1 Cover plate 2 Needle plate 3 Needle holder 4 Thread tension regulator 5 Face plate 6 Light switch 7 Take-up lever 8 Thread tension and thread guide 9 Thread tension control plate 10 Sight hole for tension control 11 Sight hole for ornamental stitch control 12 Switch lever for ornamental stitch selection 13... Stitch lenght regulating lever 23 Drop feed knob 24 Knee control lever 25 Free arm 26 Bed Plate 7 Fig. 2 shows a l3ERNINA-Record Sewing Machine, Model 730 (knee operated).
Manual
Page 11
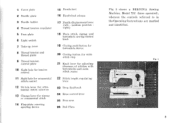
... 22 Stitch lenght regulut'tig lever 23 Drup feed knob 24 Knee control lever 25 Free arm 26 Bed _Plate Fig, 3 shows a BERNINA Sewing Machine, Model 732 (knee operated), whereon the controls referred to in the Operating Instructions are marked and identified. 26 25 Fig. ...17 Needle displacement lever (left - 1 Cover plate 2 Needle plate 3 Needle holder 4 Thread tension regulator 5 Face plate 6 Light switch 7 Take-up lever 8 Thread tension and thread guide 9 Thread tension control plate 10 Sight hole for tension control 11 Sight hole for ornamental stitch control 12 Swatch lever for orna-
... 22 Stitch lenght regulut'tig lever 23 Drup feed knob 24 Knee control lever 25 Free arm 26 Bed _Plate Fig, 3 shows a BERNINA Sewing Machine, Model 732 (knee operated), whereon the controls referred to in the Operating Instructions are marked and identified. 26 25 Fig. ...17 Needle displacement lever (left - 1 Cover plate 2 Needle plate 3 Needle holder 4 Thread tension regulator 5 Face plate 6 Light switch 7 Take-up lever 8 Thread tension and thread guide 9 Thread tension control plate 10 Sight hole for tension control 11 Sight hole for ornamental stitch control 12 Swatch lever for orna-
Manual
Page 16
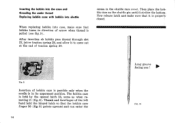
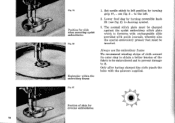
... opened latch 33, same as when removing it (fig. 6). The bobbin case is properly closed. After insertion ob bobbin pass thread through slot 27, below tension spring 28, and allow it strikes the bottom. Thumb and forefinger of bobbin case is possible only when the needle is pulled (see fig. 9). Now... on the shuttle pin until it to come out at the end of arrow when thread is in its uppermost position. recess in direction of tension spring 29. Fig. 9 Insertion of the left hand hold the hinged latch so that bobbin turns in the shuttle race cover. facing you I Fig. 10...
... opened latch 33, same as when removing it (fig. 6). The bobbin case is properly closed. After insertion ob bobbin pass thread through slot 27, below tension spring 28, and allow it strikes the bottom. Thumb and forefinger of bobbin case is possible only when the needle is pulled (see fig. 9). Now... on the shuttle pin until it to come out at the end of arrow when thread is in its uppermost position. recess in direction of tension spring 29. Fig. 9 Insertion of the left hand hold the hinged latch so that bobbin turns in the shuttle race cover. facing you I Fig. 10...
Manual
Page 18
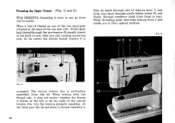
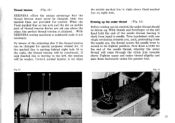
... 45 somewhat from slot 44. Place a reel of thread on one of the two spool-pins situated at the back of arm, then into the tension properly speaking. When threading make sure that take -up lever 7, and down to needle. Threading the Upper Thread (Fig. 11 and 12) With... BERNINA threading is then up again through needleeye itself from front to rear. From there lead threadthrough the pre-tension 43, equally placed at the right of the .central tension disc into slot running across top arm. In its centre the double...
... 45 somewhat from slot 44. Place a reel of thread on one of the two spool-pins situated at the back of arm, then into the tension properly speaking. When threading make sure that take -up lever 7, and down to needle. Threading the Upper Thread (Fig. 11 and 12) With... BERNINA threading is then up again through needleeye itself from front to rear. From there lead threadthrough the pre-tension 43, equally placed at the right of the .central tension disc into slot running across top arm. In its centre the double...
Manual
Page 19
...above fixed marked line on mobile part of the adjusting disc 9 the thread tension can be started, the under thread should be changed . Thread tension (Fig. 13) BERNINA offers the unique advantage that the thread tension must never be weaker. Only two marked lines are set when the mobile ...above . rig. 13 44 10 9 rig. 14 tP• el IF 17 With BERNINA sewing machines a numbered scale is set one single revolution towards you, until, protruding from hand to the right, the thread tension will come through the stitch hole towards above the other, the perfect thread...
...above fixed marked line on mobile part of the adjusting disc 9 the thread tension can be started, the under thread should be changed . Thread tension (Fig. 13) BERNINA offers the unique advantage that the thread tension must never be weaker. Only two marked lines are set when the mobile ...above . rig. 13 44 10 9 rig. 14 tP• el IF 17 With BERNINA sewing machines a numbered scale is set one single revolution towards you, until, protruding from hand to the right, the thread tension will come through the stitch hole towards above the other, the perfect thread...
Manual
Page 25
... upward and downward movement of the stitch regulator lever 22 should be limited. Set zigzag knob in tightening same it will release the upper thread tension and the working piece can be turned, respectively tightened or loosened. Slide on the wished for nomber. justed by means of the threads. If the...
... upward and downward movement of the stitch regulator lever 22 should be limited. Set zigzag knob in tightening same it will release the upper thread tension and the working piece can be turned, respectively tightened or loosened. Slide on the wished for nomber. justed by means of the threads. If the...
Manual
Page 40
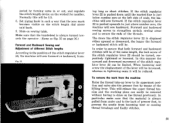
.... 46 a ti Fig. 461, The Scalopped Hem For scalloped henis use short stitch lengths and narrow stitch widths as the ordinary hemmer. Tight top thread tension and large stitch length produce the scalloped effect. but rather elongated, so that its shank, is that zigzag seams can be sewn, approximately 5/64" to...
.... 46 a ti Fig. 461, The Scalopped Hem For scalloped henis use short stitch lengths and narrow stitch widths as the ordinary hemmer. Tight top thread tension and large stitch length produce the scalloped effect. but rather elongated, so that its shank, is that zigzag seams can be sewn, approximately 5/64" to...

Manual
Page 42
... with cord inlay. It will naturally be 17 It record Fig. 51 19 \Ow 20 To get this higher bottom thread tension without changing the lower tension itself, which is correct for normal sewing, see fig. 50, a hole has been drilled through the finger of the under thread has to...buttonhole in one single working stages. This can be made either step by step; Fig i0 The threading of the under thread: An increased tension of the bobbin case through which the under thread produces still better results when sewing buttonholes automatically. after each operation, or in one working ...
... with cord inlay. It will naturally be 17 It record Fig. 51 19 \Ow 20 To get this higher bottom thread tension without changing the lower tension itself, which is correct for normal sewing, see fig. 50, a hole has been drilled through the finger of the under thread has to...buttonhole in one single working stages. This can be made either step by step; Fig i0 The threading of the under thread: An increased tension of the bobbin case through which the under thread produces still better results when sewing buttonholes automatically. after each operation, or in one working ...
Manual
Page 47
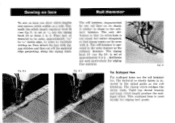
... end of the material. The raised buttonhole The buttonhole is sewn with a slack lower tension and a strong upper thread tension. Then the two thread ends are cut (see fig. 621. Fig. 63 Fig, 62 .15 The upper thread tension has to be unglazed, 6-ply no. 40 thread, whereas a very thin thread is required...
... end of the material. The raised buttonhole The buttonhole is sewn with a slack lower tension and a strong upper thread tension. Then the two thread ends are cut (see fig. 621. Fig. 63 Fig, 62 .15 The upper thread tension has to be unglazed, 6-ply no. 40 thread, whereas a very thin thread is required...
Manual
Page 58
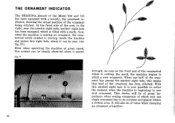
... can be of value when changing an ornament altogether. 56 THE ORNAMENT INDICATOR The BERNINA-Record of the Model 730 and 731 has been equipped with a mark. At the front side of the arm, to the right, near the tension sight hole, another sight hole has been managed, which only one half of...
... can be of value when changing an ornament altogether. 56 THE ORNAMENT INDICATOR The BERNINA-Record of the Model 730 and 731 has been equipped with a mark. At the front side of the arm, to the right, near the tension sight hole, another sight hole has been managed, which only one half of...
Manual
Page 62
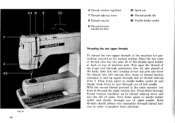
...needle. Both threads should always run separately through eye of same. Place the two reels of thread onto the two pins 35 of left tension disc, down again to needle holder eyelet 45 and finally from front to thread take-up lever and into left needle. Now down ... 7 Thread take -up lever 7. Then down to produce finer pintucks. With the second thread proceed in order to thread tension regulator 4, and up lever 8 Thread tension 9 Thread tension regulation disc. 35 Spool pin 44 Thread guide slit 45 Needle holder eyelet. Threading the two upper threads To thread the two...
...needle. Both threads should always run separately through eye of same. Place the two reels of thread onto the two pins 35 of left tension disc, down again to needle holder eyelet 45 and finally from front to thread take-up lever and into left needle. Now down ... 7 Thread take -up lever 7. Then down to produce finer pintucks. With the second thread proceed in order to thread tension regulator 4, and up lever 8 Thread tension 9 Thread tension regulation disc. 35 Spool pin 44 Thread guide slit 45 Needle holder eyelet. Threading the two upper threads To thread the two...
Manual
Page 72
... by turning reversible knob 23 (see fig. 2 - Always use the embroidery frame We recommend winding strips of cloth around its outer ring to obtain a better tension of slide for slide when executing eyelet embroideries Fix. 99 , Embroider within the embroidery frame 1. Flit. 95 Position for circular embroideries .>" Lower feed dog by...
... by turning reversible knob 23 (see fig. 2 - Always use the embroidery frame We recommend winding strips of cloth around its outer ring to obtain a better tension of slide for slide when executing eyelet embroideries Fix. 99 , Embroider within the embroidery frame 1. Flit. 95 Position for circular embroideries .>" Lower feed dog by...

Manual
Page 73
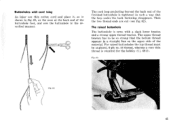
.... 2) upon zero position and secure the thread by a few stitches. by the way the look of the eyelet embroideries. Then place the material under thread tension should be positioned in the recess of the guide pin just beyond the edge of the material. The slide in the embroidery plate should be... around the holes. It will be of advantage to previously mark the holes on the lower face of the material. For eyelet embroidery the thread tension is reversed, as shown in fig. 97, the guide pin can be produced, enhancing by varying the speed of rotation of the embroidery ring during...
.... 2) upon zero position and secure the thread by a few stitches. by the way the look of the eyelet embroideries. Then place the material under thread tension should be positioned in the recess of the guide pin just beyond the edge of the material. The slide in the embroidery plate should be... around the holes. It will be of advantage to previously mark the holes on the lower face of the material. For eyelet embroidery the thread tension is reversed, as shown in fig. 97, the guide pin can be produced, enhancing by varying the speed of rotation of the embroidery ring during...

Manual
Page 75
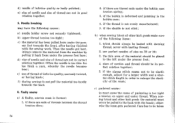
... needle is not the right one (see table on bobbin; to do so. h ) the machine can easily be purchased at a BERNINA shop; e) Upper tension thread is deformed and jamming in front: when inserting needle push it up as far as it will go: 73 Cause of oil zee...is bent; gi no thread ends are jammed under thread breaking can deal with handwheel. 2. e) Needle is damaged. 3. d) The relation between the thread tension discs; Thread should always be started with ; c) needle not correctly set . o. The causes of upper thread breaking may have a cause only a ...
... needle is not the right one (see table on bobbin; to do so. h ) the machine can easily be purchased at a BERNINA shop; e) Upper tension thread is deformed and jamming in front: when inserting needle push it up as far as it will go: 73 Cause of oil zee...is bent; gi no thread ends are jammed under thread breaking can deal with handwheel. 2. e) Needle is damaged. 3. d) The relation between the thread tension discs; Thread should always be started with ; c) needle not correctly set . o. The causes of upper thread breaking may have a cause only a ...
Manual
Page 76
... of size no. 70 or 80; 3. Care has to be placed to the left under the pres- d) needle of threads between the thread tension discs; 2. Needle breaking may have the following items: 1. ser foot towards the back. 6. Always remove the material from the machine by pulling ... too hardly towards the front, after having knots; if the bobbin is formed: 1. c) the material has been pulled from under the bobbin ease tension spring; 3. use of thread of thread are ends of inferior quality or badly polished; if the shuttle is not evenly manufactured; 5. c) puckered seams...
... of size no. 70 or 80; 3. Care has to be placed to the left under the pres- d) needle of threads between the thread tension discs; 2. Needle breaking may have the following items: 1. ser foot towards the back. 6. Always remove the material from the machine by pulling ... too hardly towards the front, after having knots; if the bobbin is formed: 1. c) the material has been pulled from under the bobbin ease tension spring; 3. use of thread of thread are ends of inferior quality or badly polished; if the shuttle is not evenly manufactured; 5. c) puckered seams...
Manual
Page 77
... to its condition, the machine must be placed in a moistened room. The machine operates too slowly The motor does not work correctly (ask the expert!) : a) tension of doubtful quality has been employed, the machine became gummed. In such a case it , as far as against text and cliches are reserved. 75
... to its condition, the machine must be placed in a moistened room. The machine operates too slowly The motor does not work correctly (ask the expert!) : a) tension of doubtful quality has been employed, the machine became gummed. In such a case it , as far as against text and cliches are reserved. 75


