
Manual
Page 4
...stitch threading 42 Top & bottom cover stitch threading 48 Top & bottom cover stitch / Cover stitch test sewing and fine tuning 51 Chain stitch threading (position G) 53 Chain stitch test sewing and fine tuning 55 Converting from overlock to cover/chain stitch 57 Converting from cover stitch ... cover stitch practical sewing 67 Chain stitch practical sewing 70 Maintenance 71 Trouble shooting 72 Index 74 Technical information 76 Optional Accessories 77 Bernina publications 78 2500_DCE_1_englisch_neu 09.10.2007 14:33 Uhr Seite 5 Contents 5 Details of the machine 6 Setting up the machine 11 ...
...stitch threading 42 Top & bottom cover stitch threading 48 Top & bottom cover stitch / Cover stitch test sewing and fine tuning 51 Chain stitch threading (position G) 53 Chain stitch test sewing and fine tuning 55 Converting from overlock to cover/chain stitch 57 Converting from cover stitch ... cover stitch practical sewing 67 Chain stitch practical sewing 70 Maintenance 71 Trouble shooting 72 Index 74 Technical information 76 Optional Accessories 77 Bernina publications 78 2500_DCE_1_englisch_neu 09.10.2007 14:33 Uhr Seite 5 Contents 5 Details of the machine 6 Setting up the machine 11 ...
Manual
Page 17
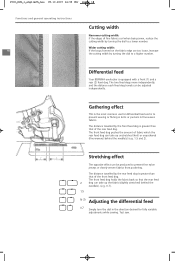
... rear feed dog is equipped with a front (1) and a rear (2) feed dog. The distance travelled by the front feed dog is to a higher number. Test sew. Differential feed Your BERNINA overlocker is greater than that the rear feed 2 dog can take up the fabric (slightly stretched) behind the needle(s) (e.g. 1.5 and 2). 2 1 Stretching effect The...
... rear feed dog is equipped with a front (1) and a rear (2) feed dog. The distance travelled by the front feed dog is to a higher number. Test sew. Differential feed Your BERNINA overlocker is greater than that the rear feed 2 dog can take up the fabric (slightly stretched) behind the needle(s) (e.g. 1.5 and 2). 2 1 Stretching effect The...

Manual
Page 22
...in the loopers. and cover stitch work . Problems can also be in perfect condition. perfect sewing results. accessory bag). · Always test sew decorative · Only use the spool caps (in rear when starting to the good quality threads for cover and chain stitch 130/...183; Use the deco-guide when without resistance through the long groove BERNINA overlocker. 2500_DCE_1_englisch_neu 09.10.2007 14:34 Uhr Seite 23 Needles, thread, fabric Needles and machine Your BERNINA overlocker is the BERNINA 2500DCET cover stitch or JLx2 needles 23 equipped with thread used When sewing,...
...in the loopers. and cover stitch work . Problems can also be in perfect condition. perfect sewing results. accessory bag). · Always test sew decorative · Only use the spool caps (in rear when starting to the good quality threads for cover and chain stitch 130/...183; Use the deco-guide when without resistance through the long groove BERNINA overlocker. 2500_DCE_1_englisch_neu 09.10.2007 14:34 Uhr Seite 23 Needles, thread, fabric Needles and machine Your BERNINA overlocker is the BERNINA 2500DCET cover stitch or JLx2 needles 23 equipped with thread used When sewing,...
Manual
Page 29
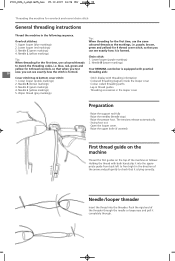
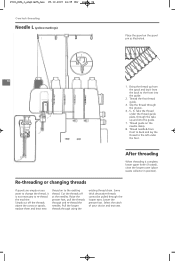
Lower looper (purple markings) When threading for the first time, use the same 1. blue, red, green and yellow for 4-thread overlock, so that when you test Your BERNINA overlocker is formed. 4. Wiper thread (grey markings) · Stitch display with both hands slip it is formed. Push the rigid end of the threader through...
Lower looper (purple markings) When threading for the first time, use the same 1. blue, red, green and yellow for 4-thread overlock, so that when you test Your BERNINA overlocker is formed. 4. Wiper thread (grey markings) · Stitch display with both hands slip it is formed. Push the rigid end of the threader through...
Manual
Page 33
... guide. 7. Lower the presser foot. Raise the presser foot, pull the threads through using the existing thread chain. Select the stitch of your choice and test sew. Thread guide on the spool pin as illustrated. 34 2 3 5 6 4 7 8 1. Re-threading or changing threads If spools are empty or you want to change the...
... guide. 7. Lower the presser foot. Raise the presser foot, pull the threads through using the existing thread chain. Select the stitch of your choice and test sew. Thread guide on the spool pin as illustrated. 34 2 3 5 6 4 7 8 1. Re-threading or changing threads If spools are empty or you want to change the...

Manual
Page 34
...move the fine tuning lever up automatically. Let go of the fabric. 2500_DCE_1_englisch_neu 09.10.2007 14:35 Uhr Seite 35 Overlock sewing test and fine tuning After threading select the stitch of the stitch. To increase the tension, move the lever down. Needle C thread... in your left hand, pull the thread chain over the thread cutter (2). 1 2 AB C D A B Fine tuning C D Compare your sewing test with your choice (stitch selection dial) and test sew. A Needle L fine tuning (yellow) B Needle C fine tuning (green) C Upper looper fine tuning (blue) D Lower looper fine tuning ...
...move the fine tuning lever up automatically. Let go of the fabric. 2500_DCE_1_englisch_neu 09.10.2007 14:35 Uhr Seite 35 Overlock sewing test and fine tuning After threading select the stitch of the stitch. To increase the tension, move the lever down. Needle C thread... in your left hand, pull the thread chain over the thread cutter (2). 1 2 AB C D A B Fine tuning C D Compare your sewing test with your choice (stitch selection dial) and test sew. A Needle L fine tuning (yellow) B Needle C fine tuning (green) C Upper looper fine tuning (blue) D Lower looper fine tuning ...

Manual
Page 35
... the deco guide without threading the first machine guide or tension slit. 3/4 thread overlock with medium to the needles. Test sew. 2500_DCE_1_englisch_neu 09.10.2007 14:35 Uhr Seite 36 Overlock sewing test and fine tuning 2 1 36 Deco guide The deco guide (in the accessory bag) is specially designed for sewing wide...
... the deco guide without threading the first machine guide or tension slit. 3/4 thread overlock with medium to the needles. Test sew. 2500_DCE_1_englisch_neu 09.10.2007 14:35 Uhr Seite 36 Overlock sewing test and fine tuning 2 1 36 Deco guide The deco guide (in the accessory bag) is specially designed for sewing wide...

Manual
Page 36
...: The elasticity of the needle thread on the underside: Increase the needle tension (green). 2500_DCE_1_englisch_neu 09.10.2007 14:35 Uhr Seite 37 Overlock sewing test and fine tuning Fine tuning for 3 thread lock and 3 thread narrow seam: flatlock The loops are formed on the underside: Increase the upper looper tension...
...: The elasticity of the needle thread on the underside: Increase the needle tension (green). 2500_DCE_1_englisch_neu 09.10.2007 14:35 Uhr Seite 37 Overlock sewing test and fine tuning Fine tuning for 3 thread lock and 3 thread narrow seam: flatlock The loops are formed on the underside: Increase the upper looper tension...
Manual
Page 45
... the guide. 2. Do not use the needle stop button! Take the thread through the take up from the spool and lay it from you (clockwise). Test sew: Place a piece of fabric under the foot. Thread guide on «1». Cut threads (thread cutter). When sewing is complete, raise the needles by...
... the guide. 2. Do not use the needle stop button! Take the thread through the take up from the spool and lay it from you (clockwise). Test sew: Place a piece of fabric under the foot. Thread guide on «1». Cut threads (thread cutter). When sewing is complete, raise the needles by...
Manual
Page 46
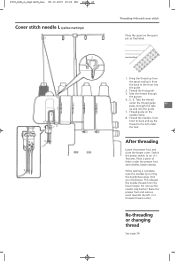
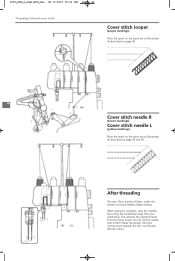
... 46 5 7 6 8 9 46 Cover stitch needle R (brown markings) Cover stitch needle L (yellow markings) Place the spool on page 43 and 45. 1 1 2 2 3 3 5 6 74 4 88 88 After threading Test sew: Place a piece of fabric under the presser foot and needles, begin sewing.
... 46 5 7 6 8 9 46 Cover stitch needle R (brown markings) Cover stitch needle L (yellow markings) Place the spool on page 43 and 45. 1 1 2 2 3 3 5 6 74 4 88 88 After threading Test sew: Place a piece of fabric under the presser foot and needles, begin sewing.
Manual
Page 48
... the thread through the groove indicated by pulling it under the needles and presser foot. 3. Place a double layer of the feeding link (see diagram). 15. Test sewing with both hands, thread the first guide located behind the machine head. 11.
... the thread through the groove indicated by pulling it under the needles and presser foot. 3. Place a double layer of the feeding link (see diagram). 15. Test sewing with both hands, thread the first guide located behind the machine head. 11.

Manual
Page 49
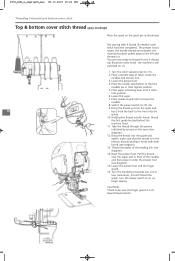
... cover stitch. 2500_DCE_2_englisch_neu 09.10.2007 15:00 Uhr Seite 49 Threading 4-thread top & bottom cover stitch (5mm) Top & bottom cover stitch thread (grey markings) Test sewing with 3 thread (2-needles, 5mm) cover stitch has been completed. The machine is in its lowest fixed position. 49 CAUTION: Check to the left and...
... cover stitch. 2500_DCE_2_englisch_neu 09.10.2007 15:00 Uhr Seite 49 Threading 4-thread top & bottom cover stitch (5mm) Top & bottom cover stitch thread (grey markings) Test sewing with 3 thread (2-needles, 5mm) cover stitch has been completed. The machine is in its lowest fixed position. 49 CAUTION: Check to the left and...

Manual
Page 50
....2007 15:00 Uhr Seite 50 Threading 4 thread top & bottom narrow cover stitch (2.5mm wide L and C needles only) Top & bottom cover stitch thread (grey markings) Test sewing with 3 thread (2-needles, 2.5mm) cover stitch has been completed. The presser foot is raised, the needle threads are now ready to the left and...
....2007 15:00 Uhr Seite 50 Threading 4 thread top & bottom narrow cover stitch (2.5mm wide L and C needles only) Top & bottom cover stitch thread (grey markings) Test sewing with 3 thread (2-needles, 2.5mm) cover stitch has been completed. The presser foot is raised, the needle threads are now ready to the left and...

Manual
Page 51
...to give a stretchy, durable seam. 2500_DCE_2_englisch_neu 09.10.2007 15:00 Uhr Seite 51 A B CE D E AB C D Cover stitch sewing test and fine tuning Cover stitch sewing test and fine tuning After threading, check that the stitch selection dial is on the underside of the fabric: Increase the needle thread... tensions. Test sew. The looper thread forms horizontal and vertical loops between the two or three needle threads on the upperside of the fabric. ...
...to give a stretchy, durable seam. 2500_DCE_2_englisch_neu 09.10.2007 15:00 Uhr Seite 51 A B CE D E AB C D Cover stitch sewing test and fine tuning Cover stitch sewing test and fine tuning After threading, check that the stitch selection dial is on the underside of the fabric: Increase the needle thread... tensions. Test sew. The looper thread forms horizontal and vertical loops between the two or three needle threads on the upperside of the fabric. ...
Manual
Page 52
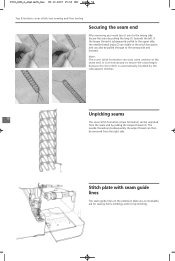
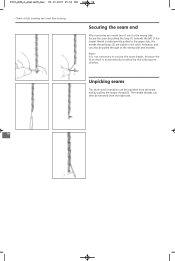
2500_DCE_2_englisch_neu 09.10.2007 15:00 Uhr Seite 52 Top & bottom cover stitch test sewing and fine tuning Securing the seam end After removing your work turn it over to the wrong side and knotted. If the looper thread ...
2500_DCE_2_englisch_neu 09.10.2007 15:00 Uhr Seite 52 Top & bottom cover stitch test sewing and fine tuning Securing the seam end After removing your work turn it over to the wrong side and knotted. If the looper thread ...

Manual
Page 55
... on position G. Incorrect stitch formation can be corrected by fine tuning. 2500_DCE_2_englisch_neu 09.10.2007 15:01 Uhr Seite 55 Chain stitch sewing test and fine tuning Sewing test After threading check that the stitch selection dial is interrupted, the needle stops in the looper cover. Sew. Cutting the thread chain (thread...sewing is on the underside of the fabric. The needle thread forms a straight line on the threading diagram in the fabric. Lower the presser foot. Test sew. Starting to form a chain. To reduce the tension push the fine tuning lever down.
... on position G. Incorrect stitch formation can be corrected by fine tuning. 2500_DCE_2_englisch_neu 09.10.2007 15:01 Uhr Seite 55 Chain stitch sewing test and fine tuning Sewing test After threading check that the stitch selection dial is interrupted, the needle stops in the looper cover. Sew. Cutting the thread chain (thread...sewing is on the underside of the fabric. The needle thread forms a straight line on the threading diagram in the fabric. Lower the presser foot. Test sew. Starting to form a chain. To reduce the tension push the fine tuning lever down.
Manual
Page 56
... from the right side. 56 3 Secure the seam by pulling the looper thread (3). 2500_DCE_2_englisch_neu 09.10.2007 15:01 Uhr Seite 56 Chain stitch sewing test and fine tuning 1 2 Securing the seam end After removing your work turn it over to the wrong side.
... from the right side. 56 3 Secure the seam by pulling the looper thread (3). 2500_DCE_2_englisch_neu 09.10.2007 15:01 Uhr Seite 56 Chain stitch sewing test and fine tuning 1 2 Securing the seam end After removing your work turn it over to the wrong side.
Manual
Page 58
... «O». 9. 2500_DCE_2_englisch_neu 09.10.2007 15:01 Uhr Seite 58 Converting from cover stitch position F (4 thread cover stitch) to top & bottom cover stitch (position H) Test sewing with both hands, thread the first guide located behind the machine head. 11. The presser foot is in the tension discs by arrows on...
... «O». 9. 2500_DCE_2_englisch_neu 09.10.2007 15:01 Uhr Seite 58 Converting from cover stitch position F (4 thread cover stitch) to top & bottom cover stitch (position H) Test sewing with both hands, thread the first guide located behind the machine head. 11. The presser foot is in the tension discs by arrows on...
Manual
Page 60
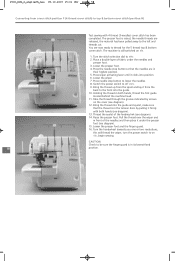
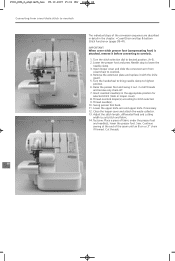
.... 12. Raise the presser foot and swing it with the knife guard. 5. Cut all threads and remove any chain-off. 7. Swing presser foot back. 11. Test sew: Place a piece of the seam until an 8 cm or 3" chain if formed. Open looper cover and slide the conversion arm from cover/chain stitch...
.... 12. Raise the presser foot and swing it with the knife guard. 5. Cut all threads and remove any chain-off. 7. Swing presser foot back. 11. Test sew: Place a piece of the seam until an 8 cm or 3" chain if formed. Open looper cover and slide the conversion arm from cover/chain stitch...

Manual
Page 71
...plate. · Retighten the setscrew. · Lower the upper knife. · Close the looper cover. · Test sew. Replacement bulbs for your BERNINA overlocker are made from the electricity supply when carrying out any of special materials. Always disconnect the machine from special material... bulb, turn to the right until the bulb engages. Your BERNINA overlocker requires very little lubrication as 1 the main components are available at your local BERNINA dealer. This should be replaced by your BERNINA dealer. Insert into the bulb fixation, press upwards and turn ...
...plate. · Retighten the setscrew. · Lower the upper knife. · Close the looper cover. · Test sew. Replacement bulbs for your BERNINA overlocker are made from the electricity supply when carrying out any of special materials. Always disconnect the machine from special material... bulb, turn to the right until the bulb engages. Your BERNINA overlocker requires very little lubrication as 1 the main components are available at your local BERNINA dealer. This should be replaced by your BERNINA dealer. Insert into the bulb fixation, press upwards and turn ...