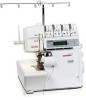
User Guide
Page 1
...DOUBLE INSULATION» or «DOUBLE INSULATED». A double insulated product is provided with any openings on behalf of BERNINA for any adjustments in the needle area, such as the result of misuse of doubleinsulated machines. The symbol product. When using an electrical appliance, basic ...parts in this manual. 3. The wrong plate can cause needle breakage. 7. Do not use only. Under no circumstances should only be used as described in the product. Do not allow to the nearest authorized BERNINA dealer or service center for servicing of the sewing computer. ...
...DOUBLE INSULATION» or «DOUBLE INSULATED». A double insulated product is provided with any openings on behalf of BERNINA for any adjustments in the needle area, such as the result of misuse of doubleinsulated machines. The symbol product. When using an electrical appliance, basic ...parts in this manual. 3. The wrong plate can cause needle breakage. 7. Do not use only. Under no circumstances should only be used as described in the product. Do not allow to the nearest authorized BERNINA dealer or service center for servicing of the sewing computer. ...
User Guide
Page 4
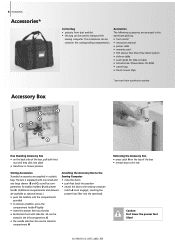
... F lightly • insert the presser feet into the slot • Buttonhole foot with slide No. 3A can be stored in the left compartment G • the needle selection box can be stored in a plastic bag.
... F lightly • insert the presser feet into the slot • Buttonhole foot with slide No. 3A can be stored in the left compartment G • the needle selection box can be stored in a plastic bag.
User Guide
Page 5
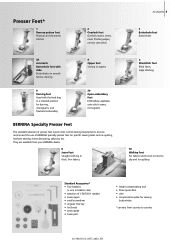
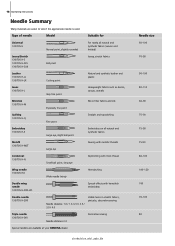
..., and freehand embroidery 20 Open embroidery foot Embroidery, appliqué, satin stitch seams, monograms BERNINA Specialty Presser Feet The standard selection of presser feet covers most normal sewing requirements, but we recommend the use of 130/705 H needles • seam ripper • small screwdriver • angular Torx key • lint brush •...
..., and freehand embroidery 20 Open embroidery foot Embroidery, appliqué, satin stitch seams, monograms BERNINA Specialty Presser Feet The standard selection of presser feet covers most normal sewing requirements, but we recommend the use of 130/705 H needles • seam ripper • small screwdriver • angular Torx key • lint brush •...
User Guide
Page 7
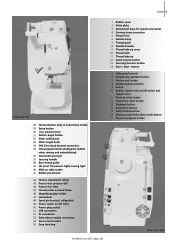
... Embroidery module connection 54 Foot control socket 55 Drop feed dog 1 Bobbin cover 2 Stitch plate 3 Attachment base for special accessories 4 Darning hoop connection 5 Presser foot 6 Needle clamp 7 Thread guide 8 Needle threader 9 Thread take-up cover 10 Thread path 11 Thread take-up /down button 17 Pattern end button 18... Needle position buttons 19 Screen 20 Bobbin winder with on /off switch and thread cutter 21 Practical stitch button 22 Decorative stitch button 23 Alphabet button ...
... Embroidery module connection 54 Foot control socket 55 Drop feed dog 1 Bobbin cover 2 Stitch plate 3 Attachment base for special accessories 4 Darning hoop connection 5 Presser foot 6 Needle clamp 7 Thread guide 8 Needle threader 9 Thread take-up cover 10 Thread path 11 Thread take-up /down button 17 Pattern end button 18... Needle position buttons 19 Screen 20 Bobbin winder with on /off switch and thread cutter 21 Practical stitch button 22 Decorative stitch button 23 Alphabet button ...
User Guide
Page 8
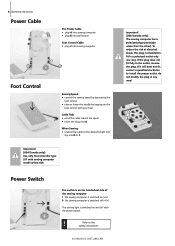
... Cable • plug C into sewing computer A C B Foot Control Sewing Speed • control the sewing speed by depressing the foot control • raise or lower the needle by tapping on the foot control with your heel Cable Tidy • wind the cable around the spool • insert the plug into A When Sewing...
... Cable • plug C into sewing computer A C B Foot Control Sewing Speed • control the sewing speed by depressing the foot control • raise or lower the needle by tapping on the foot control with your heel Cable Tidy • wind the cable around the spool • insert the plug into A When Sewing...
User Guide
Page 9
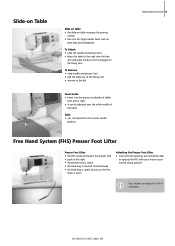
... the first stitch is raised as soon as pant legs and waistbands To Attach • raise the needle and presser foot • place the table to the right over the whole width of the table ...Scale • «0» corresponds to the center needle position Operating Instructions 9 Free Hand System (FHS) Presser Foot Lifter Presser Foot Lifter • the FHS ... free arm and press firmly so that it engages on the fixing cam To Remove • raise needle and presser foot • pull the table out of the fixing cam • remove to the left...
... the first stitch is raised as soon as pant legs and waistbands To Attach • raise the needle and presser foot • place the table to the right over the whole width of the table ...Scale • «0» corresponds to the center needle position Operating Instructions 9 Free Hand System (FHS) Presser Foot Lifter Presser Foot Lifter • the FHS ... free arm and press firmly so that it engages on the fixing cam To Remove • raise needle and presser foot • pull the table out of the fixing cam • remove to the left...

User Guide
Page 10
... can be brought up as described above for the next steps of winding the bobbin Bobbin Case A To Remove the Bobbin Case • raise the needle • turn power switch to «I» (on) • place empty bobbin on spindle Threading the Bobbin • place thread on the case should point...
... can be brought up as described above for the next steps of winding the bobbin Bobbin Case A To Remove the Bobbin Case • raise the needle • turn power switch to «I» (on) • place empty bobbin on spindle Threading the Bobbin • place thread on the case should point...
User Guide
Page 11
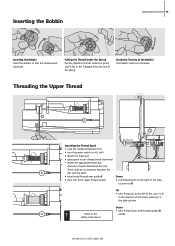
Clockwise Turning of spool determines disc size. Threading the Upper Thread C A B D Attaching the Thread Spool • raise the needle and presser foot • turn clockwise. Inserting the Bobbin Operating Instructions 11 Inserting the Bobbin Insert the bobbin so that the thread winds clockwise. Refer ...
Clockwise Turning of spool determines disc size. Threading the Upper Thread C A B D Attaching the Thread Spool • raise the needle and presser foot • turn clockwise. Inserting the Bobbin Operating Instructions 11 Inserting the Bobbin Insert the bobbin so that the thread winds clockwise. Refer ...
User Guide
Page 12
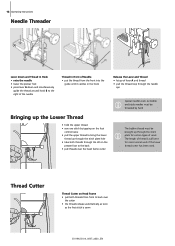
... it catches in the hook Release the Lever and Thread • let go of lever A and thread • pull the thread loop through the needle eye Special needles such as the first stitch is sufficient for certain types of thread is sewn 031196.50.04_0507_a630_EN Thread Cutter Thread Cutter on Head Frame... both threads through the slit on the presser foot to back over the cutter • the threads release automatically as soon as double and triple needles must be threaded by hand Bringing up the Lower Thread • hold the upper thread • sew one stitch by tapping on the foot ...
... it catches in the hook Release the Lever and Thread • let go of lever A and thread • pull the thread loop through the needle eye Special needles such as the first stitch is sufficient for certain types of thread is sewn 031196.50.04_0507_a630_EN Thread Cutter Thread Cutter on Head Frame... both threads through the slit on the presser foot to back over the cutter • the threads release automatically as soon as double and triple needles must be threaded by hand Bringing up the Lower Thread • hold the upper thread • sew one stitch by tapping on the foot ...

User Guide
Page 13
...thread from getting caught on the back of needle to the safety instructions! Supplementary Spool Pin A Collapsible Vertical Spool Pin • found on the spool pin 031196.50.04_0507_a630_EN Changing the Needle Removing the Needle • raise the needle • turn power switch to «0»...; (off) • lower the presser foot • loosen the needle clamp screw • pull the needle down to remove Inserting the Needle • flat side of...
...thread from getting caught on the back of needle to the safety instructions! Supplementary Spool Pin A Collapsible Vertical Spool Pin • found on the spool pin 031196.50.04_0507_a630_EN Changing the Needle Removing the Needle • raise the needle • turn power switch to «0»...; (off) • lower the presser foot • loosen the needle clamp screw • pull the needle down to remove Inserting the Needle • flat side of...

User Guide
Page 14
... • guide the thread to the front in the slit and past the tension disc A on the left side • thread the left needle • threads must not be twisted together When using the supplementary spool pin (vertical) always attach the foam pad (prevents the thread from getting... caught on the spool pin) Threading the Triple Needle • two thread spools and one full bobbin are needed A • place one thread spool on horizontal spool pin • place second thread...
... • guide the thread to the front in the slit and past the tension disc A on the left side • thread the left needle • threads must not be twisted together When using the supplementary spool pin (vertical) always attach the foam pad (prevents the thread from getting... caught on the spool pin) Threading the Triple Needle • two thread spools and one full bobbin are needed A • place one thread spool on horizontal spool pin • place second thread...
User Guide
Page 15
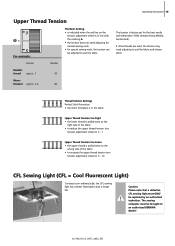
... note that a defective CFL sewing light must be replaced by an authorized technician. The sewing computer must ONLY be brought to suit the fabric Tension Needle Metallic thread approx. 3 90 Mono- Thread Tension Settings Perfect Stitch Formation • the stitch formation is in line with the marking A • the tension does... and chosen stitch. If other threads are used, the tension may need adjusting for normal sewing work , the tension can be adjusted to an authorized BERNINA dealer! 031196.50.04_0507_a630_EN
... note that a defective CFL sewing light must be replaced by an authorized technician. The sewing computer must ONLY be brought to suit the fabric Tension Needle Metallic thread approx. 3 90 Mono- Thread Tension Settings Perfect Stitch Formation • the stitch formation is in line with the marking A • the tension does... and chosen stitch. If other threads are used, the tension may need adjusting for normal sewing work , the tension can be adjusted to an authorized BERNINA dealer! 031196.50.04_0507_a630_EN
User Guide
Page 16
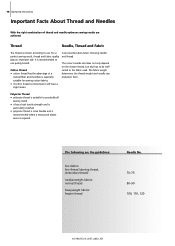
... results are the guidelines: fine fabrics: fine thread (darning thread, embroidery thread) mediumweight fabrics: normal thread heavyweight fabrics: heavier thread Needle No. 70-75 80-90 100, 110, 120 031196.50.04_0507_a630_EN Polyester Thread • polyester thread is suitable for sewing cotton ...thread. For a perfect sewing result, thread and fabric quality play an important role. 16 Operating Instructions Important Facts About Thread and Needles With the right combination of a natural fiber and therefore is especially suitable for practically all sewing needs • it will have...
... results are the guidelines: fine fabrics: fine thread (darning thread, embroidery thread) mediumweight fabrics: normal thread heavyweight fabrics: heavier thread Needle No. 70-75 80-90 100, 110, 120 031196.50.04_0507_a630_EN Polyester Thread • polyester thread is suitable for sewing cotton ...thread. For a perfect sewing result, thread and fabric quality play an important role. 16 Operating Instructions Important Facts About Thread and Needles With the right combination of a natural fiber and therefore is especially suitable for practically all sewing needs • it will have...
User Guide
Page 17
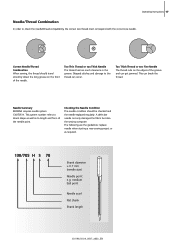
... form of the groove and can get jammed. Skipped stitches and damage to check the needle/thread compatibility, the correct size thread must correspond with the correct size needle. Needle Summary BERNINA requires needle system 130/705 H. Too Thin Thread or too Thick Needle The thread has too much clearance in the groove. medium ball point...
... form of the groove and can get jammed. Skipped stitches and damage to check the needle/thread compatibility, the correct size thread must correspond with the correct size needle. Needle Summary BERNINA requires needle system 130/705 H. Too Thin Thread or too Thick Needle The thread has too much clearance in the groove. medium ball point...
User Guide
Page 18
...: 1.0 / 1.6 / 2.0 / 2.5 / 3.0 / 4.0 Visible hems in stretch fabrics, pintucks, decorative sewing Triple needle 130/705 H-DRI Needle distance 3.0 Decorative sewing Special needles are easier to sew if the appropriate needle is used. 18 Operating Instructions Needle Summary Many materials are available at your BERNINA dealer. 031196.50.04_0507_a630_EN Needle size 60-100 70-90 90-100 80-110 60-90...
...: 1.0 / 1.6 / 2.0 / 2.5 / 3.0 / 4.0 Visible hems in stretch fabrics, pintucks, decorative sewing Triple needle 130/705 H-DRI Needle distance 3.0 Decorative sewing Special needles are easier to sew if the appropriate needle is used. 18 Operating Instructions Needle Summary Many materials are available at your BERNINA dealer. 031196.50.04_0507_a630_EN Needle size 60-100 70-90 90-100 80-110 60-90...
User Guide
Page 19
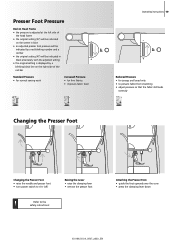
... prevent fabric from stretching • adjust pressure so that the fabric still feeds correctly Changing the Presser Foot Changing the Presser Foot • raise the needle and presser foot • turn power switch to the safety instructions!
... prevent fabric from stretching • adjust pressure so that the fabric still feeds correctly Changing the Presser Foot Changing the Presser Foot • raise the needle and presser foot • turn power switch to the safety instructions!
User Guide
Page 20
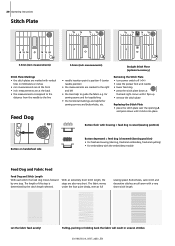
...are at the back • the measurements correspond to the distance from the needle to the line Feed Dog A A 5.5mm (inch measurements) Straight Stitch Plate (optional accessory) • needle insertion point is position 0 (center needle position) • the measurements are also very short. The fabric moves ...down at full sewing speed. Removing the Stitch Plate • turn power switch off («0») • raise the presser foot and needle • lower feed dog • press the stitch plate down until it clicks into place Button flush with housing = feed dog is ...
...are at the back • the measurements correspond to the distance from the needle to the line Feed Dog A A 5.5mm (inch measurements) Straight Stitch Plate (optional accessory) • needle insertion point is position 0 (center needle position) • the measurements are also very short. The fabric moves ...down at full sewing speed. Removing the Stitch Plate • turn power switch off («0») • raise the presser foot and needle • lower feed dog • press the stitch plate down until it clicks into place Button flush with housing = feed dog is ...

User Guide
Page 21
... Operating instructions 21 If the foot is actually on the feed dog, so that it . Correct this problem, place one or more plates to the needle. Uneven layers To solve this by placing one , two or three 1 compensating plates as possible to the edge of the foot close as required behind...
... Operating instructions 21 If the foot is actually on the feed dog, so that it . Correct this problem, place one or more plates to the needle. Uneven layers To solve this by placing one , two or three 1 compensating plates as possible to the edge of the foot close as required behind...
User Guide
Page 22
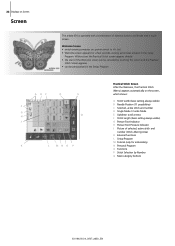
... A BC D F G H J E Q K L MNO P Practical Stitch Screen After the Welcome, the Practical Stitch (Menu) appears automatically on the screen, which shows: A Stitch width (basic setting always visible) B Needle Position (11 possibilities) C Selected, active stitch and number D Single Mode / Combi Mode E Up/down scroll arrows F Stitch length (basic setting always visible) G Presser Foot Indicator...
... A BC D F G H J E Q K L MNO P Practical Stitch Screen After the Welcome, the Practical Stitch (Menu) appears automatically on the screen, which shows: A Stitch width (basic setting always visible) B Needle Position (11 possibilities) C Selected, active stitch and number D Single Mode / Combi Mode E Up/down scroll arrows F Stitch length (basic setting always visible) G Presser Foot Indicator...
User Guide
Page 24
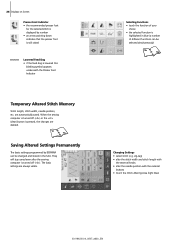
...if the feed dog is lowered this blinking symbol appears underneath the Presser Foot Indicator Temporary Altered Stitch Memory Stitch length, stitch width, needle position, etc. zig-zag) • alter the stitch width and stitch length with the external knobs • alter the...is turned off («0»). 24 Displays on Screen Presser Foot Indicator • the recommended presser foot for the selected stitch is displayed by BERNINA can be changed and stored in blue (a number of different functions can be selected simultaneously) 29 33 Changing Settings • select stitch (e.g. The...
...if the feed dog is lowered this blinking symbol appears underneath the Presser Foot Indicator Temporary Altered Stitch Memory Stitch length, stitch width, needle position, etc. zig-zag) • alter the stitch width and stitch length with the external knobs • alter the...is turned off («0»). 24 Displays on Screen Presser Foot Indicator • the recommended presser foot for the selected stitch is displayed by BERNINA can be changed and stored in blue (a number of different functions can be selected simultaneously) 29 33 Changing Settings • select stitch (e.g. The...


