
Beretta Over & Under User Manual
Page 2
...disassembly, assembly and use of defective, improper, hand-loaded, reloaded or remanufactured ammunition, customer abuse or neglect of this firearm, located throughout this manual. THE USE OF OTHER MANUFACTURER'S SPARE PARTS AND ACCESSORIES COULD CAUSE MALFUNCTIONS AND/OR BREAKAGES THAT WILL NOT BE COVERED BY THE BERETTA WARRANTY. READ THE BASIC SAFETY...THE SALE, TRANSPORTATION AND USE OF FIREARMS IN YOUR AREA. 30 INCLUDE IT WITH THE GUN WHEN IT CHANGES OWNERSHIP OR WHEN IT IS LOANED OR PRESENTED TO ANOTHER PERSON. WE RECOMMEND THE USE OF ORIGINAL BERETTA SPARE PARTS AND ACCESSORIES. ...
...disassembly, assembly and use of defective, improper, hand-loaded, reloaded or remanufactured ammunition, customer abuse or neglect of this firearm, located throughout this manual. THE USE OF OTHER MANUFACTURER'S SPARE PARTS AND ACCESSORIES COULD CAUSE MALFUNCTIONS AND/OR BREAKAGES THAT WILL NOT BE COVERED BY THE BERETTA WARRANTY. READ THE BASIC SAFETY...THE SALE, TRANSPORTATION AND USE OF FIREARMS IN YOUR AREA. 30 INCLUDE IT WITH THE GUN WHEN IT CHANGES OWNERSHIP OR WHEN IT IS LOANED OR PRESENTED TO ANOTHER PERSON. WE RECOMMEND THE USE OF ORIGINAL BERETTA SPARE PARTS AND ACCESSORIES. ...

Beretta Over & Under User Manual
Page 3
... SHOTGUN 42 DECOCKING THE HAMMERS 42 DISASSEMBLY 43 BERETTA MOBILCHOKE® AND OPTIMACHOKE® TUBES 44 ADJUSTMENT OF LENGTH OF PULL AND REPLACEMENT OF TRIGGER 46 INTERCHANGEABLE TRIGGER GROUP 47 REMOVING THE STOCK 48 REPLACEMENT OF THE GEL•TEK RECOIL PAD 49 ADJUSTABLE STOCK WITH MEMORY SYSTEM 50 REPLACEMENT OF TRUGLO® FRONT SIGHT LUMINOUS INSERT 51 REPLACEMENT OF FIRING PINS 51 MAINTENANCE 52 WARRANTY AND EXTENSION OF THE WARRANTY REPAIR...
... SHOTGUN 42 DECOCKING THE HAMMERS 42 DISASSEMBLY 43 BERETTA MOBILCHOKE® AND OPTIMACHOKE® TUBES 44 ADJUSTMENT OF LENGTH OF PULL AND REPLACEMENT OF TRIGGER 46 INTERCHANGEABLE TRIGGER GROUP 47 REMOVING THE STOCK 48 REPLACEMENT OF THE GEL•TEK RECOIL PAD 49 ADJUSTABLE STOCK WITH MEMORY SYSTEM 50 REPLACEMENT OF TRUGLO® FRONT SIGHT LUMINOUS INSERT 51 REPLACEMENT OF FIRING PINS 51 MAINTENANCE 52 WARRANTY AND EXTENSION OF THE WARRANTY REPAIR...
Beretta Over & Under User Manual
Page 6
...gun in the barrel or chamber can cause damage to your firearm, following the instructions provided in the ammunition that each use factory-loaded, new ammunition manufactured to ensure that dirt or lint does not accumulate in the proper caliber or gauge and type for the particular firearm. Firing with an obstruction in an emergency. Never pull...firing immediately, engage the manual safety and unload the firearm. Open and empty the chamber(s) of the firearm is in the working parts. Always check the bore and chamber(s) prior to loading to industry specifications: CIP (Europe and...
...gun in the barrel or chamber can cause damage to your firearm, following the instructions provided in the ammunition that each use factory-loaded, new ammunition manufactured to ensure that dirt or lint does not accumulate in the proper caliber or gauge and type for the particular firearm. Firing with an obstruction in an emergency. Never pull...firing immediately, engage the manual safety and unload the firearm. Open and empty the chamber(s) of the firearm is in the working parts. Always check the bore and chamber(s) prior to loading to industry specifications: CIP (Europe and...
Beretta Over & Under User Manual
Page 8
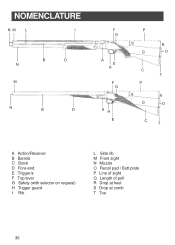
NOMENCLATURE NM L I B D N M N B D F G A E H F G AH E P S R Q O C T P S R Q O C T A Action/Receiver B Barrels C Stock D Fore-end E Trigger/s F Top lever G Safety (with selector on request) H Trigger guard I Rib L Side rib M Front sight N Muzzle O Recoil pad / Butt plate P Line of sight Q Length of pull R Drop at heel S Drop at comb T Toe 36
NOMENCLATURE NM L I B D N M N B D F G A E H F G AH E P S R Q O C T P S R Q O C T A Action/Receiver B Barrels C Stock D Fore-end E Trigger/s F Top lever G Safety (with selector on request) H Trigger guard I Rib L Side rib M Front sight N Muzzle O Recoil pad / Butt plate P Line of sight Q Length of pull R Drop at heel S Drop at comb T Toe 36

Beretta Over & Under User Manual
Page 10
... 83, 84 and 85. Position the rounded surface of the firearm. Fig. 14 Swing the barrels upward smoothly and evenly. To assemble the shotgun, proceed as instructed. Insert the Monobloc inside the action so that lubricant is present as instructed. Before using this shotgun, make sure that the hinge pins of...fore-end iron are shipped partially disassembled (barrel/fore-end and stock/action body). CAUTION: The top lever must be kept in the open position before closing the gun. Wipe excess rust preventative oil from the Monobloc and from the barrels by the arrows on fig....
... 83, 84 and 85. Position the rounded surface of the firearm. Fig. 14 Swing the barrels upward smoothly and evenly. To assemble the shotgun, proceed as instructed. Insert the Monobloc inside the action so that lubricant is present as instructed. Before using this shotgun, make sure that the hinge pins of...fore-end iron are shipped partially disassembled (barrel/fore-end and stock/action body). CAUTION: The top lever must be kept in the open position before closing the gun. Wipe excess rust preventative oil from the Monobloc and from the barrels by the arrows on fig....
Beretta Over & Under User Manual
Page 11
... your shotgun on the side of the barrel. Beretta assumes no responsibility for physical injury or property damage resulting from ammunition. (See point 3 of the BASIC SAFETY RULES). Use of reloaded ammunition will find the markings for the gauge and chamber length for incidents occurring through the use . WARNING: Never use of ...the fore-end latch to catch the barrel hook. You will void the manufacturer's warranty. Fig. 17 SIDE-BY-SIDE Fit the fore-end iron (the curved steel component at the rear of the fore-end) over -and-under the barrels. The operation is inserted into the chamber...
... your shotgun on the side of the barrel. Beretta assumes no responsibility for physical injury or property damage resulting from ammunition. (See point 3 of the BASIC SAFETY RULES). Use of reloaded ammunition will find the markings for the gauge and chamber length for incidents occurring through the use . WARNING: Never use of ...the fore-end latch to catch the barrel hook. You will void the manufacturer's warranty. Fig. 17 SIDE-BY-SIDE Fit the fore-end iron (the curved steel component at the rear of the fore-end) over -and-under the barrels. The operation is inserted into the chamber...
Beretta Over & Under User Manual
Page 12
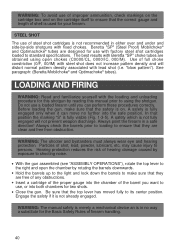
..." choke tubes are obtained using the shotgun. See paragraph: (Beretta Mobilchoke® and Optimachoke® tubes). Do not use a loaded firearm until you want to standard specifications. Always point the firearm in either over and under and side-by exposure to shooting noise. ● With the gun assembled (see "ASSEMBLY OPERATIONS"), rotate the top lever to ensure that the safety...
..." choke tubes are obtained using the shotgun. See paragraph: (Beretta Mobilchoke® and Optimachoke® tubes). Do not use a loaded firearm until you want to standard specifications. Always point the firearm in either over and under and side-by exposure to shooting noise. ● With the gun assembled (see "ASSEMBLY OPERATIONS"), rotate the top lever to ensure that the safety...
Beretta Over & Under User Manual
Page 13
...-set the gun for the next shot. This will fire the barrel you have selected with the barrel selector: ● (Selector to the left -one in the side-by -sides). NOTICE: The Manufacturer assumes no need to operate the barrel selector (if present) since the gun is automatically ready to fire, disengage the safety and pull the trigger. WARNING: If the gun...
...-set the gun for the next shot. This will fire the barrel you have selected with the barrel selector: ● (Selector to the left -one in the side-by -sides). NOTICE: The Manufacturer assumes no need to operate the barrel selector (if present) since the gun is automatically ready to fire, disengage the safety and pull the trigger. WARNING: If the gun...
Beretta Over & Under User Manual
Page 14
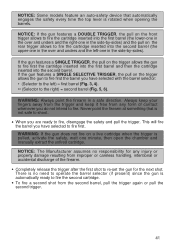
...; Pull the trigger to decock the first hammer. ● Move the selector to the second position. (On some models this is not possible since the selector is necessary to sharply tap the butt, with sufficient force to ensure that both chambers are unloaded. UNLOADING THE SHOTGUN WARNING: Do not rely on an unloaded gun without the use...
...; Pull the trigger to decock the first hammer. ● Move the selector to the second position. (On some models this is not possible since the selector is necessary to sharply tap the butt, with sufficient force to ensure that both chambers are unloaded. UNLOADING THE SHOTGUN WARNING: Do not rely on an unloaded gun without the use...

Beretta Over & Under User Manual
Page 15
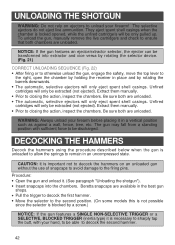
... the top left section of the breechface of the barrels downward. Disengage Monobloc recesses from the barrels by pulling the fore-end catch lever down before attempting disassembly. The top lever remains open the gun. ● Take out the snapcaps, close the gun and replace the fore-end. Let the top lever return to catch the barrel hook. Remove the...
... the top left section of the breechface of the barrels downward. Disengage Monobloc recesses from the barrels by pulling the fore-end catch lever down before attempting disassembly. The top lever remains open the gun. ● Take out the snapcaps, close the gun and replace the fore-end. Let the top lever return to catch the barrel hook. Remove the...
Beretta Over & Under User Manual
Page 16
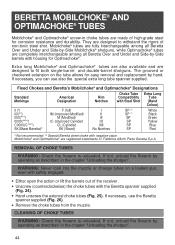
... in the chapter "Unloading the shotgun". 44 Fixed Chokes and Beretta's Mobilchoke® and Optimachoke® Designations Standard Markings American Designation Rim Notches Choke Tube Extra Long Compatibility Tube with Steel Shot (Band Colour) 0 (*) 00(**) 000(***) 0000(****) C0000(C****) SK(Skeet Beretta)(2) F (full) IM (Improved Modified) M (Modified) IC (Improved Cylinder) CL (Cylinder) SK (Skeet) I II ) III IIII1) IIIII No Notches SP...
... in the chapter "Unloading the shotgun". 44 Fixed Chokes and Beretta's Mobilchoke® and Optimachoke® Designations Standard Markings American Designation Rim Notches Choke Tube Extra Long Compatibility Tube with Steel Shot (Band Colour) 0 (*) 00(**) 000(***) 0000(****) C0000(C****) SK(Skeet Beretta)(2) F (full) IM (Improved Modified) M (Modified) IC (Improved Cylinder) CL (Cylinder) SK (Skeet) I II ) III IIII1) IIIII No Notches SP...
Beretta Over & Under User Manual
Page 17
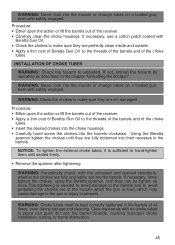
... or change tubes on a loaded gun, even with safety engaged. Using the Beretta spanner tighten the chokes until they are not damaged. If not, unload the firearm by operating as described in the barrels. WARNING: Choke tubes must be tighten no choke tubes in the barrels at all times, even during storage and cleaning. Cleaning barrels with no more.This tightening is...
... or change tubes on a loaded gun, even with safety engaged. Using the Beretta spanner tighten the chokes until they are not damaged. If not, unload the firearm by operating as described in the barrels. WARNING: Choke tubes must be tighten no choke tubes in the barrels at all times, even during storage and cleaning. Cleaning barrels with no more.This tightening is...
Beretta Over & Under User Manual
Page 18
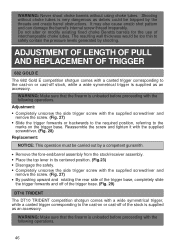
... without using choke tubes. ADJUSTMENT OF LENGTH OF PULL AND REPLACEMENT OF TRIGGER 682 GOLD E The 682 Gold E competition shotgun comes with the supplied screwdriver. (Fig. 28) Replacement: NOTICE: This operation must be carried out by the threads and create barrel obstructions. Reassemble the screw and tighten it with a canted trigger corresponding to the cast-on or cast-off of interchangeable choke tubes. Adjustment...
... without using choke tubes. ADJUSTMENT OF LENGTH OF PULL AND REPLACEMENT OF TRIGGER 682 GOLD E The 682 Gold E competition shotgun comes with the supplied screwdriver. (Fig. 28) Replacement: NOTICE: This operation must be carried out by the threads and create barrel obstructions. Reassemble the screw and tighten it with a canted trigger corresponding to the cast-on or cast-off of interchangeable choke tubes. Adjustment...
Beretta Over & Under User Manual
Page 19
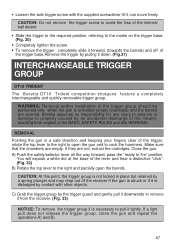
... this WARNING. WARNING: Removal and/or installation of the trigger, rotate the top lever to the right to open the barrels. Make sure that the chambers are opened. A) Push the safety/selector lever all the way forward, pass the "ready to cock the hammers. If a light pull does not release the trigger group, close the gun and repeat the operations...
... this WARNING. WARNING: Removal and/or installation of the trigger, rotate the top lever to the right to open the barrels. Make sure that the chambers are opened. A) Push the safety/selector lever all the way forward, pass the "ready to cock the hammers. If a light pull does not release the trigger group, close the gun and repeat the operations...
Beretta Over & Under User Manual
Page 20
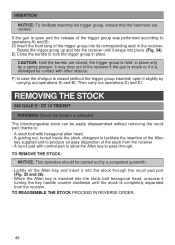
... Until the barrels are cocked. F) In case the shotgun is closed , the trigger group is completely separated from the receiver. - TO REMOVE THE STOCK: NOTICE: This operation should be easily disassembled without the trigger group inserted) open and the release of the trigger group was performed... Rotate the trigger group up and into the stock bolt hexagonal head, unscrew it slightly by a spring plunger. INSERTION NOTICE: To facilitate inserting the trigger group, ensure that the hammers are closed (without removing the recoil pad, thanks to: - The interchangeable stock can be...
... Until the barrels are cocked. F) In case the shotgun is closed , the trigger group is completely separated from the receiver. - TO REMOVE THE STOCK: NOTICE: This operation should be easily disassembled without the trigger group inserted) open and the release of the trigger group was performed... Rotate the trigger group up and into the stock bolt hexagonal head, unscrew it slightly by a spring plunger. INSERTION NOTICE: To facilitate inserting the trigger group, ensure that the hammers are closed (without removing the recoil pad, thanks to: - The interchangeable stock can be...
Beretta Over & Under User Manual
Page 21
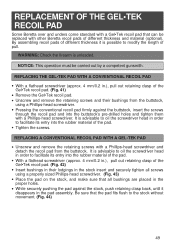
... material of pull. Be sure that all screws using a Phillips-head screwdriver. ● Pressing the conventional recoil pad firmly against the stock, push retaining clasp back, until it is advisable to oil the screwdriver head in order to modify the length of the pad. ● Tighten the screws. REPLACEMENT OF THE GEL•TEK RECOIL PAD Some Beretta over and...
... material of pull. Be sure that all screws using a Phillips-head screwdriver. ● Pressing the conventional recoil pad firmly against the stock, push retaining clasp back, until it is advisable to oil the screwdriver head in order to modify the length of the pad. ● Tighten the screws. REPLACEMENT OF THE GEL•TEK RECOIL PAD Some Beretta over and...
Beretta Over & Under User Manual
Page 22
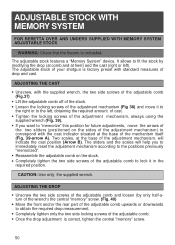
... B). CAUTION: Use only the supplied wrench. It allows to fit the stock by only half-aturn of the wrench) the central "memory" screw. (Fig. 40) ● Move the front and/or the rear part of the adjustable comb upwards or downwards to the left ). ADJUSTABLE STOCK WITH MEMORY SYSTEM FOR BERETTA OVER AND UNDERS SUPPLIED WITH MEMORY SYSTEM ADJUSTABLE STOCK WARNING...
... B). CAUTION: Use only the supplied wrench. It allows to fit the stock by only half-aturn of the wrench) the central "memory" screw. (Fig. 40) ● Move the front and/or the rear part of the adjustable comb upwards or downwards to the left ). ADJUSTABLE STOCK WITH MEMORY SYSTEM FOR BERETTA OVER AND UNDERS SUPPLIED WITH MEMORY SYSTEM ADJUSTABLE STOCK WARNING...
Beretta Over & Under User Manual
Page 23
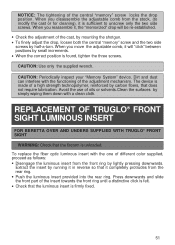
...adjustment mechanism. When you move the adjustable comb, it completely protrudes from the stock, (to unscrew only the two side screws. Press downwards and slide the front part...reassemble it is made of the cast, by mounting the shotgun. ● To finely adjust the drop, loosen both the ...cast or for cleaning), it , the "memorized" drop will "click" between positions by half-a-turn. When you disassemble the adjustable comb from the rear ring. ● Push the luminous insert provided into the rear ring. REPLACEMENT OF TRUGLO® FRONT SIGHT LUMINOUS INSERT FOR BERETTA...
...adjustment mechanism. When you move the adjustable comb, it completely protrudes from the stock, (to unscrew only the two side screws. Press downwards and slide the front part...reassemble it is made of the cast, by mounting the shotgun. ● To finely adjust the drop, loosen both the ...cast or for cleaning), it , the "memorized" drop will "click" between positions by half-a-turn. When you disassemble the adjustable comb from the rear ring. ● Push the luminous insert provided into the rear ring. REPLACEMENT OF TRUGLO® FRONT SIGHT LUMINOUS INSERT FOR BERETTA...
Beretta Over & Under User Manual
Page 24
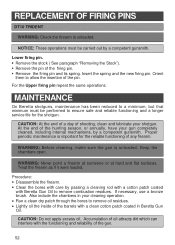
...: ● Disassemble the firearm. ● Clean the bores with Beretta Gun Oil to ensure safe and reliable functioning and a longer service life for the reliable functioning of the firing pin. ● Remove the firing pin and its spring. For the Upper firing pin repeat the same operations. Lower firing pin. ● Remove the stock ( See paragraph "Removing the Stock"). ● Remove the...
...: ● Disassemble the firearm. ● Clean the bores with Beretta Gun Oil to ensure safe and reliable functioning and a longer service life for the reliable functioning of the firing pin. ● Remove the firing pin and its spring. For the Upper firing pin repeat the same operations. Lower firing pin. ● Remove the stock ( See paragraph "Removing the Stock"). ● Remove the...
Beretta Over & Under User Manual
Page 25
...: The hinge pin area is present as instructed. ● Clean with care the external surfaces of the gun to any trace of accidents involving children, unload...shotgun, make repairs to remove any firearm without proper knowledge or training. CAUTION: Once disassembled, the firearm (barrels/fore-end and receiver/stock) should be stored in a separate locked location. Any alterations or adjustments that lubricant is a very important mating surface. Before storage, always check the conditions of your firearm so that they are numerous Beretta special parts and accessories...
...: The hinge pin area is present as instructed. ● Clean with care the external surfaces of the gun to any trace of accidents involving children, unload...shotgun, make repairs to remove any firearm without proper knowledge or training. CAUTION: Once disassembled, the firearm (barrels/fore-end and receiver/stock) should be stored in a separate locked location. Any alterations or adjustments that lubricant is a very important mating surface. Before storage, always check the conditions of your firearm so that they are numerous Beretta special parts and accessories...


