
User Manual
Page 41
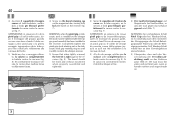
... lock the barrel on the shotgun the stock must be fixed and without movement when properly assembled and tightened. 4) Serrer le capuchon de fixation du canon sur le tube magasin, en le serrant à fond pour bloquer parfaitement le canon contre la carcasse (fig. 7). The barrel should be tightened after the trigger guard assembly has been installed in...
... lock the barrel on the shotgun the stock must be fixed and without movement when properly assembled and tightened. 4) Serrer le capuchon de fixation du canon sur le tube magasin, en le serrant à fond pour bloquer parfaitement le canon contre la carcasse (fig. 7). The barrel should be tightened after the trigger guard assembly has been installed in...
User Manual
Page 85
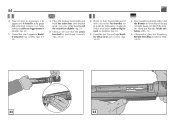
...sollevare leggermente le bretelle) (fig. 33). 5) Controllare che l'aggancio bretelle-otturatore sia corretto (figg. 3435). 4) Place the shotgun horizontally and hook the action bars onto the bolt guide (use your other hand to lift the action bars slightly) (fig. 33). 5) Check to be sure that the action bars...-bolt is positioned correctly (figs. 34-35). 4) Placer le fusil horizontalement et faire s'accrocher les bretelles sur le guide de l'obturateur (s'aider...
...sollevare leggermente le bretelle) (fig. 33). 5) Controllare che l'aggancio bretelle-otturatore sia corretto (figg. 3435). 4) Place the shotgun horizontally and hook the action bars onto the bolt guide (use your other hand to lift the action bars slightly) (fig. 33). 5) Check to be sure that the action bars...-bolt is positioned correctly (figs. 34-35). 4) Placer le fusil horizontalement et faire s'accrocher les bretelles sur le guide de l'obturateur (s'aider...
User Manual
Page 87
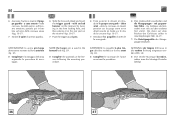
...hammer on the receiver (figs. 36-37). 7) Push the trigger guard pins. ATTENTION: la goupille la plus longue doit être montée sur le trou avant (fig. 38). 8) Compléter le montage de l'arme en suivant la procédure. 6) Den Vorderschaft vorschieben und die Abzugsgruppe - ins Gehäuse... stecken; ACHTUNG: der längere Stift muss in the rear part on the receiver, by twisting in ... auf dem Rücken des Gehäuses selbst in the forward hole (fig. 38). 8) Complete the assembly of the firearm following the mounting procedure. ...
...hammer on the receiver (figs. 36-37). 7) Push the trigger guard pins. ATTENTION: la goupille la plus longue doit être montée sur le trou avant (fig. 38). 8) Compléter le montage de l'arme en suivant la procédure. 6) Den Vorderschaft vorschieben und die Abzugsgruppe - ins Gehäuse... stecken; ACHTUNG: der längere Stift muss in the rear part on the receiver, by twisting in ... auf dem Rücken des Gehäuses selbst in the forward hole (fig. 38). 8) Complete the assembly of the firearm following the mounting procedure. ...
User Manual
Page 103
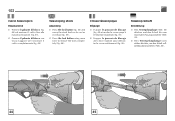
... Verriegelungsknopf noch stärker drücken, um den Schaft vollständig abzumontieren (Abb. 46). 44 45 Telescoping stock Adjusting 1) Press the lock button (fig. 44) and move the stock back as far out as it will go (fig. 45). 2) Press the lock button using more force to remove the stock completely (fig. 46).
... Verriegelungsknopf noch stärker drücken, um den Schaft vollständig abzumontieren (Abb. 46). 44 45 Telescoping stock Adjusting 1) Press the lock button (fig. 44) and move the stock back as far out as it will go (fig. 45). 2) Press the lock button using more force to remove the stock completely (fig. 46).


