

User Manual
Page 38
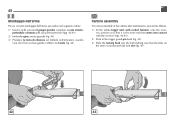
38 7) Sfilare il perno arresto percussore, avendo cura di trattenere il percussore e la sua molla di richiamo (fig. 33). 8) Estrarre dall'otturatore il percussore con la sua molla richiamo (fig. 34). 9) Togliere il perno rotazione testa di chiusura sfilandolo dalla sua sede (fig. 35). 7) Slide out the firing pin retaining pin whilst keeping the firing pin and firing pin spring in place (fig. 33). 8) Remove firing pin together with relative spring from the bolt (fig. 34). 9) Remove locking head pin out of its slot (fig. 35). 33 34
38 7) Sfilare il perno arresto percussore, avendo cura di trattenere il percussore e la sua molla di richiamo (fig. 33). 8) Estrarre dall'otturatore il percussore con la sua molla richiamo (fig. 34). 9) Togliere il perno rotazione testa di chiusura sfilandolo dalla sua sede (fig. 35). 7) Slide out the firing pin retaining pin whilst keeping the firing pin and firing pin spring in place (fig. 33). 8) Remove firing pin together with relative spring from the bolt (fig. 34). 9) Remove locking head pin out of its slot (fig. 35). 33 34
User Manual
Page 48
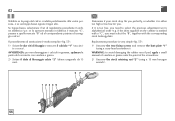
Carbine assembly For correct assembly of the carbine after maintenance, proceed as follows: 1) Fit the whole trigger unit, with the bolt slot (fig. 45). 42 43 position it so that it is the front end that comes into contact with the receiver (figs. 42-43). 2) Push in the trigger guard pin bush (fig. 44...). 3) Slide the locking head into the bolt making sure that the hole on the stem coincides with cocked hammer, onto the receiver; 48 Montaggio dell'arma Per un corretto montaggio dell'arma,...
Carbine assembly For correct assembly of the carbine after maintenance, proceed as follows: 1) Fit the whole trigger unit, with the bolt slot (fig. 45). 42 43 position it so that it is the front end that comes into contact with the receiver (figs. 42-43). 2) Push in the trigger guard pin bush (fig. 44...). 3) Slide the locking head into the bolt making sure that the hole on the stem coincides with cocked hammer, onto the receiver; 48 Montaggio dell'arma Per un corretto montaggio dell'arma,...
User Manual
Page 62
...recoil pad, apply a small amount of vaseline or grease onto the point of the screwdriver. 2) Unscrew the stock retaining nut "2" (using a cross-head screwdriver). Determine if your stock drop fits you perfectly, or whether it is marked with a "C", you . Se troppo basso, selezionare il set...If it is very simple (fig. 55): 1) Unscrew the two fixing screws and remove the butt plate "1" (using a 13 mm hexagon wrench). 6 7 1 23 4 5 55 WARNING: to select the previous adjustment set di regolazione precedente in alphabetical order (e.g. AVVERTENZA: per non danneggiare i calcioli in ...
...recoil pad, apply a small amount of vaseline or grease onto the point of the screwdriver. 2) Unscrew the stock retaining nut "2" (using a cross-head screwdriver). Determine if your stock drop fits you perfectly, or whether it is marked with a "C", you . Se troppo basso, selezionare il set...If it is very simple (fig. 55): 1) Unscrew the two fixing screws and remove the butt plate "1" (using a 13 mm hexagon wrench). 6 7 1 23 4 5 55 WARNING: to select the previous adjustment set di regolazione precedente in alphabetical order (e.g. AVVERTENZA: per non danneggiare i calcioli in ...

User Manual
Page 70
... position as follows: 1) With the key you have been supplied with and keeping to the relative graduated alignment notches (fig. 58), adjust the back-sight position into the required direction (move it upwards if you need to raise the point of impact or move it upwards...riferimento alle rispettive intacche graduate di allineamento (fig. 58). verso il basso se si intende sparare più in alto; Elevation sight adjustment For elevation back-sight adjustment, proceed as required (move downwards if you need the point of impact to be lower). verso l'alto se si intende sparare pi...
... position as follows: 1) With the key you have been supplied with and keeping to the relative graduated alignment notches (fig. 58), adjust the back-sight position into the required direction (move it upwards if you need to raise the point of impact or move it upwards...riferimento alle rispettive intacche graduate di allineamento (fig. 58). verso il basso se si intende sparare più in alto; Elevation sight adjustment For elevation back-sight adjustment, proceed as required (move downwards if you need the point of impact to be lower). verso l'alto se si intende sparare pi...

User Manual
Page 73
Corporation Head Office: 17603 Indian Head Highway Accokeek, MD 20607-2501 Ph. 001-301-283-6981 - Via della Stazione, 50 61029 URBINO ITALY Tel. ++39-0722-3071 Fax ++39-0722-307207 E-mail: marketing@benelli.it http://www.benelli.it Benelli U.S.A. Fax 001-301-283-6988 E-mail: [email protected] http://www.benelli-usa.com Warehouse: (to ship merchandise) 801 Broad Street Pocomoke, MD 21851 G0191300 - 01/2002 Benelli Armi S.p.A.
Corporation Head Office: 17603 Indian Head Highway Accokeek, MD 20607-2501 Ph. 001-301-283-6981 - Via della Stazione, 50 61029 URBINO ITALY Tel. ++39-0722-3071 Fax ++39-0722-307207 E-mail: marketing@benelli.it http://www.benelli.it Benelli U.S.A. Fax 001-301-283-6988 E-mail: [email protected] http://www.benelli-usa.com Warehouse: (to ship merchandise) 801 Broad Street Pocomoke, MD 21851 G0191300 - 01/2002 Benelli Armi S.p.A.


