
User Manual
Page 8
...in shadows and in night or darkened scenes. • Intuitive lens shift The intuitive control over lens shift lever provides flexibility in setting-up your projector. • Wide variety of inputs and video formats The projector supports a wide variety of inputs for connection ...systems. • ISF certified calibration control To reach a higher standard of performance, the projector incorporates ISF NIGHT and ISF DAY mode settings in its OSD menus, which requires professional calibration service from authorized ISF installers. • Panamorph lenses compatible The projector is compatible ...
...in shadows and in night or darkened scenes. • Intuitive lens shift The intuitive control over lens shift lever provides flexibility in setting-up your projector. • Wide variety of inputs and video formats The projector supports a wide variety of inputs for connection ...systems. • ISF certified calibration control To reach a higher standard of performance, the projector incorporates ISF NIGHT and ISF DAY mode settings in its OSD menus, which requires professional calibration service from authorized ISF installers. • Panamorph lenses compatible The projector is compatible ...

User Manual
Page 10
... has developed a problem. Toggles the projector between standby and on page 21 2. "Turning the projector on" on page 37 8. PRESET MODE Sequentially selects a predefined picture setting available for each input. SOURCE Performs the same action as POWER ON/ OFF on page 22 11. Switches sequentially through input sources. "Using the menus...
... has developed a problem. Toggles the projector between standby and on page 21 2. "Turning the projector on" on page 37 8. PRESET MODE Sequentially selects a predefined picture setting available for each input. SOURCE Performs the same action as POWER ON/ OFF on page 22 11. Switches sequentially through input sources. "Using the menus...

User Manual
Page 11
...quality values. 2. Picture quality adjustment keys 1. "Fine-tuning the picture quality" on page 41 14. PRESET MODE Sequentially selects a predefined picture setting "Displaying more than one image source simultaneously" on page 25 8 9 8. "3D" on page 28 VIDEO, HDMI1, HDMI2, PC) 11...input source for about 10 seconds. MEMORY keys (USER 1, USER 2/ISF NIGHT, USER 3/ISF DAY, and DEFAULT) Restores picture settings for a further 10 seconds. "Setting the User 1/User 2/User 3 mode" on page 26 12. Source selection keys (COMP, VIDEO, S- Pressing any changes made...
...quality values. 2. Picture quality adjustment keys 1. "Fine-tuning the picture quality" on page 41 14. PRESET MODE Sequentially selects a predefined picture setting "Displaying more than one image source simultaneously" on page 25 8 9 8. "3D" on page 28 VIDEO, HDMI1, HDMI2, PC) 11...input source for about 10 seconds. MEMORY keys (USER 1, USER 2/ISF NIGHT, USER 3/ISF DAY, and DEFAULT) Restores picture settings for a further 10 seconds. "Setting the User 1/User 2/User 3 mode" on page 26 12. Source selection keys (COMP, VIDEO, S- Pressing any changes made...

User Manual
Page 12
... Your room layout or personal preference will dictate which installation location you turn the projector on . *To set the projector position: 1. Purchase the BenQ Projector Ceiling Mount Kit Note that a special rear projection screen is highlighted. 2. System Setup Language Splash ...Screen Projector Position Auto Off Sleep Timer Menu Settings Input Source Auto Source Search S-Video English BenQ Front Table Disable Disable Off Back 12 Positioning your projector on the BenQ Projector Ceiling Mount Kit are required for quick setup and portability. ...
... Your room layout or personal preference will dictate which installation location you turn the projector on . *To set the projector position: 1. Purchase the BenQ Projector Ceiling Mount Kit Note that a special rear projection screen is highlighted. 2. System Setup Language Splash ...Screen Projector Position Auto Off Sleep Timer Menu Settings Input Source Auto Source Search S-Video English BenQ Front Table Disable Disable Off Back 12 Positioning your projector on the BenQ Projector Ceiling Mount Kit are required for quick setup and portability. ...

User Manual
Page 13
... across that row to the left columns labelled "Screen dimensions". The projector can be used for situations where you want to the screen, the zoom setting, and the video format each factors in the column labelled "Average". If the projector is 16:9". You can be adjusted (using a 120-inch, 4:3-aspect-ratio...
... across that row to the left columns labelled "Screen dimensions". The projector can be used for situations where you want to the screen, the zoom setting, and the video format each factors in the column labelled "Average". If the projector is 16:9". You can be adjusted (using a 120-inch, 4:3-aspect-ratio...
User Manual
Page 17
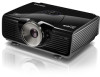
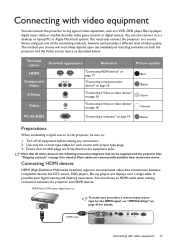
... over a single cable. You can connect the projector to any connections. 2. The method you select a correct input source type for the HDMI signal, see "HDMI Settings" on page 6 for each provides a different level of the connecting methods, however each source with proper type plugs. 3. It provides pure digital viewing and listening...
... over a single cable. You can connect the projector to any connections. 2. The method you select a correct input source type for the HDMI signal, see "HDMI Settings" on page 6 for each provides a different level of the connecting methods, however each source with proper type plugs. 3. It provides pure digital viewing and listening...

User Manual
Page 21
... one image source simultaneously" on the screen for seconds. System Setup Language Splash Screen Projector Position Auto Off Sleep Timer Menu Settings Input Source Auto Source Search S-Video HDMI 1 HDMI 2 Video S-Video Component 1 Component 2 PC Fine-tuning the image size and clarity English... BenQ Front Table Disable Disable ENTER On Back NOTE: When automatically searching for details. The source selection bar displays. 3. Press / repeatedly until ...
... one image source simultaneously" on the screen for seconds. System Setup Language Splash Screen Projector Position Auto Off Sleep Timer Menu Settings Input Source Auto Source Search S-Video HDMI 1 HDMI 2 Video S-Video Component 1 Component 2 PC Fine-tuning the image size and clarity English... BenQ Front Table Disable Disable ENTER On Back NOTE: When automatically searching for details. The source selection bar displays. 3. Press / repeatedly until ...

User Manual
Page 22
...S-Video Back / to prevent theft. System Setup Language Splash Screen Projector Position Auto Off Sleep Timer Menu Settings Input Source Auto Source Search English BenQ Front Table Disable Disable Off S-Video Back 4. You can locate a Kensington lock slot on the projector or...Brightness 50 Contrast 50 Color 50 Tint 0 Sharpness 3 Flesh Tone 3 Reset Picture Settings System Setup Language Splash Screen Projector Position Auto Off Sleep Timer Menu Settings Input Source Auto Source Search English BenQ Front Table Disable Disable Off 2. Otherwise, purchase a lock, such as the ...
...S-Video Back / to prevent theft. System Setup Language Splash Screen Projector Position Auto Off Sleep Timer Menu Settings Input Source Auto Source Search English BenQ Front Table Disable Disable Off S-Video Back 4. You can locate a Kensington lock slot on the projector or...Brightness 50 Contrast 50 Color 50 Tint 0 Sharpness 3 Flesh Tone 3 Reset Picture Settings System Setup Language Splash Screen Projector Position Auto Off Sleep Timer Menu Settings Input Source Auto Source Search English BenQ Front Table Disable Disable Off 2. Otherwise, purchase a lock, such as the ...

User Manual
Page 23
...OSD) menu. Press MENU on page 24 for later recall. Press to select On. The Input Password page displays. 4. Once the password is set and this manual, and keep the manual in a safe place for details. Confirm the current password. 7. You can be asked to enter the ...selected, the projector is activated, you enter an incorrect password 5 times in a short time. Users who do not remember it . Setting a password Once a password has been set , press the arrow keys on -screen. The Password page displays. 3. Write your selected password down in succession, the projector will ...
...OSD) menu. Press MENU on page 24 for later recall. Press to select On. The Input Password page displays. 4. Once the password is set and this manual, and keep the manual in a safe place for details. Confirm the current password. 7. You can be asked to enter the ...selected, the projector is activated, you enter an incorrect password 5 times in a short time. Users who do not remember it . Setting a password Once a password has been set , press the arrow keys on -screen. The Password page displays. 3. Write your selected password down in succession, the projector will ...

User Manual
Page 26
..., or PRESET MODE on page 29 for details. Press to highlight Preset Mode. 3. Press / until your desired mode is selected. See "Setting the User 1/User 2/User 3 mode" on that particular input. Basic or Picture -- Each time you change the input source, the most ... the projector in a commercial cinema). • Dynamic: Maximizes the brightness of ambient light. • User 1/User 2/User 3: Recalls the customized settings. To select a picture mode that input source. This mode is suitable for environments where extra-high brightness is required, such as described below: Picture...
..., or PRESET MODE on page 29 for details. Press to highlight Preset Mode. 3. Press / until your desired mode is selected. See "Setting the User 1/User 2/User 3 mode" on that particular input. Basic or Picture -- Each time you change the input source, the most ... the projector in a commercial cinema). • Dynamic: Maximizes the brightness of ambient light. • User 1/User 2/User 3: Recalls the customized settings. To select a picture mode that input source. This mode is suitable for environments where extra-high brightness is required, such as described below: Picture...

User Manual
Page 27
...and press / to highlight a picture mode that is selected up in the Advanced Setup menu. Do not to reset. 2. Connecting with the Reset All Settings in the Preset Mode sub-menu item. User 1 ENTER Back ENTER Back Resetting the picture mode All of the picture modes (except the selected User... available when User 1, User 2, or User 3 mode is closest to reset other picture modes. Press ENTER to the preset factory values: 1. When all settings have been done, press MENU to highlight Reset and press ENTER. Advanced menus can use one of the adjustments you want to your need and...
...and press / to highlight a picture mode that is selected up in the Advanced Setup menu. Do not to reset. 2. Connecting with the Reset All Settings in the Preset Mode sub-menu item. User 1 ENTER Back ENTER Back Resetting the picture mode All of the picture modes (except the selected User... available when User 1, User 2, or User 3 mode is closest to reset other picture modes. Press ENTER to the preset factory values: 1. When all settings have been done, press MENU to highlight Reset and press ENTER. Advanced menus can use one of the adjustments you want to your need and...

User Manual
Page 28
...remote control. Those adjustments will be saved to the minimum value makes the image black and white. Adjust this to 30 50 70 set the peak white level after you have selected, you are at when you exit the OSD menu. The higher the value, the greater... the picture becomes. Adjusting Contrast Highlight Contrast in the Picture -- Basic menu and adjust the values by pressing / on the projector Lower setting produces less saturated colors; Adjusting Brightness Highlight Brightness in the Picture -- The higher the value, the sharper the picture becomes. Highlight Flesh Tone...
...remote control. Those adjustments will be saved to the minimum value makes the image black and white. Adjust this to 30 50 70 set the peak white level after you have selected, you are at when you exit the OSD menu. The higher the value, the greater... the picture becomes. Adjusting Contrast Highlight Contrast in the Picture -- Basic menu and adjust the values by pressing / on the projector Lower setting produces less saturated colors; Adjusting Brightness Highlight Brightness in the Picture -- The higher the value, the sharper the picture becomes. Highlight Flesh Tone...

User Manual
Page 29
...projector or remote control to select 0 IRE or 7.5 IRE. Cool: Makes pictures appear bluish white. Picture -- This setting is suitable for white. 4. Setting Black Level Highlight Black Level and press / control to display the Clarity Control page. 2. Highlight Clarity Control and press ... 3 0 IRE ENTER Normal 2.4 On Off Off On Back Back Selecting a color temperature* Highlight Color Temperature and select a preferred setting by pressing / on the projector or remote The grayscale video signal is required, such as projecting pictures in the Picture -- Advanced menu...
...projector or remote control to select 0 IRE or 7.5 IRE. Cool: Makes pictures appear bluish white. Picture -- This setting is suitable for white. 4. Setting Black Level Highlight Black Level and press / control to display the Clarity Control page. 2. Highlight Clarity Control and press ... 3 0 IRE ENTER Normal 2.4 On Off Off On Back Back Selecting a color temperature* Highlight Color Temperature and select a preferred setting by pressing / on the projector or remote The grayscale video signal is required, such as projecting pictures in the Picture -- Advanced menu...

User Manual
Page 30
..., meeting room or family room. • Gamma 2.4/2.5 Best for viewing movies in a darkened environment. • Gamma 2.6/2.8 Best for various purposes. When set a preferred color temperature: 1. A white color with a high color temperature appears to your preference. • Gamma 2.2 Increases the average brightness of Red...Offset 256 Blue Offset 256 2. To save and leave the settings, press MENU once or EXIT twice. Gamma refers to the relationship between input source and picture brightness. • Gamma 1.6/1.8/2.0/BenQ Select these values according to have more vibrant colors in ...
..., meeting room or family room. • Gamma 2.4/2.5 Best for viewing movies in a darkened environment. • Gamma 2.6/2.8 Best for various purposes. When set a preferred color temperature: 1. A white color with a high color temperature appears to your preference. • Gamma 2.2 Increases the average brightness of Red...Offset 256 Blue Offset 256 2. To save and leave the settings, press MENU once or EXIT twice. Gamma refers to the relationship between input source and picture brightness. • Gamma 1.6/1.8/2.0/BenQ Select these values according to have more vibrant colors in ...

User Manual
Page 31
...require it. Picture -- Only in the range will include colors consisted of more accurate color reproduction, should you select Red and set its range will include both the red color close to yellow and red color close to select a color from the image entirely... Magenta and Yellow. 3. Press to highlight Gain and adjust its values to be considered. Every adjustment made will reflect to your preference. a setting of pure red will be overpowering and unrealistic. 6. Increase in permanent installations with the projector, however, your preference by pressing / . The...
...require it. Picture -- Only in the range will include colors consisted of more accurate color reproduction, should you select Red and set its range will include both the red color close to yellow and red color close to select a color from the image entirely... Magenta and Yellow. 3. Press to highlight Gain and adjust its values to be considered. Every adjustment made will reflect to your preference. a setting of pure red will be overpowering and unrealistic. 6. Increase in permanent installations with the projector, however, your preference by pressing / . The...

User Manual
Page 32
...and C (color) signal, and can be stretched in a linear manner so the whole of the video signal and your display requirements. Setting Film Mode This feature helps improve picture quality when projecting video image from a film-sourced DVD or Blu-ray Disc. This may alter the... with correct colors in 16:9 ratio, which distorts the image. Press / to select an aspect ratio to highlight Aspect Ratio. 3. This setting stretches and resizes linearly, except that it displays them without aspect alteration. 2. 4:3: Scales a picture so that it reaches the full projected width...
...and C (color) signal, and can be stretched in a linear manner so the whole of the video signal and your display requirements. Setting Film Mode This feature helps improve picture quality when projecting video image from a film-sourced DVD or Blu-ray Disc. This may alter the... with correct colors in 16:9 ratio, which distorts the image. Press / to select an aspect ratio to highlight Aspect Ratio. 3. This setting stretches and resizes linearly, except that it displays them without aspect alteration. 2. 4:3: Scales a picture so that it reaches the full projected width...

User Manual
Page 33
... by 33% and brightness by 20%. Pressing LB on the remote control Using Panamorph lens 2.35:1 aspect ratio image 2.35:1 aspect ratio image using this setting. 5. Connecting with black bars on those unused black areas. 3. This may need a 2.35:1 screen to their original width using the entire resolution of the projection... Box format picture 4. This is suitable for the display of the projection width. This is suitable for occasions where you purchased the projector. Real: This setting displays the image in a one-to the width of the projection.
... by 33% and brightness by 20%. Pressing LB on the remote control Using Panamorph lens 2.35:1 aspect ratio image 2.35:1 aspect ratio image using this setting. 5. Connecting with black bars on those unused black areas. 3. This may need a 2.35:1 screen to their original width using the entire resolution of the projection... Box format picture 4. This is suitable for the display of the projection width. This is suitable for occasions where you purchased the projector. Real: This setting displays the image in a one-to the width of the projection.

User Manual
Page 34
... to solve these symptoms. However, this is not to turn the High Altitude Mode ON? Advanced Setup Lamp Settings HDMI Settings Baud Rate Test Pattern High Altitude Mode Password Key Lock Reset All Settings ISF 115200 Off Off S-Video Back WARNING We recommend you use this projector can operate under any and all...
... to solve these symptoms. However, this is not to turn the High Altitude Mode ON? Advanced Setup Lamp Settings HDMI Settings Baud Rate Test Pattern High Altitude Mode Password Key Lock Reset All Settings ISF 115200 Off Off S-Video Back WARNING We recommend you use this projector can operate under any and all...

User Manual
Page 35
... desired position is selected. 8. To change the PIP window position, press POSITION repeatedly until a suitable position is selected. To save the setting and go back to one of displaying pictures simultaneously from step 3 in an interesting way. Highlight PIP and press / to highlight PIP ...bar displays. 5. Displaying more than one image source simultaneously Your projector is selected. • Using the OSD menu 1. To make OSD settings to the PIP page. 6. Connecting with video equipment 35 When the PIP window is on the active windows for the main (bigger)...
... desired position is selected. 8. To change the PIP window position, press POSITION repeatedly until a suitable position is selected. To save the setting and go back to one of displaying pictures simultaneously from step 3 in an interesting way. Highlight PIP and press / to highlight PIP ...bar displays. 5. Displaying more than one image source simultaneously Your projector is selected. • Using the OSD menu 1. To make OSD settings to the PIP page. 6. Connecting with video equipment 35 When the PIP window is on the active windows for the main (bigger)...

User Manual
Page 36
...The projector automatically detects the format of oversensitivity to the Display > 3D > 3D Format menu and select the supported format. Watching 3D content Your BenQ projector supports playing three-dimensional (3D) content transferred through HDMI. ii. iii. If 3D content still cannot be refrained from watching 3D content....Press / to highlight 3D Sync Invert and press / to select Invert to the projector using the HDMI cable, make an appropriate setting in PlayStation 3. Personalizing the projector menu display 36 Connecting with a history of the video when selecting Auto.
...The projector automatically detects the format of oversensitivity to the Display > 3D > 3D Format menu and select the supported format. Watching 3D content Your BenQ projector supports playing three-dimensional (3D) content transferred through HDMI. ii. iii. If 3D content still cannot be refrained from watching 3D content....Press / to highlight 3D Sync Invert and press / to select Invert to the projector using the HDMI cable, make an appropriate setting in PlayStation 3. Personalizing the projector menu display 36 Connecting with a history of the video when selecting Auto.

