
W7000 Data Sheet
Page 1
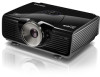
... Dimensions(W x D x H) Weight Power Supply 16.85" x 12.48" x 5.71" 14.8lbs (6.7kg) 100 to change without notice. 7 W7000 12-01-11-BQus BenQ America Corp. 15375 Barranca Parkway. Suite A-205. All rights reserved. Product names, logos, brands, and other trademarks featured or referred to change without... are the property of their respective trademark holders. Irvine, CA 92618 Tel: (949) 255-9500 www.BenQ.us BenQ is a registered trademark of Texas Instruments. W7000 VIDEO PROJECTOR 3 D Full HD Features Native Full HD 1080p (1920 x 1080) Resolution 2000 ANSI Lumens, 50000:1...
... Dimensions(W x D x H) Weight Power Supply 16.85" x 12.48" x 5.71" 14.8lbs (6.7kg) 100 to change without notice. 7 W7000 12-01-11-BQus BenQ America Corp. 15375 Barranca Parkway. Suite A-205. All rights reserved. Product names, logos, brands, and other trademarks featured or referred to change without... are the property of their respective trademark holders. Irvine, CA 92618 Tel: (949) 255-9500 www.BenQ.us BenQ is a registered trademark of Texas Instruments. W7000 VIDEO PROJECTOR 3 D Full HD Features Native Full HD 1080p (1920 x 1080) Resolution 2000 ANSI Lumens, 50000:1...

W7000 Data Sheet
Page 2
Distance Chart/Ceiling Installation W7000 Video Projector Wall Mount/Ceiling Mount Chart Ceiling mount screws: M6 x 8 (Max. L = 8 mm) 4.09" 9.45" 6.89" Dimensions 12.48" 5.71" 16.85" 3.28" 3.63" 8.75" 11.11" 15.67" 4.17" 8.33" 16.7" 4.9" 14.34" 5.95" 5.04" 5.95" 6.81" 12.76" Units: inch
Distance Chart/Ceiling Installation W7000 Video Projector Wall Mount/Ceiling Mount Chart Ceiling mount screws: M6 x 8 (Max. L = 8 mm) 4.09" 9.45" 6.89" Dimensions 12.48" 5.71" 16.85" 3.28" 3.63" 8.75" 11.11" 15.67" 4.17" 8.33" 16.7" 4.9" 14.34" 5.95" 5.04" 5.95" 6.81" 12.76" Units: inch

User Manual
Page 2
... 17 Preparations 17 Connecting HDMI devices 17 Connecting component-video devices ... 18 Connecting S-Video or video devices..... 18 Connecting a computer 19 Using the projector 20 Turning the projector on 20 Selecting an input source 21 Fine-tuning the image size and clarity 21 Using the menus 22 Securing the... projector 22 Using a security cable lock 22 Utilizing the password function 23 Adjusting the projected image 25 Adjusting the projection angle 25 2 Table of ...
... 17 Preparations 17 Connecting HDMI devices 17 Connecting component-video devices ... 18 Connecting S-Video or video devices..... 18 Connecting a computer 19 Using the projector 20 Turning the projector on 20 Selecting an input source 21 Fine-tuning the image size and clarity 21 Using the menus 22 Securing the... projector 22 Using a security cable lock 22 Utilizing the password function 23 Adjusting the projected image 25 Adjusting the projection angle 25 2 Table of ...

User Manual
Page 3
... in a safe place for your purchase of this quality BenQ video projector! Do not place inflammables near fire alarms; - Do not place the projector in any of this manual through the control menus and operation. Do not store the projector on a level, horizontal surface during operation. - For ... and be damaged; - space that you for future reference. 2. locations where altitude is poorly ventilated or confined. Always place the projector on end vertically. Do not use of the following environments: - Doing so may become excessively high, such as the inside of ...
... in a safe place for your purchase of this quality BenQ video projector! Do not place inflammables near fire alarms; - Do not place the projector in any of this manual through the control menus and operation. Do not store the projector on a level, horizontal surface during operation. - For ... and be damaged; - space that you for future reference. 2. locations where altitude is poorly ventilated or confined. Always place the projector on end vertically. Do not use of the following environments: - Doing so may become excessively high, such as the inside of ...

User Manual
Page 4
... mount installation. The lamp becomes extremely hot during operation. If the projector does become wet, BenQ's Ceiling Mount Kit for approximately 45 minutes prior to have the projector repaired. 4 Important safety instructions 5. Excessive operation of displaying inverted Liquids spilled into the projector lens is on rare occasions. Do not place liquids near or on...
... mount installation. The lamp becomes extremely hot during operation. If the projector does become wet, BenQ's Ceiling Mount Kit for approximately 45 minutes prior to have the projector repaired. 4 Important safety instructions 5. Excessive operation of displaying inverted Liquids spilled into the projector lens is on rare occasions. Do not place liquids near or on...

User Manual
Page 5
...page 46. Important safety instructions 5 They will leave marks on the crucial internal parts. Never attempt to replace the lamp assembly until the projector has cooled down and is a sudden change in temperature. 14. Avoid volatile liquids Do not use , adjust the projection lens to an... appropriate position, put the lens cushion around the lens, and fit the lens cushion and projector cushion together to a suitably qualified technician. This product contains the following materials which are dangerous high voltages inside which has its own ...
...page 46. Important safety instructions 5 They will leave marks on the crucial internal parts. Never attempt to replace the lamp assembly until the projector has cooled down and is a sudden change in temperature. 14. Avoid volatile liquids Do not use , adjust the projection lens to an... appropriate position, put the lens cushion around the lens, and fit the lens cushion and projector cushion together to a suitably qualified technician. This product contains the following materials which are dangerous high voltages inside which has its own ...

User Manual
Page 6
Some of purchase. Please consult your place of purchase. Please check with your dealer for detailed information. Projector Remote control Batteries Component Video cable Warranty card User manual CD Quick start guide Power cable VGA cable 6 Overview The warranty card is only supplied in some specific regions. Overview Shipping contents Carefully unpack and verify that you have the items below. Some of the items may not be available depending on your region of the accessories may vary from region to region.
Some of purchase. Please consult your place of purchase. Please check with your dealer for detailed information. Projector Remote control Batteries Component Video cable Warranty card User manual CD Quick start guide Power cable VGA cable 6 Overview The warranty card is only supplied in some specific regions. Overview Shipping contents Carefully unpack and verify that you have the items below. Some of the items may not be available depending on your region of the accessories may vary from region to region.

User Manual
Page 7
...infrared (IR) sensors on the ceiling, we strongly recommend that you use a proper fitting BenQ projector ceiling mount kit and that you to have a pleasant experience using your BenQ projector, so we need to bring this safety matter to your region. • If the ...from possible battery leakage. If you intend to mount your BenQ projector. You can purchase a BenQ projector ceiling mount kit from the ceiling due to negative. 3. BenQ recommends that you purchased your projector on the projector that the projector may fall from the place you also purchase a separate Kensington...
...infrared (IR) sensors on the ceiling, we strongly recommend that you use a proper fitting BenQ projector ceiling mount kit and that you to have a pleasant experience using your BenQ projector, so we need to bring this safety matter to your region. • If the ...from possible battery leakage. If you intend to mount your BenQ projector. You can purchase a BenQ projector ceiling mount kit from the ceiling due to negative. 3. BenQ recommends that you purchased your projector on the projector that the projector may fall from the place you also purchase a separate Kensington...

User Manual
Page 8
...HDTV) 720p, 1080i and 1080p formats, with the 1080p format providing a true 1:1 image reproduction. • High picture quality The projector provides excellent picture quality due to its high resolution, excellent home theater brightness, super high contrast ratio, vivid color and rich gray-scale... to automated screen and environment lighting systems. • ISF certified calibration control To reach a higher standard of performance, the projector incorporates ISF NIGHT and ISF DAY mode settings in its OSD menus, which requires professional calibration service from authorized ISF installers. ...
...HDTV) 720p, 1080i and 1080p formats, with the 1080p format providing a true 1:1 image reproduction. • High picture quality The projector provides excellent picture quality due to its high resolution, excellent home theater brightness, super high contrast ratio, vivid color and rich gray-scale... to automated screen and environment lighting systems. • ISF certified calibration control To reach a higher standard of performance, the projector incorporates ISF NIGHT and ISF DAY mode settings in its OSD menus, which requires professional calibration service from authorized ISF installers. ...

User Manual
Page 9
... video equipment" on page 10 for connection details. 7 8 9 1011 12 13 14 15 16 17 Under view 18 7. Ceiling mount holes 19 19 18 Overview 9 Projector exterior view Front and upper side view 1 2 1. Projection lens 6. HDMI ports 10. RS-232 control port Used to connect these devices. 15. S-Video input (mini...
... video equipment" on page 10 for connection details. 7 8 9 1011 12 13 14 15 16 17 Under view 18 7. Ceiling mount holes 19 19 18 Overview 9 Projector exterior view Front and upper side view 1 2 1. Projection lens 6. HDMI ports 10. RS-232 control port Used to connect these devices. 15. S-Video input (mini...

User Manual
Page 10
.... 12. "Indicators" on page 22 11. "Selecting an input source" on page 26 9. TEMPerature warning light Lights up or flashes when the projector lamp has developed a problem. "Selecting a preset mode" on page 21 10. SOURCE Performs the same action as POWER ON/ OFF on page ...provided behind the hand sign . 6. Zoom ring Adjusts the size of the projected image. POWER indicator light Lights up or flashes when the projector is activated. "Indicators" on page 21 2. Manually corrects distorted pictures resulting from an angled projection. "Using the menus" on page 22...
.... 12. "Indicators" on page 22 11. "Selecting an input source" on page 26 9. TEMPerature warning light Lights up or flashes when the projector lamp has developed a problem. "Selecting a preset mode" on page 21 10. SOURCE Performs the same action as POWER ON/ OFF on page ...provided behind the hand sign . 6. Zoom ring Adjusts the size of the projected image. POWER indicator light Lights up or flashes when the projector is activated. "Indicators" on page 21 2. Manually corrects distorted pictures resulting from an angled projection. "Using the menus" on page 22...

User Manual
Page 11
... (OSD) menu item. Remote control For details, see the info provided behind the hand sign . 1 7. POWER ON/OFF Toggles the projector between on for about 10 seconds. PRESET MODE Sequentially selects a predefined picture setting "Displaying more than one image source simultaneously" on . INVERT... main window and subwindow with ACTIVE, and adjusts the size and position of the appropriate picture quality values. 2. "Turning the projector on" on page 20, "Turning the projector off . "Selecting the aspect ratio" on page 22 10. MEMORY keys (USER 1, USER 2/ISF NIGHT, USER 3/ISF...
... (OSD) menu item. Remote control For details, see the info provided behind the hand sign . 1 7. POWER ON/OFF Toggles the projector between on for about 10 seconds. PRESET MODE Sequentially selects a predefined picture setting "Displaying more than one image source simultaneously" on . INVERT... main window and subwindow with ACTIVE, and adjusts the size and position of the appropriate picture quality values. 2. "Turning the projector on" on page 20, "Turning the projector off . "Selecting the aspect ratio" on page 22 10. MEMORY keys (USER 1, USER 2/ISF NIGHT, USER 3/ISF...

User Manual
Page 12
...screen, the location of a suitable power outlet, as well as the location and distance between the projector and the rest of four possible installation locations. Purchase the BenQ Projector Ceiling Mount Kit Note that a special rear projection screen is selected. Press MENU on . 2. Front... Table: Select this location with the projector placed near the floor in one of your projector on the BenQ Projector Ceiling Mount Kit are required for quick setup and portability. 3. Your room layout or personal preference will...
...screen, the location of a suitable power outlet, as well as the location and distance between the projector and the rest of four possible installation locations. Purchase the BenQ Projector Ceiling Mount Kit Note that a special rear projection screen is selected. Press MENU on . 2. Front... Table: Select this location with the projector placed near the floor in one of your projector on the BenQ Projector Ceiling Mount Kit are required for quick setup and portability. 3. Your room layout or personal preference will...

User Manual
Page 13
...the projected picture is 16:9". Check that projection distance. Checking the min and max projection distance values in the column labelled "Average". The projector can be adjusted (using a 120-inch, 4:3-aspect-ratio screen, please refer to the position of "Projection distance [mm]" on page 16... for a given screen size 1. Decide the exact position of the projector for details. For example, if you have different vertical offset values. Measure the distance between the min and max distances listed on these...
...the projected picture is 16:9". Check that projection distance. Checking the min and max projection distance values in the column labelled "Average". The projector can be adjusted (using a 120-inch, 4:3-aspect-ratio screen, please refer to the position of "Projection distance [mm]" on page 16... for a given screen size 1. Decide the exact position of the projector for details. For example, if you have different vertical offset values. Measure the distance between the min and max distances listed on these...

User Manual
Page 14
... : Screen : Center of lens The screen aspect ratio is 16:9 and the projected picture is not in a different position (to that recommended), you place the projector in the table above, please contact your dealer for assistance. 14 Positioning your screen size is 16:9 Screen dimensions Diagonal [inch (mm)] Height [mm] Width...10772 311 250 (6350) 3113 5534 8977 11221 13465 389 300 (7620) 3735 6641 10772 13465 16158 467 The above numbers are listed. If your projector Use the Keystone function to center the image on page 25 for details. If you will occur.
... : Screen : Center of lens The screen aspect ratio is 16:9 and the projected picture is not in a different position (to that recommended), you place the projector in the table above, please contact your dealer for assistance. 14 Positioning your screen size is 16:9 Screen dimensions Diagonal [inch (mm)] Height [mm] Width...10772 311 250 (6350) 3113 5534 8977 11221 13465 389 300 (7620) 3735 6641 10772 13465 16158 467 The above numbers are listed. If your projector Use the Keystone function to center the image on page 25 for details. If you will occur.

User Manual
Page 15
... 343 457 572 686 800 914 1029 1143 1257 1372 1486 1600 1715 1829 1943 2057 2172 2286 2858 3429 The above , please contact your projector 15 Only the recommended screen sizes are provided for those users who already have 4:3 aspect ratio screens or intend to purchase 4:3 aspect ratio screens to...
... 343 457 572 686 800 914 1029 1143 1257 1372 1486 1600 1715 1829 1943 2057 2172 2286 2858 3429 The above , please contact your projector 15 Only the recommended screen sizes are provided for those users who already have 4:3 aspect ratio screens or intend to purchase 4:3 aspect ratio screens to...

User Manual
Page 16
...shift lever: 1. Lock the lever by turning it clockwise. • When the screen position is fixed Projector Screen Range of placement Center of lens • When the projector position is measured as a percentage of the screen. Shifting the projection lens The lens shift control provides ...flexibility for details. 16 Positioning your projector To use the lever to adjust the projected image position. 3. Release the lever by turning it counterclockwise. 2. The lens shift ...
...shift lever: 1. Lock the lever by turning it clockwise. • When the screen position is fixed Projector Screen Range of placement Center of lens • When the projector position is measured as a percentage of the screen. Shifting the projection lens The lens shift control provides ...flexibility for details. 16 Positioning your projector To use the lever to adjust the projected image position. 3. Release the lever by turning it counterclockwise. 2. The lens shift ...
User Manual
Page 17
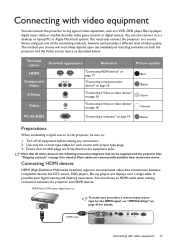
... can also connect it to : 1. Use only the correct type cables for each provides a different level of matching terminals on both the projector and the Video source device as a VCR, DVD player, Blu-ray player, digital tuner, cable or satellite decoder, video game console or... digital camera. Connecting HDMI devices HDMI (High-Definition Multimedia Interface) supports uncompressed video data transmission between the projector and HDMI devices. HDMI device: DVD player, digital tuner, etc. Ensure that all cables shown in the following connection diagrams may not...
... can also connect it to : 1. Use only the correct type cables for each provides a different level of matching terminals on both the projector and the Video source device as a VCR, DVD player, Blu-ray player, digital tuner, cable or satellite decoder, video game console or... digital camera. Connecting HDMI devices HDMI (High-Definition Multimedia Interface) supports uncompressed video data transmission between the projector and HDMI devices. HDMI device: DVD player, digital tuner, etc. Ensure that all cables shown in the following connection diagrams may not...

User Manual
Page 18
... Component Video connection between the cables and the terminals. Connecting component-video devices Be sure to match the corresponding colors between the projector and the video source device, you have been connected correctly. 18 Connecting with some analog video cameras). • If the ...selected video image is not displayed after the projector is turned on and operating correctly. AV equipment From audio output To audio input terminals terminals S-Video cable or Video cable &#...
... Component Video connection between the cables and the terminals. Connecting component-video devices Be sure to match the corresponding colors between the projector and the video source device, you have been connected correctly. 18 Connecting with some analog video cameras). • If the ...selected video image is not displayed after the projector is turned on and operating correctly. AV equipment From audio output To audio input terminals terminals S-Video cable or Video cable &#...

User Manual
Page 19
Usually a key combination like Fn + F3 or CRT/LCD key turns the external display on the laptop. Connecting a computer Connect the projector to a computer with video equipment 19 Press Fn and the labeled function key simultaneously. Laptop or desktop computer To audio input terminals From audio output ... combination. Connecting with a VGA cable. Locate a function key labeled CRT/LCD or a function key with a monitor symbol on /off. Refer to your laptop's documentation to a projector.
Usually a key combination like Fn + F3 or CRT/LCD key turns the external display on the laptop. Connecting a computer Connect the projector to a computer with video equipment 19 Press Fn and the labeled function key simultaneously. Laptop or desktop computer To audio input terminals From audio output ... combination. Connecting with a VGA cable. Locate a function key labeled CRT/LCD or a function key with a monitor symbol on /off. Refer to your laptop's documentation to a projector.


