

User Guide
Page 5
... view ...4 Bottom view...5 REMOTE CONTROL PARTS ...6 REMOTE CONTROL OPERATING RANGE...8 PROJECTOR AND REMOTE CONTROL BUTTONS...8 SETUP AND OPERATION...9 INSERTING THE REMOTE CONTROL BATTERIES ...9 CONNECTING INPUT DEVICES ...10 STARTING AND SHUTTING DOWN THE PROJECTOR...11 SETTING AN ACCESS PASSWORD (SECURITY LOCK) ...12 ADJUSTING THE PROJECTOR LEVEL ...13 ADJUSTING THE ZOOM, FOCUS AND KEYSTONE ...14 ADJUSTING...
... view ...4 Bottom view...5 REMOTE CONTROL PARTS ...6 REMOTE CONTROL OPERATING RANGE...8 PROJECTOR AND REMOTE CONTROL BUTTONS...8 SETUP AND OPERATION...9 INSERTING THE REMOTE CONTROL BATTERIES ...9 CONNECTING INPUT DEVICES ...10 STARTING AND SHUTTING DOWN THE PROJECTOR...11 SETTING AN ACCESS PASSWORD (SECURITY LOCK) ...12 ADJUSTING THE PROJECTOR LEVEL ...13 ADJUSTING THE ZOOM, FOCUS AND KEYSTONE ...14 ADJUSTING...
User Guide
Page 9
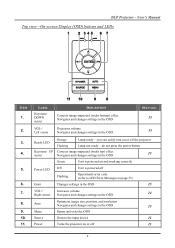
...Orange Flashing Lamp ready-you can safely turn on or off the projector Lamp not ready-do not press the power button Keystone/ UP Corrects image-trapezoid (wider top) effect cursor Navigates and changes settings in the OSD 15 Green Unit is powered on and working ... the OSD 14 Auto Optimizes image size, position, and resolution Navigates and changes settings in the OSD 15 Menu Opens and exits the OSD Source Detects the input device 11 Power Turns the projector on or off 11 - 3 - UUsseerr''ss MMaannuuaall Top view-On-screen Display (OSD) buttons and LEDs ITEM 1. 2. 3. 4....
...Orange Flashing Lamp ready-you can safely turn on or off the projector Lamp not ready-do not press the power button Keystone/ UP Corrects image-trapezoid (wider top) effect cursor Navigates and changes settings in the OSD 15 Green Unit is powered on and working ... the OSD 14 Auto Optimizes image size, position, and resolution Navigates and changes settings in the OSD 15 Menu Opens and exits the OSD Source Detects the input device 11 Power Turns the projector on or off 11 - 3 - UUsseerr''ss MMaannuuaall Top view-On-screen Display (OSD) buttons and LEDs ITEM 1. 2. 3. 4....
User Guide
Page 13
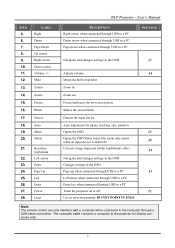
... through a USB cable connection. DDLLPP PPrroojjeeccttoorr -- Page Up 25. Left 26. The computer cable connects a computer to a PC Turns the projector on or off 11 Use as on -screen picture Makes the screen blank Detects the input device Auto adjustment for phase, tracking, size, position...only opens when an input device is detected) 28 Corrects image-trapezoid (wider top/bottom) effect 14 Navigates and changes settings in the OSD Changes settings in Zoom out Freeze/unfreezes the on -screen pointer. LABEL Right Down Page Down Up cursor Right cursor Down cursor ...
... through a USB cable connection. DDLLPP PPrroojjeeccttoorr -- Page Up 25. Left 26. The computer cable connects a computer to a PC Turns the projector on or off 11 Use as on -screen picture Makes the screen blank Detects the input device Auto adjustment for phase, tracking, size, position...only opens when an input device is detected) 28 Corrects image-trapezoid (wider top/bottom) effect 14 Navigates and changes settings in the OSD Changes settings in Zoom out Freeze/unfreezes the on -screen pointer. LABEL Right Down Page Down Up cursor Right cursor Down cursor ...

User Guide
Page 17
... the computer keyboard to switch the display output to the projector. (Check the user manual of the PC to determine the appropriate Fn key combination to a wall outlet. Connect the other end to change display output.) See Setting an Access Password (Security Lock) on page 12 if ...Security Lock is a PC, press the appropriate keys on (-). 3. If more than one input device is on the projector. DDLLPP PPrroojjeeccttoorr -- Switch (B) from off . To turn on a...
... the computer keyboard to switch the display output to the projector. (Check the user manual of the PC to determine the appropriate Fn key combination to a wall outlet. Connect the other end to change display output.) See Setting an Access Password (Security Lock) on page 12 if ...Security Lock is a PC, press the appropriate keys on (-). 3. If more than one input device is on the projector. DDLLPP PPrroojjeeccttoorr -- Switch (B) from off . To turn on a...
User Guide
Page 18
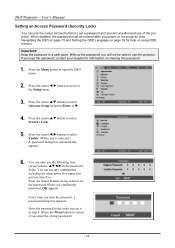
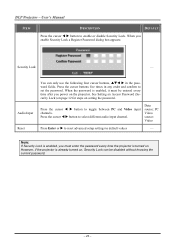
...combination including the same arrow five times, but not less than five. UUsseerr''ss MMaannuuaall Setting an Access Password (Security Lock) You can only use the projector. Important: Keep the password in the order you set it at step 6. (Press the Menu button to select Advance Setup and press Enter or... X. 4. Without the password, you power on the projector (see Navigating the OSD on page 15 and Setting the OSD Language on page 16 for information on using OSD menus). If you enter the wrong password.) - 12 - ...
...combination including the same arrow five times, but not less than five. UUsseerr''ss MMaannuuaall Setting an Access Password (Security Lock) You can only use the projector. Important: Keep the password in the order you set it at step 6. (Press the Menu button to select Advance Setup and press Enter or... X. 4. Without the password, you power on the projector (see Navigating the OSD on page 15 and Setting the OSD Language on page 16 for information on using OSD menus). If you enter the wrong password.) - 12 - ...
User Guide
Page 19
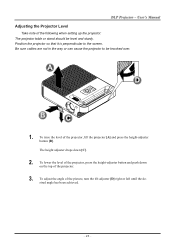
... until the desired angle has been achieved. - 13 - UUsseerr''ss MMaannuuaall Adjusting the Projector Level Take note of the following when setting up the projector: The projector table or stand should be knocked over. 1. To adjust the angle of the projector, lift the projector [A] and press the height-adjuster button [B]. DDLLPP PPrroojjeeccttoorr -- The height adjuster drops...
... until the desired angle has been achieved. - 13 - UUsseerr''ss MMaannuuaall Adjusting the Projector Level Take note of the following when setting up the projector: The projector table or stand should be knocked over. 1. To adjust the angle of the projector, lift the projector [A] and press the height-adjuster button [B]. DDLLPP PPrroojjeeccttoorr -- The height adjuster drops...
User Guide
Page 21
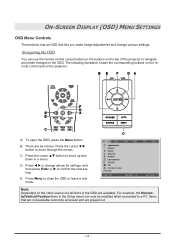
... items in the Setup menu can use the remote control cursor buttons or the buttons on the top of the projector to navigate and make image adjustments and change values for settings, and then press Enter or X to close the OSD or leave a submenu. Items that lets you make... W X button to the OSD. Note: Depending on the projector. Navigating the OSD You can only be accessed and are grayed out. - 15 - Press Menu to confirm the new setting. A. ON-SCREEN DISPLAY (OSD) MENU SETTINGS OSD Menu Controls The projector has an OSD that are not available cannot be modified when...
... items in the Setup menu can use the remote control cursor buttons or the buttons on the top of the projector to navigate and make image adjustments and change values for settings, and then press Enter or X to close the OSD or leave a submenu. Items that lets you make... W X button to the OSD. Note: Depending on the projector. Navigating the OSD You can only be accessed and are grayed out. - 15 - Press Menu to confirm the new setting. A. ON-SCREEN DISPLAY (OSD) MENU SETTINGS OSD Menu Controls The projector has an OSD that are not available cannot be modified when...
User Guide
Page 22
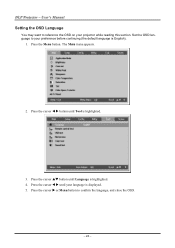
UUsseerr''ss MMaannuuaall Setting the OSD Language You may want to reference the OSD on your preference before continuing (the default language is displayed. 5. Press the cursor W X button until Tool is highlighted. 4. Press the cursor X or Menu button to your projector while reading this section. DDLLPP PPrroojjeeccttoorr -- Press the Menu button. Press the cursor ST button until your language is English). 1. Set the OSD language to confirm the language, and close the OSD. - 16 - The Main menu appears. 2. Press the cursor W X until Language is highlighted. 3.
UUsseerr''ss MMaannuuaall Setting the OSD Language You may want to reference the OSD on your preference before continuing (the default language is displayed. 5. Press the cursor W X button until Tool is highlighted. 4. Press the cursor X or Menu button to your projector while reading this section. DDLLPP PPrroojjeeccttoorr -- Press the Menu button. Press the cursor ST button until your language is English). 1. Set the OSD language to confirm the language, and close the OSD. - 16 - The Main menu appears. 2. Press the cursor W X until Language is highlighted. 3.
User Guide
Page 23
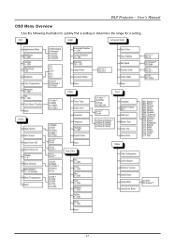
DDLLPP PPrroojjeeccttoorr -- UUsseerr''ss MMaannuuaall OSD Menu Overview Use the following illustration to quickly find a setting or determine the range for a setting. - 17 -
DDLLPP PPrroojjeeccttoorr -- UUsseerr''ss MMaannuuaall OSD Menu Overview Use the following illustration to quickly find a setting or determine the range for a setting. - 17 -
User Guide
Page 24
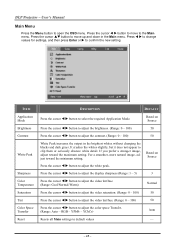
...menu. It crushes the whites slightly, but it does not appear to open the OSD menu. For a smoother, more natural image, adjust toward the maximum setting. RGB - Press the cursor ST button to move to adjust the contrast. (Range: 0 - 100) Based on Source 3 Normal 50 50 Auto Resets ...all Main settings to adjust the color space Transfer. (Range: Auto - Press the cursor W X button to adjust the display sharpness (Range: 1 - 5) Press the cursor W X button to ...
...menu. It crushes the whites slightly, but it does not appear to open the OSD menu. For a smoother, more natural image, adjust toward the maximum setting. RGB - Press the cursor ST button to move to adjust the contrast. (Range: 0 - 100) Based on Source 3 Normal 50 50 Auto Resets ...all Main settings to adjust the color space Transfer. (Range: Auto - Press the cursor W X button to adjust the display sharpness (Range: 1 - 5) Press the cursor W X button to ...
User Guide
Page 26
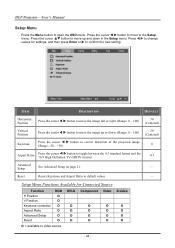
...(HDTV) format. 4:3 Advanced Setup See Advanced Setup on page 21. - DDLLPP PPrroojjeeccttoorr -- Setup Menu Functions Available for settings, and then press Enter or X to move to video source - 20 - UUsseerr''ss MMaannuuaall Setup Menu Press the Menu... button to default values - Reset Resets Keystone and Aspect Ratio to open the OSD menu. Press the cursor ST button to confirm the new setting. Press W X to change values for Connected Source Function H Position V Position Keystone correction Aspect Ratio Advanced Setup Reset RGB O O O O O O DVI-D O O O O Component O O O...
...(HDTV) format. 4:3 Advanced Setup See Advanced Setup on page 21. - DDLLPP PPrroojjeeccttoorr -- Setup Menu Functions Available for settings, and then press Enter or X to move to video source - 20 - UUsseerr''ss MMaannuuaall Setup Menu Press the Menu... button to default values - Reset Resets Keystone and Aspect Ratio to open the OSD menu. Press the cursor ST button to confirm the new setting. Press W X to change values for Connected Source Function H Position V Position Keystone correction Aspect Ratio Advanced Setup Reset RGB O O O O O O DVI-D O O O O Component O O O...
User Guide
Page 27
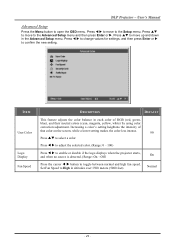
... W X to move up and down in altitudes over 1500 meters (5000 feet). 80 On Normal - 21 - Press W X to change values for settings, and then press Enter or X to toggle between normal and high fan speed. Press W X to adjust the selected color. (Range: 0 - 100) Press W X to open ... Press the Menu button to enable or disable if the logo displays when the projector starts, and when no source is detected. (Range: On - Press ST to move to High in the Advanced Setup menu. Increasing a color's setting heightens the intensity of RGB (red, green, blue), and their neutral colors (cyan, ...
... W X to move up and down in altitudes over 1500 meters (5000 feet). 80 On Normal - 21 - Press W X to change values for settings, and then press Enter or X to toggle between normal and high fan speed. Press W X to adjust the selected color. (Range: 0 - 100) Press W X to open ... Press the Menu button to enable or disable if the logo displays when the projector starts, and when no source is detected. (Range: On - Press ST to move to High in the Advanced Setup menu. Increasing a color's setting heightens the intensity of RGB (red, green, blue), and their neutral colors (cyan, ...
User Guide
Page 28
...22 - When the password is enabled, it must enter the password every time the projector is turned on , Security Lock can only use the following four cursor buttons, STW X in any order and confirm to set the password. See Setting an Access Password (Security Lock) on page 12 for steps on the... projector. Note: If Security Lock is already turned on . Data source: PC Video source: Video Press Enter...
...22 - When the password is enabled, it must enter the password every time the projector is turned on , Security Lock can only use the following four cursor buttons, STW X in any order and confirm to set the password. See Setting an Access Password (Security Lock) on page 12 for steps on the... projector. Note: If Security Lock is already turned on . Data source: PC Video source: Video Press Enter...
User Guide
Page 29
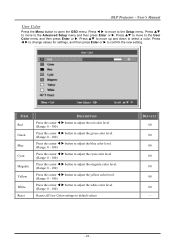
Press W X to move up and down to the Setup menu. Press ST to move to select a color. Press W X to change values for settings, and then press Enter or X to default values DEFAULT 80 80 80 80 80 80 80 - - 23 - ITEM Red Green Blue Cyan Magenta Yellow White ... adjust the yellow color level. (Range: 0 - 100) Press the cursor W X button to adjust the white color level. (Range: 0 - 100) Resets all User Color settings to confirm the new setting. Press ST to move to the Advanced Setup menu and then press Enter or X. Press ST to move to the User Color menu...
Press W X to move up and down to the Setup menu. Press ST to move to select a color. Press W X to change values for settings, and then press Enter or X to default values DEFAULT 80 80 80 80 80 80 80 - - 23 - ITEM Red Green Blue Cyan Magenta Yellow White ... adjust the yellow color level. (Range: 0 - 100) Press the cursor W X button to adjust the white color level. (Range: 0 - 100) Resets all User Color settings to confirm the new setting. Press ST to move to the Advanced Setup menu and then press Enter or X. Press ST to move to the User Color menu...
User Guide
Page 30
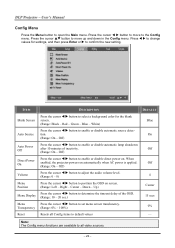
... lamp shutdown after 10 minutes of inactivity. (Range: On - Red - Blue - When enabled, the projector powers on . Note: The Config menu functions are available to select a background color for settings, and then press Enter or X to move to position the OSD on screen. (Range: Left -...- Press W X to change values for the blank screen. (Range: Black - Down - DDLLPP PPrroojjeeccttoorr -- Press the cursor ST button to confirm the new setting. White) Press the cursor W X button to enable or disable direct power on automatically when AC power is applied. (Range: On - Off) Press the ...
... lamp shutdown after 10 minutes of inactivity. (Range: On - Red - Blue - When enabled, the projector powers on . Note: The Config menu functions are available to select a background color for settings, and then press Enter or X to move to position the OSD on screen. (Range: Left -...- Press W X to change values for the blank screen. (Range: Black - Down - DDLLPP PPrroojjeeccttoorr -- Press the cursor ST button to confirm the new setting. White) Press the cursor W X button to enable or disable direct power on automatically when AC power is applied. (Range: On - Off) Press the ...
User Guide
Page 31
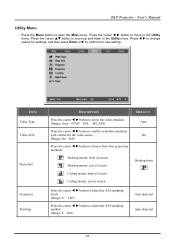
... Projection Frequency Tracking DESCRIPTION Press the cursor W X button to open the Main menu. Press W X to confirm the new setting. PAL - SECAM) Press the cursor W X button to enable or disable automatic gain control for settings, and then press Enter or X to change values for the video source. (Range: On - UUsseerr''ss MMaannuuaall Utility...
... Projection Frequency Tracking DESCRIPTION Press the cursor W X button to open the Main menu. Press W X to confirm the new setting. PAL - SECAM) Press the cursor W X button to enable or disable automatic gain control for settings, and then press Enter or X to change values for the video source. (Range: On - UUsseerr''ss MMaannuuaall Utility...
User Guide
Page 33
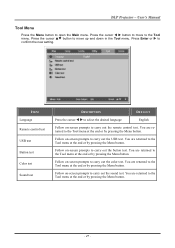
UUsseerr''ss MMaannuuaall Tool Menu Press the Menu button to confirm the new setting. Press the cursor ST button to move to carry out the sound test. Follow on -screen prompts to the Tool menu. You are returned to ...
UUsseerr''ss MMaannuuaall Tool Menu Press the Menu button to confirm the new setting. Press the cursor ST button to move to carry out the sound test. Follow on -screen prompts to the Tool menu. You are returned to ...
User Guide
Page 41
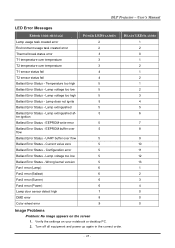
Current value zero 5 10 Ballast Error Status - Verify the settings on the screen 1. Lamp voltage too high 5 3 Ballast Error Status - Lamp does not ignite 5 4 Ballast Error Status - Lamp extinguished 5 5 Ballast Error Status - EEPROM buffer over ...
Current value zero 5 10 Ballast Error Status - Verify the settings on the screen 1. Lamp voltage too high 5 3 Ballast Error Status - Lamp does not ignite 5 4 Ballast Error Status - Lamp extinguished 5 5 Ballast Error Status - EEPROM buffer over ...
User Guide
Page 42
...within the 10-meter (33-feet) specified range. 4. Ensure the projector-to turn off. Adjust the Focus on the remote control or projector. 3. Position the projector so it is securely connected. 2. Set the Frequency and Tracking settings on , press the power button. 2. Problem: The image is... good by a connected PC's video card, connect to the default settings. 2. Replace the lamp module....
...within the 10-meter (33-feet) specified range. 4. Ensure the projector-to turn off. Adjust the Focus on the remote control or projector. 3. Position the projector so it is securely connected. 2. Set the Frequency and Tracking settings on , press the power button. 2. Problem: The image is... good by a connected PC's video card, connect to the default settings. 2. Replace the lamp module....

