
Display Pilot User Manual
Page 2
... user if problems (such as data loss and system failure) occurred due to reach a menu are used for flicker-free models only) The performance of their respective companies, and are shown in any form or by any warranties, merchantability or fitness for example: System > Information. In this document, the steps needed to non-factory installed software, parts, and/or non-original accessories. (Applicable for informational...
... user if problems (such as data loss and system failure) occurred due to reach a menu are used for flicker-free models only) The performance of their respective companies, and are shown in any form or by any warranties, merchantability or fitness for example: System > Information. In this document, the steps needed to non-factory installed software, parts, and/or non-original accessories. (Applicable for informational...

Display Pilot User Manual
Page 3
... Servicing (Windows only)...2 Typographics...2 Introduction...4 Compatible operating systems...4 Installing and launching the Display Pilot software...4 Exiting Display Pilot...4 Overview...5 Adjusting the settings...6 Configuring Preferences...6 Color setting synchronization between computer and monitor (ICCsync)(selected models only 6 Applying and customizing a color mode...7 Selecting a color mode from the menu (Color Mode 7 Customizing and restoring a color mode...7 Switching color modes with keyboard shortcuts...8 Switching color modes from the context menu (Windows only 8 Switching...
... Servicing (Windows only)...2 Typographics...2 Introduction...4 Compatible operating systems...4 Installing and launching the Display Pilot software...4 Exiting Display Pilot...4 Overview...5 Adjusting the settings...6 Configuring Preferences...6 Color setting synchronization between computer and monitor (ICCsync)(selected models only 6 Applying and customizing a color mode...7 Selecting a color mode from the menu (Color Mode 7 Customizing and restoring a color mode...7 Switching color modes with keyboard shortcuts...8 Switching color modes from the context menu (Windows only 8 Switching...
Display Pilot User Manual
Page 4
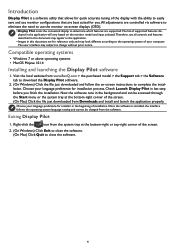
... the installation. Introduction Display Pilot is installed, the interface follows the operating system language setting and cannot be accessed through the Start menu or the system tray at the bottom-right or top-right corner of supported features displayed in the application will vary based on -screen instructions to complete the installation. Exiting Display Pilot 1. All adjustments are controlled via software to eliminate the need to use monitor...
... the installation. Introduction Display Pilot is installed, the interface follows the operating system language setting and cannot be accessed through the Start menu or the system tray at the bottom-right or top-right corner of supported features displayed in the application will vary based on -screen instructions to complete the installation. Exiting Display Pilot 1. All adjustments are controlled via software to eliminate the need to use monitor...

Display Pilot User Manual
Page 5
... a color mode on page 7 • Working with two color modes simultaneously (DualView) on page 9 2 Display menu Switches to different input signals, or pivot, PIP, and PBP settings. • Changing an input on page 10 • Rotating your screen on page 10 • Working with two or more video sources (PIP/PBP) on page 10 3 Tools menu Access to extended functions to work with multiple application windows and...
... a color mode on page 7 • Working with two color modes simultaneously (DualView) on page 9 2 Display menu Switches to different input signals, or pivot, PIP, and PBP settings. • Changing an input on page 10 • Rotating your screen on page 10 • Working with two or more video sources (PIP/PBP) on page 10 3 Tools menu Access to extended functions to work with multiple application windows and...

Display Pilot User Manual
Page 7
... adjustment bars from the menu (Color Mode) 1. All except the HDR color mode (if supported) available for the connected monitor are provided with several ways to apply a color mode. • Available color modes vary by model.Visit www.BenQ.com > the purchased model > the Specifications tab to the user manual of the Color Mode list. Select the desired color modes and click Reset. 7 Selecting a color mode from the window, or input...
... adjustment bars from the menu (Color Mode) 1. All except the HDR color mode (if supported) available for the connected monitor are provided with several ways to apply a color mode. • Available color modes vary by model.Visit www.BenQ.com > the purchased model > the Specifications tab to the user manual of the Color Mode list. Select the desired color modes and click Reset. 7 Selecting a color mode from the window, or input...

Display Pilot User Manual
Page 10
... the keys to Tools > Keyboard Hotkey. 2. Go to Display > Display. 2. Select the desired input from the menu 1. Go to Display > PIP/PBP. 3. Connect the video cable properly between the monitor and the video sources. 2. Automatically rotate the screen (Auto Pivot)(selected models only) 1. Make sure you cannot control the monitor input and switch the signal back from the original computer.To switch inputs easily from the list for hotkey switch. Select...
... the keys to Tools > Keyboard Hotkey. 2. Go to Display > Display. 2. Select the desired input from the menu 1. Go to Display > PIP/PBP. 3. Connect the video cable properly between the monitor and the video sources. 2. Automatically rotate the screen (Auto Pivot)(selected models only) 1. Make sure you cannot control the monitor input and switch the signal back from the original computer.To switch inputs easily from the list for hotkey switch. Select...

Display Pilot User Manual
Page 15
... will be reset. To reset color modes only, go to switch on the function.The system will be prompted to download and/or to the Internet. 2. Go to System > Preferences > Auto update notice and move the slide to System > Information > Factory Reset. All the customized changes will then check for a system update automatically 1. Make sure your computer is launched. 3. If a software update is required...
... will be reset. To reset color modes only, go to switch on the function.The system will be prompted to download and/or to the Internet. 2. Go to System > Preferences > Auto update notice and move the slide to System > Information > Factory Reset. All the customized changes will then check for a system update automatically 1. Make sure your computer is launched. 3. If a software update is required...
Resolution file
Page 1
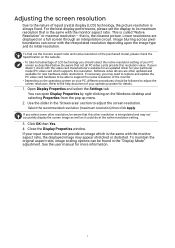
... the "Display Mode" adjustment. If your PC, different procedures should select the native resolution setting of liquid crystal display (LCD) technology, the picture resolution is interpolated and may appear stretched or distorted. To find out the monitor aspect ratio and native resolution of the purchased model, please check the Specification on a full screen through an interpolation circuit. Software video drivers are displayed on...
... the "Display Mode" adjustment. If your PC, different procedures should select the native resolution setting of liquid crystal display (LCD) technology, the picture resolution is interpolated and may appear stretched or distorted. To find out the monitor aspect ratio and native resolution of the purchased model, please check the Specification on a full screen through an interpolation circuit. Software video drivers are displayed on...

Resolution file
Page 2
Close the Display Properties window. 2 The best results are obtained by using the factory modes already set in Control Panel. 2. Double click the Display icon in your computer. Select the Adapter tab, and select an appropriate refresh rate to the help document of the applicable factory modes as listed in the specification table. 4. From the Display Properties window, select the Settings tab and click the Advanced button. 3. Adjusting the screen refresh...
Close the Display Properties window. 2 The best results are obtained by using the factory modes already set in Control Panel. 2. Double click the Display icon in your computer. Select the Adapter tab, and select an appropriate refresh rate to the help document of the applicable factory modes as listed in the specification table. 4. From the Display Properties window, select the Settings tab and click the Advanced button. 3. Adjusting the screen refresh...

User Manual
Page 4
... color mode? Setup How to frequently used functions or menus? Using the monitor wall mounting kit (purchased separately) 41 Menus and accessories How to use the provided controller (Hotkey Puck G2)? Choosing an appropriate color mode 49 What menu options are interested in. Working with the topics that you are available to each Color Mode 63 How to switch the input sources? Connect the PC video cable. 22 Signal Input...
... color mode? Setup How to frequently used functions or menus? Using the monitor wall mounting kit (purchased separately) 41 Menus and accessories How to use the provided controller (Hotkey Puck G2)? Choosing an appropriate color mode 49 What menu options are interested in. Working with the topics that you are available to each Color Mode 63 How to switch the input sources? Connect the PC video cable. 22 Signal Input...

User Manual
Page 10
... user to check whether the monitor is the sole responsibility of its intended sales area. power cable) only with local technical standards if the user brings the monitor out of the user if problems (such as electric shock and fire. Note Supplementary information. Useful information for example: Menu > System > Information. 10 Failure to components, data, or personal injury caused by misuse and improper operation...
... user to check whether the monitor is the sole responsibility of its intended sales area. power cable) only with local technical standards if the user brings the monitor out of the user if problems (such as electric shock and fire. Note Supplementary information. Useful information for example: Menu > System > Information. 10 Failure to components, data, or personal injury caused by misuse and improper operation...
User Manual
Page 11
... ...39 Viewing angle adjustment 40 Using the monitor wall mounting kit (purchased separately 41 How to adjust your monitor 42 The control panel ...42 5-way controller and basic menu operations 43 Working with the hot keys 45 Hotkey Puck G2 and its basic operations 47 Working with a Mac series product 49 Adjusting Display Mode 49 Choosing an appropriate color mode 49 Working with two or more video sources with one set of...
... ...39 Viewing angle adjustment 40 Using the monitor wall mounting kit (purchased separately 41 How to adjust your monitor 42 The control panel ...42 5-way controller and basic menu operations 43 Working with the hot keys 45 Hotkey Puck G2 and its basic operations 47 Working with a Mac series product 49 Adjusting Display Mode 49 Choosing an appropriate color mode 49 Working with two or more video sources with one set of...

User Manual
Page 22
... the setting is not displayed, disconnect the DP cable. The video cables included in this document may connect the headphones to an appropriate port of the video cable to the headphone jack. 22 or or 2. Connect the PC video cable. To go to any video source other end of a digital output source (e.g., a computer). 3. 2. Connect the monitor to the OSD menu, see 5-way controller and basic menu operations on the monitor. Connect the...
... the setting is not displayed, disconnect the DP cable. The video cables included in this document may connect the headphones to an appropriate port of the video cable to the headphone jack. 22 or or 2. Connect the PC video cable. To go to any video source other end of a digital output source (e.g., a computer). 3. 2. Connect the monitor to the OSD menu, see 5-way controller and basic menu operations on the monitor. Connect the...

User Manual
Page 47
... Mode) by default. Alternatively, go to the monitor. Hotkey Puck G2 and its basic operations Apart from the control keys, Hotkey Puck G2 also provides a quick way to control and access the OSD menu. • You need to connect the Hotkey Puck G2 to your monitor prior to other devices with mini USB ports. 1 2 6 3 5 4 No. Do not connect it to use. Follow the instructions in Connect...
... Mode) by default. Alternatively, go to the monitor. Hotkey Puck G2 and its basic operations Apart from the control keys, Hotkey Puck G2 also provides a quick way to control and access the OSD menu. • You need to connect the Hotkey Puck G2 to your monitor prior to other devices with mini USB ports. 1 2 6 3 5 4 No. Do not connect it to use. Follow the instructions in Connect...
User Manual
Page 48
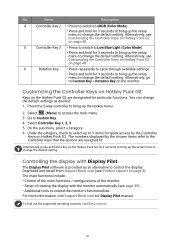
... up the setup menu to change the default setting. Select (Menu) to Custom Key. 4. Alternatively, press and hold a key on page 48. 5 Controller Key 3 • Press to switch to Low Blue Light (Color Mode). • Press and hold for 3 seconds to bring up the setup menu to change the default setting. For more information, visit Support.BenQ.com for particular functions. Customizing the Controller Keys on Hotkey Puck G2 Keys on the monitor. Controlling the display with...
... up the setup menu to change the default setting. Select (Menu) to Custom Key. 4. Alternatively, press and hold a key on page 48. 5 Controller Key 3 • Press to switch to Low Blue Light (Color Mode). • Press and hold for 3 seconds to bring up the setup menu to change the default setting. For more information, visit Support.BenQ.com for particular functions. Customizing the Controller Keys on Hotkey Puck G2 Keys on the monitor. Controlling the display with...

User Manual
Page 49
... compatibilities with Mac products, visit Support.BenQ.com and look for all the available color modes. Choosing an appropriate color mode Your monitor provides various color modes that are recommended to set the picture mode (color mode) of the Mac chip on your Mac product and may not best suit your Mac product. See Connect the PC video cable. Go to a Mac series product. Adjusting Display Mode To display images of images. Working...
... compatibilities with Mac products, visit Support.BenQ.com and look for all the available color modes. Choosing an appropriate color mode Your monitor provides various color modes that are recommended to set the picture mode (color mode) of the Mac chip on your Mac product and may not best suit your Mac product. See Connect the PC video cable. Go to a Mac series product. Adjusting Display Mode To display images of images. Working...

User Manual
Page 70
... the OSD controls, press and hold any key for 10 seconds. Resolution Notice Sets whether to USB-C™ technology limitation. Configuration The USB transmission speed changes accordingly due to display the resolution notice of the recommended resolution when a new input source is activated, the OSD controls and hotkey operations will be disabled. Item OSD Settings Language Display Time OSD Lock Function Range Sets the OSD menu language. Prevents...
... the OSD controls, press and hold any key for 10 seconds. Resolution Notice Sets whether to USB-C™ technology limitation. Configuration The USB transmission speed changes accordingly due to display the resolution notice of the recommended resolution when a new input source is activated, the OSD controls and hotkey operations will be disabled. Item OSD Settings Language Display Time OSD Lock Function Range Sets the OSD menu language. Prevents...

User Manual
Page 71
... monitor Off automatically in power saving mode. • OFF • 10 min • 20 min • 30 min DisplayPort Selects an appropriate DP standard for Display Data Channel/Command Interface, which was developed by Video Electronics Standards Association (VESA). Auto Power Sets the time to the USB ports in standby mode. DDC/CI capability allows monitor controls to be sent via the software for remote diagnostics.
... monitor Off automatically in power saving mode. • OFF • 10 min • 20 min • 30 min DisplayPort Selects an appropriate DP standard for Display Data Channel/Command Interface, which was developed by Video Electronics Standards Association (VESA). Auto Power Sets the time to the USB ports in standby mode. DDC/CI capability allows monitor controls to be sent via the software for remote diagnostics.

User Manual
Page 74
... sound can be heard from the connected external speakers. • Remove your computer and monitor go into a low power "sleep" mode when not actively in white and there is a message Out of Range on the screen, this means you are using a display mode that does not help, check the signal cable connectors. Power LED indicator The LED indicator is white or orange. • If the LED lights...
... sound can be heard from the connected external speakers. • Remove your computer and monitor go into a low power "sleep" mode when not actively in white and there is a message Out of Range on the screen, this means you are using a display mode that does not help, check the signal cable connectors. Power LED indicator The LED indicator is white or orange. • If the LED lights...
User Manual
Page 75
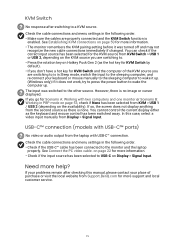
... monitor or Scenario B: Working in the following order. • Make sure the cables are switching to USB-C on Display > Signal Input. You can check if the correct input source has been selected for more support and local customer service. 75 The input was turned off and may not recognize the new cable connections immediately if changed. USB-C™ connection (models with USB-C™ ports) No video or audio output from KVM Switch > USB 1 or USB 2, depending on...
... monitor or Scenario B: Working in the following order. • Make sure the cables are switching to USB-C on Display > Signal Input. You can check if the correct input source has been selected for more support and local customer service. 75 The input was turned off and may not recognize the new cable connections immediately if changed. USB-C™ connection (models with USB-C™ ports) No video or audio output from KVM Switch > USB 1 or USB 2, depending on...