
User Manual
Page 1
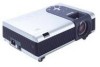
PB8140 / PB8240 / PB8250 Digital Projector Installation Series User's Manual Welcome
PB8140 / PB8240 / PB8250 Digital Projector Installation Series User's Manual Welcome
User Manual
Page 3
... Panel 8 Controls and Functions 9 External Control Panel 9 Remote Control Description 10 Remote Control Effective Range 11 Installing or Replacing the Batteries 12 Setting Up Your Projector 13 Choosing a Location 13 Making Connections 13 Connecting to a Laptop or Desktop Computer 14 Connecting Equipment to the Component Video Input 14 Connecting to Video...
... Panel 8 Controls and Functions 9 External Control Panel 9 Remote Control Description 10 Remote Control Effective Range 11 Installing or Replacing the Batteries 12 Setting Up Your Projector 13 Choosing a Location 13 Making Connections 13 Connecting to a Laptop or Desktop Computer 14 Connecting Equipment to the Component Video Input 14 Connecting to Video...

User Manual
Page 4
...4. Image Menu 29 3. PIP (Picture In Picture) Menu 35 Maintenance 36 Cleaning the lens 36 Cleaning the projector case 36 Cleaning and replacing the air filters 36 Storing the projector 37 Transporting the projector 37 Lamp Information 38 Use and Replacement of the Lamp 38 Lamp Replacement 38 Temp Warning Light 40...43 Optional Accessories (not included in the standard package 43 Ordering Parts or Getting Information 43 Troubleshooting 44 Common Problems & Solutions 44 Specifications 45 Projector Specifications 45 Technical Specifications 45 Timing Chart 47 iv Table of Contents
...4. Image Menu 29 3. PIP (Picture In Picture) Menu 35 Maintenance 36 Cleaning the lens 36 Cleaning the projector case 36 Cleaning and replacing the air filters 36 Storing the projector 37 Transporting the projector 37 Lamp Information 38 Use and Replacement of the Lamp 38 Lamp Replacement 38 Temp Warning Light 40...43 Optional Accessories (not included in the standard package 43 Ordering Parts or Getting Information 43 Troubleshooting 44 Common Problems & Solutions 44 Specifications 45 Projector Specifications 45 Technical Specifications 45 Timing Chart 47 iv Table of Contents
User Manual
Page 7
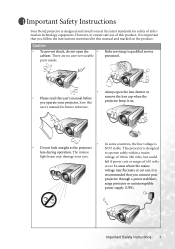
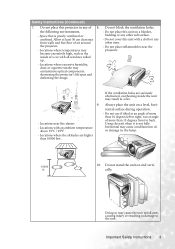
Important Safety Instructions Your BenQ projector is designed and tested to meet the latest standards for ... to operate safely within a mains light beam may fluctuate or cut out, it is important that you connect your projector through a power stabilizer, surge protector or uninterruptible power supply (UPS). The intense to qualified service personnel. •... Always open the • cabinet. In areas where the mains voltage may damage your projector. However, to 240 volts, but could fail if power cuts or surges of ±10 volts occur. Caution...
Important Safety Instructions Your BenQ projector is designed and tested to meet the latest standards for ... to operate safely within a mains light beam may fluctuate or cut out, it is important that you connect your projector through a power stabilizer, surge protector or uninterruptible power supply (UPS). The intense to qualified service personnel. •... Always open the • cabinet. In areas where the mains voltage may damage your projector. However, to 240 volts, but could fail if power cuts or surges of ±10 volts occur. Caution...
User Manual
Page 8
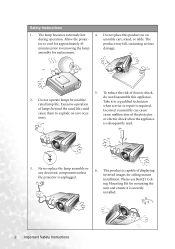
...inverted images for mounting the unit and ensure it to explode on an during operation. Excessive operation of the projector or electric shock when the appliance is required. Incorrect reassembly can cause cause malfunction of lamps beyond the ...unplugged. 6. Never replace the lamp assembly or any electronic components unless the projector is securely installed. 2 Important Safety Instructions This product is capable of electric shock, 2. Please use BenQ's Ceiling Mounting Kit for ceiling mount installation. Safety Instructions 1. assembly for approximately...
...inverted images for mounting the unit and ensure it to explode on an during operation. Excessive operation of the projector or electric shock when the appliance is required. Incorrect reassembly can cause cause malfunction of lamps beyond the ...unplugged. 6. Never replace the lamp assembly or any electronic components unless the projector is securely installed. 2 Important Safety Instructions This product is capable of electric shock, 2. Please use BenQ's Ceiling Mounting Kit for ceiling mount installation. Safety Instructions 1. assembly for approximately...
User Manual
Page 9
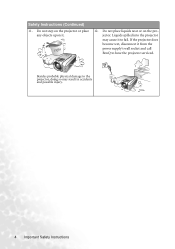
...ventilation holes. Do not place inflammables near fire alarms - Locations near the - the following environments. - Allow at angle of air around the projector. - projector. - Locations with a cloth or any other item. - Do not stand the unit on a level, hori- Important Safety Instructions 3 Safety ...smoke may cause the unit to , the lamp. - zontal surface during operation. - Doing so may contaminate optical components, shortening the projector's life span and darkening the image. Do not place this unit on a blanket, bedding or any other soft surface. - Do ...
...ventilation holes. Do not place inflammables near fire alarms - Locations near the - the following environments. - Allow at angle of air around the projector. - projector. - Locations with a cloth or any other item. - Do not stand the unit on a level, hori- Important Safety Instructions 3 Safety ...smoke may cause the unit to , the lamp. - zontal surface during operation. - Doing so may contaminate optical components, shortening the projector's life span and darkening the image. Do not place this unit on a blanket, bedding or any other soft surface. - Do ...
User Manual
Page 10
Liquids spilled into the projector may result in accidents and possible injury. 4 Important Safety Instructions Safety Instructions (Continued) 11. Besides probable physical damage to the projector, doing so may cause it to have the projector serviced. If the projector does become wet, disconnect it . 12. Do not step on the projector. Do not place liquids near or on the projector or place any objects upon it from the power supply's wall socket and call BenQ to fail.
Liquids spilled into the projector may result in accidents and possible injury. 4 Important Safety Instructions Safety Instructions (Continued) 11. Besides probable physical damage to the projector, doing so may cause it to have the projector serviced. If the projector does become wet, disconnect it . 12. Do not step on the projector. Do not place liquids near or on the projector or place any objects upon it from the power supply's wall socket and call BenQ to fail.

User Manual
Page 11
The projector offers the following features: • Full-function remote control with laser pointer/ remote mouse function • High quality manual zoom lens • One-key auto-... to deliver high reliability and ease of the projected image will vary depending on the ambient lighting conditions and contrast/brightness settings. Introduction 5 Introduction Projector Features The projector integrates high-performance optical engine projection and a user-friendly design to provide high quality AV picture • HDTV compatibility (YPbPr) • Two PC input...
The projector offers the following features: • Full-function remote control with laser pointer/ remote mouse function • High quality manual zoom lens • One-key auto-... to deliver high reliability and ease of the projected image will vary depending on the ambient lighting conditions and contrast/brightness settings. Introduction 5 Introduction Projector Features The projector integrates high-performance optical engine projection and a user-friendly design to provide high quality AV picture • HDTV compatibility (YPbPr) • Two PC input...

User Manual
Page 12
... Cord 240V Component Video Cable 6 Introduction If any of these items are missing, please contact your place of the items shown below. PB8250 DiUnissgetiart'laslalMtPioraonujneScaetlroiers Projector Soft Carry Case User's Manual 1 .001 P/N:53.J940 Batteries 3-2 Power Converter User's Manual CD Quick Start Guide Warranty Booklet Remote Control S-Video Cable Video Cable...
... Cord 240V Component Video Cable 6 Introduction If any of these items are missing, please contact your place of the items shown below. PB8250 DiUnissgetiart'laslalMtPioraonujneScaetlroiers Projector Soft Carry Case User's Manual 1 .001 P/N:53.J940 Batteries 3-2 Power Converter User's Manual CD Quick Start Guide Warranty Booklet Remote Control S-Video Cable Video Cable...
User Manual
Page 13
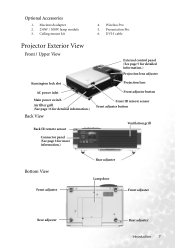
Presentation Pro 6. Macintosh adapter 2. 250W / 300W lamp module 3. DVI-I cable Projector Exterior View Front / Upper View External control panel (See page 9 for detailed information.) Projection lens adjuster Kensington lock slot Projection lens AC power inlet Main ...
Presentation Pro 6. Macintosh adapter 2. 250W / 300W lamp module 3. DVI-I cable Projector Exterior View Front / Upper View External control panel (See page 9 for detailed information.) Projection lens adjuster Kensington lock slot Projection lens AC power inlet Main ...

User Manual
Page 15
...21 for the displayed image. Zoom ring When the on -screen display control developed a problem. image. Lights 6. 6Menu up or flashes when the projector is not page 40 for more information.) Exits and saves the menu settings. Refer to When the on-screen menu is under operation. 10. Power... Turns the on -screen menu is activated, Adjusts the size of the image. Auto (Refer to #6 buttons are used as Flashes red if the projector's Keystone -/+ hot keys. Refer to page 22 for more infor- Blank (Refer to page 20 for more information. 11. Power (Refer to hide...
...21 for the displayed image. Zoom ring When the on -screen display control developed a problem. image. Lights 6. 6Menu up or flashes when the projector is not page 40 for more information.) Exits and saves the menu settings. Refer to When the on-screen menu is under operation. 10. Power... Turns the on -screen menu is activated, Adjusts the size of the image. Auto (Refer to #6 buttons are used as Flashes red if the projector's Keystone -/+ hot keys. Refer to page 22 for more infor- Blank (Refer to page 20 for more information. 11. Power (Refer to hide...

User Manual
Page 16
Remote Control Description Front View Power (18, 19) 6Down/ Menu (26) 3 Left/ Keystone 4 Right/ Keystone + (20) Auto (21) L-Click/ R-click (23) Zoom in +/ Zoom out - (23) Return (23, 24) PIP Position (23) PIP Source (23) Freeze (24) LED (22) Source (21) Laser Pointer (22) Exit (26) Blank (22) Mouse Pad (23) Drag (23) Volume +/- (23) Mute (23) PIP Size (23) Preset (34) Notes on Remote Control Operation Make sure that there are no obstacles between the remote control and the IR sensors on the projector that might obstruct the infra-red beam. 10 Introduction
Remote Control Description Front View Power (18, 19) 6Down/ Menu (26) 3 Left/ Keystone 4 Right/ Keystone + (20) Auto (21) L-Click/ R-click (23) Zoom in +/ Zoom out - (23) Return (23, 24) PIP Position (23) PIP Source (23) Freeze (24) LED (22) Source (21) Laser Pointer (22) Exit (26) Blank (22) Mouse Pad (23) Drag (23) Volume +/- (23) Mute (23) PIP Size (23) Preset (34) Notes on Remote Control Operation Make sure that there are no obstacles between the remote control and the IR sensors on the projector that might obstruct the infra-red beam. 10 Introduction

User Manual
Page 17
... DIODE ACHTUNG Introduction 11 The distance between the remote control and the sensors should be held at an angle within 30 degrees of the projector's IR remote control sensors to depress the Laser button for continuous output. The laser pointer is necessary to function correctly. Parents should not exceed... 6 meters (19.5 feet). 6m Warning Messages on the front and the back of the projector. The remote control must be mindful of the dangers of laser energy and keep this remote control out of the reach of children. Remote ...
... DIODE ACHTUNG Introduction 11 The distance between the remote control and the sensors should be held at an angle within 30 degrees of the projector's IR remote control sensors to depress the Laser button for continuous output. The laser pointer is necessary to function correctly. Parents should not exceed... 6 meters (19.5 feet). 6m Warning Messages on the front and the back of the projector. The remote control must be mindful of the dangers of laser energy and keep this remote control out of the reach of children. Remote ...
User Manual
Page 19
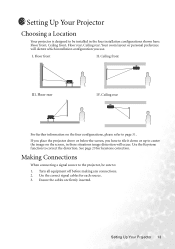
..., please refer to be sure to correct the distortion. Setting Up Your Projector 13 Use the Keystone function to : 1. See page 20 for each source. 3. Ceiling front III. Setting Up Your Projector Choosing a Location Your projector is designed to page 31. Use the correct signal cables for keystone correction.... Floor rear IV. If you place the projector above or below the screen, you use. Your room layout or personal preference will occur. Ensure the cables are firmly inserted. I. Floor...
..., please refer to be sure to correct the distortion. Setting Up Your Projector 13 Use the Keystone function to : 1. See page 20 for each source. 3. Ceiling front III. Setting Up Your Projector Choosing a Location Your projector is designed to page 31. Use the correct signal cables for keystone correction.... Floor rear IV. If you place the projector above or below the screen, you use. Your room layout or personal preference will occur. Ensure the cables are firmly inserted. I. Floor...

User Manual
Page 20
...images. Some of these sources will provide an analog component video output, a standard VGA output, or a YPbPr (default) format. The projector is capable of accepting HDTV data through a Component Video connector. The USB cable is required if you are connecting to an older Macintosh ...8226; 576p • 1080i (50/ 60 Hz) 14 Setting Up Your Projector Use a Component Video cable that came with your projector to the Component Video Input Component Video cable RGB YPbPr AV equipment The projector is capable of displaying various High Definition TV display modes. Connecting to a ...
...images. Some of these sources will provide an analog component video output, a standard VGA output, or a YPbPr (default) format. The projector is capable of accepting HDTV data through a Component Video connector. The USB cable is required if you are connecting to an older Macintosh ...8226; 576p • 1080i (50/ 60 Hz) 14 Setting Up Your Projector Use a Component Video cable that came with your projector to the Component Video Input Component Video cable RGB YPbPr AV equipment The projector is capable of displaying various High Definition TV display modes. Connecting to a ...
User Manual
Page 21
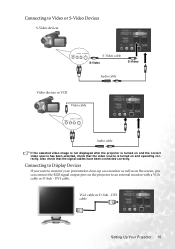
...want to monitor your presentation close-up on a monitor as well as on the screen, you can connect the RGB signal output port on the projector to Video or S-Video Devices S-Video devices S-Video cable S-Video S-Video Audio cable Video devices or VCR Video cable Audio cable If the selected... video image is not displayed after the projector is turned on and the correct video source has been selected, check that the signal cables have been connected correctly. Also check that the video...
...want to monitor your presentation close-up on a monitor as well as on the screen, you can connect the RGB signal output port on the projector to Video or S-Video Devices S-Video devices S-Video cable S-Video S-Video Audio cable Video devices or VCR Video cable Audio cable If the selected... video image is not displayed after the projector is turned on and the correct video source has been selected, check that the signal cables have been connected correctly. Also check that the video...

User Manual
Page 22
...the next page). Maximum zoom Minimum image size Focus ring Zoom ring 16 Setting Up Your Projector Screen Size Place the projector at the required distance from the screen according to release the adjuster. Lift the projector up and press the adjuster button to the required picture size (see the table on ...the remote control. If the screen and the projector are not perpendicular to fine-tune the projection angle. The adjuster will drop into position and be locked. 2. Screw the rear adjuster feet to each...
...the next page). Maximum zoom Minimum image size Focus ring Zoom ring 16 Setting Up Your Projector Screen Size Place the projector at the required distance from the screen according to release the adjuster. Lift the projector up and press the adjuster button to the required picture size (see the table on ...the remote control. If the screen and the projector are not perpendicular to fine-tune the projection angle. The adjuster will drop into position and be locked. 2. Screw the rear adjuster feet to each...
User Manual
Page 23
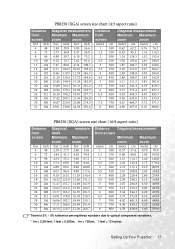
... 559.8 There is 3% ~ 5% tolerance among these numbers due to optical component variations. * 1m = 3.28 feet, 1 feet = 0.305m, 1m = 100cm, 1 feet = 12 inches Setting Up Your Projector 17
... 559.8 There is 3% ~ 5% tolerance among these numbers due to optical component variations. * 1m = 3.28 feet, 1 feet = 0.305m, 1m = 100cm, 1 feet = 12 inches Setting Up Your Projector 17

User Manual
Page 24
... Up 1. Switch all of six messages will be displayed on . 2. Plug the power cord into the projector and into a wall socket. 3. Turn the main power switch on the remote control or projector to search input signals. Press and hold Power on . If there is turned on the wall socket switch... light flashes green when the power is no input source detected, one of the connected equipment on the screen 18 Operation Next, the projector starts to start the unit. Irrespective of selected input source, the screen shows "Acquiring Signal" at the bottom right corner of start up , a...
... Up 1. Switch all of six messages will be displayed on . 2. Plug the power cord into the projector and into a wall socket. 3. Turn the main power switch on the remote control or projector to search input signals. Press and hold Power on . If there is turned on the wall socket switch... light flashes green when the power is no input source detected, one of the connected equipment on the screen 18 Operation Next, the projector starts to start the unit. Irrespective of selected input source, the screen shows "Acquiring Signal" at the bottom right corner of start up , a...

User Manual
Page 25
... fans continue to run for approximately 90 seconds to cool down. Disconnect the power cord from the wall socket. Press Power again to start the projector within hours, the fans will run for a few minutes to cool down process. You can also press Source on a blank screen. If the frequency/ resolution... sequence is not properly shut down, to protect the lamp, when you will not respond to re-start the projector after the fans stop. Press Power and a warning message appears. Turn the main power switch off , press Power again. 2. For more information, refer to select ...
... fans continue to run for approximately 90 seconds to cool down. Disconnect the power cord from the wall socket. Press Power again to start the projector within hours, the fans will run for a few minutes to cool down process. You can also press Source on a blank screen. If the frequency/ resolution... sequence is not properly shut down, to protect the lamp, when you will not respond to re-start the projector after the fans stop. Press Power and a warning message appears. Turn the main power switch off , press Power again. 2. For more information, refer to select ...


