
User Manual
Page 1
MX716/MX717 Digital Projector User Manual Welcome
MX716/MX717 Digital Projector User Manual Welcome

User Manual
Page 2
... size 16 Connection 17 Connecting video source devices........18 Operation 19 Starting up the projector 19 Adjusting the projected image 20 Using the menus 22 Securing the projector 23 Switching input signal 26 Magnifying and searching for details ...27 Selecting the aspect... 2 Table of contents Controlling the projector through a LAN environment 36 Shutting down the projector 39 Direct power off 39 Menu operation 40 Maintenance 50 Care of the projector 50 Lamp information 51 Troubleshooting......... 58 Specifications 59 Projector specifications 59 Dimensions 60 Ceiling mount...
... size 16 Connection 17 Connecting video source devices........18 Operation 19 Starting up the projector 19 Adjusting the projected image 20 Using the menus 22 Securing the projector 23 Switching input signal 26 Magnifying and searching for details ...27 Selecting the aspect... 2 Table of contents Controlling the projector through a LAN environment 36 Shutting down the projector 39 Direct power off 39 Menu operation 40 Maintenance 50 Care of the projector 50 Lamp information 51 Troubleshooting......... 58 Specifications 59 Projector specifications 59 Dimensions 60 Ceiling mount...
User Manual
Page 3
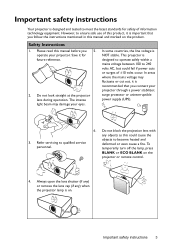
... servicing to become heated and deformed or even cause a fire. In some countries, the line voltage is on. Important safety instructions Your projector is designed and tested to meet the latest standards for future reference. 2. In areas where the mains voltage may damage your eyes. To...However, to ensure safe use of information technology equipment. Save it for safety of this product, it is recommended that you connect your projector. Safety Instructions 1. The intense light beam may fluctuate or cut out, it is designed to operate safely within a mains voltage between 100...
... servicing to become heated and deformed or even cause a fire. In some countries, the line voltage is on. Important safety instructions Your projector is designed and tested to meet the latest standards for future reference. 2. In areas where the mains voltage may damage your eyes. To...However, to ensure safe use of information technology equipment. Save it for safety of this product, it is recommended that you connect your projector. Safety Instructions 1. The intense light beam may fluctuate or cut out, it is designed to operate safely within a mains voltage between 100...

User Manual
Page 4
... to cool for replacement. 11. part is under operation, you ever undo or remove any electronic components unless the projector is a normal phenomenon and not a product defect. 4 Important safety instructions Allow the projector unstable cart, stand, or table. Do not attempt to break on an during operation. Never replace the lamp assembly...
... to cool for replacement. 11. part is under operation, you ever undo or remove any electronic components unless the projector is a normal phenomenon and not a product defect. 4 Important safety instructions Allow the projector unstable cart, stand, or table. Do not attempt to break on an during operation. Never replace the lamp assembly...

User Manual
Page 5
... injury or resulting in any other item. - Do not place inflammables near fire alarms - Do not stand the projector on a level, horizontal surface during operation. - Do not place this projector in damage to , the lamp. 3000 m (10000 feet) 0 m (0 feet) 16. Do not use ... instructions 5 Safety Instructions (Continued) 13. Allow at angle of more than 10 degrees left to back. Always place the projector on end vertically. Using the projector when it is poorly ventilated or confined. the following environments. - Do not block the ventilation holes. - Do not place...
... injury or resulting in any other item. - Do not place inflammables near fire alarms - Do not stand the projector on a level, horizontal surface during operation. - Do not place this projector in damage to , the lamp. 3000 m (10000 feet) 0 m (0 feet) 16. Do not use ... instructions 5 Safety Instructions (Continued) 13. Allow at angle of more than 10 degrees left to back. Always place the projector on end vertically. Using the projector when it is poorly ventilated or confined. the following environments. - Do not block the ventilation holes. - Do not place...

User Manual
Page 6
... must be earthed. 6 Important safety instructions Do not step on the ceiling, we need to bring this safety matter to your BenQ projector. If the projector does become loose. If you use of the wrong gauge or length screws. Lamp contains mercury. See www.lamprecycle.org. 20....with local disposal laws. If you purchased your attention to prevent possible damage to an improper attachment through the use a non-BenQ brand projector ceiling mount kit, there is securely installed. Besides probable physical damage to the mounting bracket become wet, disconnect it is ...
... must be earthed. 6 Important safety instructions Do not step on the ceiling, we need to bring this safety matter to your BenQ projector. If the projector does become loose. If you use of the wrong gauge or length screws. Lamp contains mercury. See www.lamprecycle.org. 20....with local disposal laws. If you purchased your attention to prevent possible damage to an improper attachment through the use a non-BenQ brand projector ceiling mount kit, there is securely installed. Besides probable physical damage to the mounting bracket become wet, disconnect it is ...

User Manual
Page 7
... distance. • The lamp brightness will decline over time and may vary within the lamp manufacturers specifications. Introduction Projector features The projector integrates high-performance optical engine projection and a user-friendly design to deliver high reliability and ease of the projected ... password protected function • 3D color management allowing color adjustments to your liking • Selectable quick cooling function making the projector cool in a shorter time • Presentation timer for better control of time during presentations • One-key auto-adjustment ...
... distance. • The lamp brightness will decline over time and may vary within the lamp manufacturers specifications. Introduction Projector features The projector integrates high-performance optical engine projection and a user-friendly design to deliver high reliability and ease of the projected ... password protected function • 3D color management allowing color adjustments to your liking • Selectable quick cooling function making the projector cool in a shorter time • Presentation timer for better control of time during presentations • One-key auto-adjustment ...

User Manual
Page 8
MX716 MX717 Projector Power cord VGA cable Quick start guide User manual CD Warranty card* Remote control with batteries Soft carry case Optional accessories 1. RS232 cable 8 Introduction Standard ...
MX716 MX717 Projector Power cord VGA cable Quick start guide User manual CD Warranty card* Remote control with batteries Soft carry case Optional accessories 1. RS232 cable 8 Introduction Standard ...

User Manual
Page 9
Rear adjuster foot Front adjuster foot Ceiling mount holes 24 10 11 12 13 14 15 16 17 18 AUDIO-IN MX717 19 20 22 24 23 21 22 23 Introduction 9 Consult your dealer for details.) Lamp cover Vent (heated air exhaust) Quick-release button Lens cap ... input jack Audio output jack AC power jack Kensington anti-theft lock slot 12V DC output terminal Used to connect these devices. Projector exterior view Front/upper side 1 2 3 MX716 4 1 2 3 MX717 5 Rear/lower side 12 10 11 13 14 MX716 19 22 15 16 17 18 1. 2. 6 3. 4. 5. 7 6. 8 7. 8. 9. 9 10. 11. 6 12. 13. 14. 7 15. 8 16...
Rear adjuster foot Front adjuster foot Ceiling mount holes 24 10 11 12 13 14 15 16 17 18 AUDIO-IN MX717 19 20 22 24 23 21 22 23 Introduction 9 Consult your dealer for details.) Lamp cover Vent (heated air exhaust) Quick-release button Lens cap ... input jack Audio output jack AC power jack Kensington anti-theft lock slot 12V DC output terminal Used to connect these devices. Projector exterior view Front/upper side 1 2 3 MX716 4 1 2 3 MX717 5 Rear/lower side 12 10 11 13 14 MX716 19 22 15 16 17 18 1. 2. 6 3. 4. 5. 7 6. 8 7. 8. 9. 9 10. 11. 6 12. 13. 14. 7 15. 8 16...

User Manual
Page 10
...11. exits and saves menu settings. 13. Activates the selected On-Screen Display (OSD) menu item. 7. Right/ Decreases the projector volume. 8. SOURCE Displays the source selection bar. 10 Introduction LAMP indicator light Adjusts the focus of the lamp. MENU/EXIT ...12. TEMPerature warning light Lights up 2. Controls and functions Projector MX716 MX717 1 1 2 9 2 9 3 10 3 10 4 11 4 11 5 6 12 13 5 14 6 12 13 14 7 15 7 15 8 11 8 11...
...11. exits and saves menu settings. 13. Activates the selected On-Screen Display (OSD) menu item. 7. Right/ Decreases the projector volume. 8. SOURCE Displays the source selection bar. 10 Introduction LAMP indicator light Adjusts the focus of the lamp. MENU/EXIT ...12. TEMPerature warning light Lights up 2. Controls and functions Projector MX716 MX717 1 1 2 9 2 9 3 10 3 10 4 11 4 11 5 6 12 13 5 14 6 12 13 14 7 15 7 15 8 11 8 11...
User Manual
Page 11
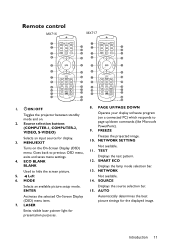
Remote control MX716 MX717 1 2 13 14 3 15 4 16 5 17 6 16 7 18 8 19 9 20 10 21 11 22 12 23 24 1. Goes back to hide the screen picture. 5. FREEZE Freezes .../PAGE DOWN Operate your display software program (on the On-Screen Display (OSD) menu. MODE Selects an available picture setup mode. ON/OFF Toggles the projector between standby mode and on. 2. Source selection buttons (COMPUTER-1, COMPUTER-2, VIDEO, S-VIDEO) Selects an input source for presentation purposes. 1 2 13 14 3 15 4 16 5 17 6 16...
Remote control MX716 MX717 1 2 13 14 3 15 4 16 5 17 6 16 7 18 8 19 9 20 10 21 11 22 12 23 24 1. Goes back to hide the screen picture. 5. FREEZE Freezes .../PAGE DOWN Operate your display software program (on the On-Screen Display (OSD) menu. MODE Selects an available picture setup mode. ON/OFF Toggles the projector between standby mode and on. 2. Source selection buttons (COMPUTER-1, COMPUTER-2, VIDEO, S-VIDEO) Selects an input source for presentation purposes. 1 2 13 14 3 15 4 16 5 17 6 16...
User Manual
Page 12
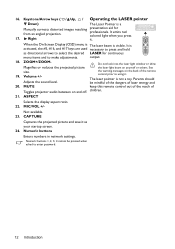
... the projected picture the laser light beam on and off. Adjusts the sound level. MUTE keep this remote control out of the reach of Toggles projector audio between on yourself or others. Right it . It is not a toy. ZOOM+/ZOOM- Parents should be pressed when asked to make adjustments. ASPECT Selects...
... the projected picture the laser light beam on and off. Adjusts the sound level. MUTE keep this remote control out of the reach of Toggles projector audio between on yourself or others. Right it . It is not a toy. ZOOM+/ZOOM- Parents should be pressed when asked to make adjustments. ASPECT Selects...

User Manual
Page 13
...top of the projector. Make sure that there are located on the projector that might obstruct the infra-red beam. • Operating the projector from the front MX716 Approx. +15º • Operating the projector from the top MX716 Approx. +15º MX717 Approx. +15º MX717 Approx. +15&#...186; Introduction 13 The remote control must be held at an angle within 30 degrees perpendicular to the projector's IR remote control sensors to function correctly....
...top of the projector. Make sure that there are located on the projector that might obstruct the infra-red beam. • Operating the projector from the front MX716 Approx. +15º • Operating the projector from the top MX716 Approx. +15º MX717 Approx. +15º MX717 Approx. +15&#...186; Introduction 13 The remote control must be held at an angle within 30 degrees perpendicular to the projector's IR remote control sensors to function correctly....

User Manual
Page 15
...location of a suitable power outlet, as well as the location and distance between the projector and the rest of your projector 15 Note that a special rear projection screen and the BenQ Projector Ceiling Mount Kit are required for quick setup and portability. 3. This is the most ...of the screen. Positioning your projector Choosing a location Your projector is designed to be installed in front of the screen. Front Table Select this location with the projector placed on . 2. Note that a special rear projection screen is required. Purchase the BenQ Projector Ceiling Mount Kit from the...
...location of a suitable power outlet, as well as the location and distance between the projector and the rest of your projector 15 Note that a special rear projection screen and the BenQ Projector Ceiling Mount Kit are required for quick setup and portability. 3. This is the most ...of the screen. Positioning your projector Choosing a location Your projector is designed to be installed in front of the screen. Front Table Select this location with the projector placed on . 2. Note that a special rear projection screen is required. Purchase the BenQ Projector Ceiling Mount Kit from the...
User Manual
Page 16
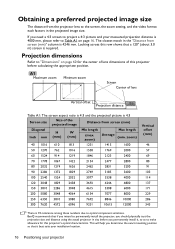
... 300 7620 4572 6096 9231 10615 12000 Vertical offset (mm) 46 57 69 80 91 103 114 137 171 229 286 343 There is required. BenQ recommends that it , so as to make allowance for this row shows that a 120'' (about 3.0 m) screen is 3% tolerance among these numbers... due to project a 4:3 picture and your projector Projection dimensions Refer to "Dimensions" on page 16. A1 Maximum zoom Minimum zoom Screen Center of lens Vertical offset Projection distance Table A1: The screen...
... 300 7620 4572 6096 9231 10615 12000 Vertical offset (mm) 46 57 69 80 91 103 114 137 171 229 286 343 There is required. BenQ recommends that it , so as to make allowance for this row shows that a 120'' (about 3.0 m) screen is 3% tolerance among these numbers... due to project a 4:3 picture and your projector Projection dimensions Refer to "Dimensions" on page 16. A1 Maximum zoom Minimum zoom Screen Center of lens Vertical offset Projection distance Table A1: The screen...

User Manual
Page 17
..., some cables may not be sure to: 1. Component Video to DVI-A cable 7. Ensure the cables are for each projector model. Notebook or desktop computer A/V device Monitor (VGA) (DVI) 1 2 3 19 4 5 9786 Speakers 9 MX716 or or MX717 AUDIO-IN 1. USB cable 8. Turn all equipment off before making any connections. 2. VGA cable 6. Use the correct...
..., some cables may not be sure to: 1. Component Video to DVI-A cable 7. Ensure the cables are for each projector model. Notebook or desktop computer A/V device Monitor (VGA) (DVI) 1 2 3 19 4 5 9786 Speakers 9 MX716 or or MX717 AUDIO-IN 1. USB cable 8. Turn all equipment off before making any connections. 2. VGA cable 6. Use the correct...
User Manual
Page 18
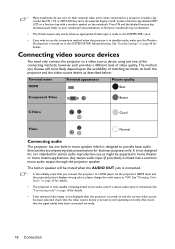
...use as described below: Terminal name Terminal appearance Picture quality HDMI Best Component Video Better S-Video Good Video Normal Connecting audio The projector has one of the connecting methods, however each provides a different level of matching terminals on /off. See "Changing Color ...Space" on in standby mode, make sure the Monitor Out function is mixed into a common mono audio output through the projector speaker. Press FN and the labeled function key simultaneously. Refer to your notebook's documentation to find your notebook's key combination. •...
...use as described below: Terminal name Terminal appearance Picture quality HDMI Best Component Video Better S-Video Good Video Normal Connecting audio The projector has one of the connecting methods, however each provides a different level of matching terminals on /off. See "Changing Color ...Space" on in standby mode, make sure the Monitor Out function is mixed into a common mono audio output through the projector speaker. Press FN and the labeled function key simultaneously. Refer to your notebook's documentation to find your notebook's key combination. •...
User Manual
Page 19
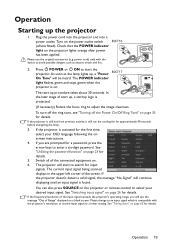
... run the cooling fan for input signals. If the projector doesn't detect a valid signal, the message "No Signal" will continue displaying until an input signal is still hot from previous activity, it will start up , a "Power MX717 On Tone" will see "Turning off the Power On/Off Ring Tone" on a blank screen...
... run the cooling fan for input signals. If the projector doesn't detect a valid signal, the message "No Signal" will continue displaying until an input signal is still hot from previous activity, it will start up , a "Power MX717 On Tone" will see "Turning off the Power On/Off Ring Tone" on a blank screen...

User Manual
Page 20
...adjuster foot to each other, the projected image becomes trapezoidal. MX717 To retract the foot, hold up the projector while pressing the quick-release button, then slowly lower the projector. The strong light from . screen and the projector are not perpendicular to fine-tune the horizontal angle. To ...not placed on page 26 for 3 seconds. To retract the feet, screw the adjuster feet in the corner of the projector. To adjust the projector (MX717): Screw the adjuster feet to provide the best picture quality. Auto-adjusting the image In some cases, you want it is...
...adjuster foot to each other, the projected image becomes trapezoidal. MX717 To retract the foot, hold up the projector while pressing the quick-release button, then slowly lower the projector. The strong light from . screen and the projector are not perpendicular to fine-tune the horizontal angle. To ...not placed on page 26 for 3 seconds. To retract the feet, screw the adjuster feet in the corner of the projector. To adjust the projector (MX717): Screw the adjuster feet to provide the best picture quality. Auto-adjusting the image In some cases, you want it is...
User Manual
Page 21
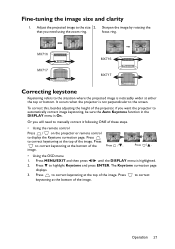
...the image by rotating the that you want the projector to the situation where the projected image is On. Press to highlight Keystone and press ENTER. The Keystone correction page displays. 3. MX716 MX717 MX716 MX717 Correcting keystone Keystoning refers to automatically correct image ...keystoning, be sure the Auto Keystone function in the DISPLAY menu is noticeably wider at the bottom of the image. It occurs when the projector is highlighted. 2. Press MENU...
...the image by rotating the that you want the projector to the situation where the projected image is On. Press to highlight Keystone and press ENTER. The Keystone correction page displays. 3. MX716 MX717 MX716 MX717 Correcting keystone Keystoning refers to automatically correct image ...keystoning, be sure the Auto Keystone function in the DISPLAY menu is noticeably wider at the bottom of the image. It occurs when the projector is highlighted. 2. Press MENU...


