User Manual
Page 3
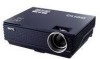
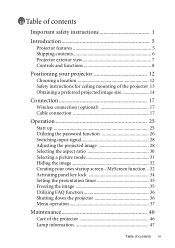
Table of contents Important safety instructions 1 Introduction 5 Projector features 5 Shipping contents 6 Projector exterior view 7 Controls and functions 8 Positioning your projector 12 Choosing a location 12 Safety instructions for ceiling mounting of contents iii MyScreen function . 32 ...timer 35 Freezing the image 35 Utilizing FAQ function 36 Shutting down the projector 36 Menu operation 37 Maintenance 46 Care of the projector 46 Lamp information 47 Table of the projector 13 Obtaining a preferred projected image size 14 Connection 17 Wireless connection (optional...
Table of contents Important safety instructions 1 Introduction 5 Projector features 5 Shipping contents 6 Projector exterior view 7 Controls and functions 8 Positioning your projector 12 Choosing a location 12 Safety instructions for ceiling mounting of contents iii MyScreen function . 32 ...timer 35 Freezing the image 35 Utilizing FAQ function 36 Shutting down the projector 36 Menu operation 37 Maintenance 46 Care of the projector 46 Lamp information 47 Table of the projector 13 Obtaining a preferred projected image size 14 Connection 17 Wireless connection (optional...
User Manual
Page 4
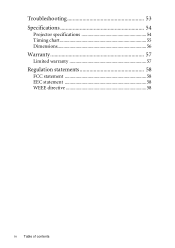
Troubleshooting 53 Specifications 54 Projector specifications 54 Timing chart 55 Dimensions 56 Warranty 57 Limited warranty 57 Regulation statements 58 FCC statement 58 EEC statement 58 WEEE directive 58 iv Table of contents
Troubleshooting 53 Specifications 54 Projector specifications 54 Timing chart 55 Dimensions 56 Warranty 57 Limited warranty 57 Regulation statements 58 FCC statement 58 EEC statement 58 WEEE directive 58 iv Table of contents
User Manual
Page 5
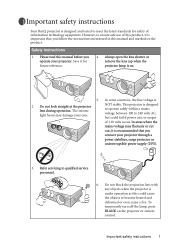
.... 4. Important safety instructions 1 Always open the lens shutter or remove the lens cap when the projector lamp is on the projector or remote control. Do not look straight at the projector lens during operation. The intense light beam may fluctuate or cut out, it is important that you...this manual and marked on the product. Refer servicing to ensure safe use of information technology equipment. Important safety instructions Your BenQ projector is under operation as this could fail if power cuts or surges of ±10 volts occur. However, to qualified service personnel. 6....
.... 4. Important safety instructions 1 Always open the lens shutter or remove the lens cap when the projector lamp is on the projector or remote control. Do not look straight at the projector lens during operation. The intense light beam may fluctuate or cut out, it is important that you...this manual and marked on the product. Refer servicing to ensure safe use of information technology equipment. Important safety instructions Your BenQ projector is under operation as this could fail if power cuts or surges of ±10 volts occur. However, to qualified service personnel. 6....
User Manual
Page 6
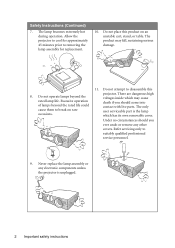
...Never replace the lamp assembly or any other covers. Under no circumstances should come into contact with live parts. Allow the projector to cool for replacement. 10. There are dangerous high voltages inside which has its own removable cover. The only user serviceable... part is unplugged. 2 Important safety instructions Excessive operation of lamps beyond the rated lamp life. projector. Do not place this 8. Refer servicing only to removing the lamp assembly for approximately 45 minutes prior to suitably qualified professional...
...Never replace the lamp assembly or any other covers. Under no circumstances should come into contact with live parts. Allow the projector to cool for replacement. 10. There are dangerous high voltages inside which has its own removable cover. The only user serviceable... part is unplugged. 2 Important safety instructions Excessive operation of lamps beyond the rated lamp life. projector. Do not place this 8. Refer servicing only to removing the lamp assembly for approximately 45 minutes prior to suitably qualified professional...
User Manual
Page 7
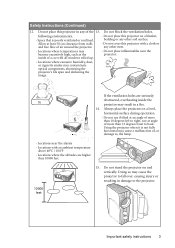
... - Allow at angle of air around the projector. - If the ventilation holes are higher than 15 degrees front to the projector. Using the projector when it is poorly ventilated or confined. Locations near the projector. - Do not stand the projector on a blanket, bedding or any other soft... Doing so may cause a malfunction of a car with an ambient temperature above 40°C / 104°F - Do not cover this projector in a fire. 14. Locations with all windows rolled up. - Important safety instructions 3 following environments. - Space that is not fully horizontal may...
... - Allow at angle of air around the projector. - If the ventilation holes are higher than 15 degrees front to the projector. Using the projector when it is poorly ventilated or confined. Locations near the projector. - Do not stand the projector on a blanket, bedding or any other soft... Doing so may cause a malfunction of a car with an ambient temperature above 40°C / 104°F - Do not cover this projector in a fire. 14. Locations with all windows rolled up. - Important safety instructions 3 following environments. - Space that is not fully horizontal may...
User Manual
Page 8
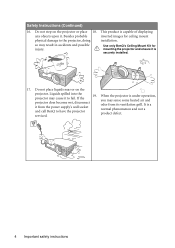
... it from its ventilation grill. projector does become wet, disconnect it . When the projector is securely installed. 17. This product is a normal phenomenon and not a product defect. 4 Important safety instructions If the 19. Use only BenQ's Ceiling Mount Kit for ceiling mount...supply's wall socket and call BenQ to have the projector serviced. Do not step on the projector. Do not place liquids near or on the projector or place 18. Besides probable inverted images for mounting the projector and ensure it to the projector, doing installation. Safety Instructions...
... it from its ventilation grill. projector does become wet, disconnect it . When the projector is securely installed. 17. This product is a normal phenomenon and not a product defect. 4 Important safety instructions If the 19. Use only BenQ's Ceiling Mount Kit for ceiling mount...supply's wall socket and call BenQ to have the projector serviced. Do not step on the projector. Do not place liquids near or on the projector or place 18. Besides probable inverted images for mounting the projector and ensure it to the projector, doing installation. Safety Instructions...
User Manual
Page 9
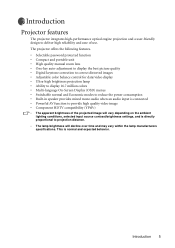
Introduction 5 The projector offers the following features. • Selectable password protected function • Compact and portable unit • High quality manual zoom lens • One-key auto-...is connected • Powerful AV function to provide high quality video image • Component HDTV compatibility (YPbPr) • The apparent brightness of use. Introduction Projector features The projector integrates high-performance optical engine projection and a user-friendly design to projection distance. • The lamp brightness will vary depending on the ambient lighting...
Introduction 5 The projector offers the following features. • Selectable password protected function • Compact and portable unit • High quality manual zoom lens • One-key auto-...is connected • Powerful AV function to provide high quality video image • Component HDTV compatibility (YPbPr) • The apparent brightness of use. Introduction Projector features The projector integrates high-performance optical engine projection and a user-friendly design to projection distance. • The lamp brightness will vary depending on the ambient lighting...
User Manual
Page 10
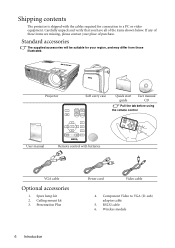
...) adaptor cable 5. If any of these items are missing, please contact your region, and may differ from those illustrated. Presentation Plus Power cord Video cable 4. Projector Soft carry case Quick start User manual guide CD Pull the tab before using the remote control User manual Remote control with the cables required... purchase. Carefully unpack and verify that you have all of the items shown below. Spare lamp kit 2. Ceiling mount kit 3. RS232 cable 6. Shipping contents The projector is shipped with batteries VGA cable Optional accessories 1.
...) adaptor cable 5. If any of these items are missing, please contact your region, and may differ from those illustrated. Presentation Plus Power cord Video cable 4. Projector Soft carry case Quick start User manual guide CD Pull the tab before using the remote control User manual Remote control with the cables required... purchase. Carefully unpack and verify that you have all of the items shown below. Spare lamp kit 2. Ceiling mount kit 3. RS232 cable 6. Shipping contents The projector is shipped with batteries VGA cable Optional accessories 1.
User Manual
Page 12
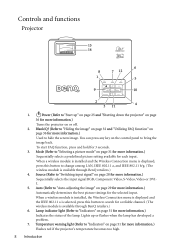
... for more information.) Used to "Switching input signal" on page 28 for more information.) Turns the projector on page 51 for a reliable channel. (The wireless module is available through BenQ retailers.) 6. You can press any key on the control panel to "Indicators" on or off.... 2. Source (Refer to hide the screen image. Lamp indicator light (Refer to search for more information.) Flashes red if the projector's temperature becomes too high. ...
... for more information.) Used to "Switching input signal" on page 28 for more information.) Turns the projector on page 51 for a reliable channel. (The wireless module is available through BenQ retailers.) 6. You can press any key on the control panel to "Indicators" on or off.... 2. Source (Refer to hide the screen image. Lamp indicator light (Refer to search for more information.) Flashes red if the projector's temperature becomes too high. ...

User Manual
Page 13
... -screen display control menu. 12. 5Exit Exits and saves the menu settings. Zoom ring (Refer to "Start up or flashes when the projector is under operation. 9. 3 Left 10. Power (Refer to "Fine-tuning the image size and clarity" on page 29 for more information.) Turns ...the projector on page 36 for more information.) Adjusts the focus of the screen. To release the function, press Freeze again. 3. 5Up, 6 Down Introduction 9 Remote control 7 1 8 2...
... -screen display control menu. 12. 5Exit Exits and saves the menu settings. Zoom ring (Refer to "Start up or flashes when the projector is under operation. 9. 3 Left 10. Power (Refer to "Fine-tuning the image size and clarity" on page 29 for more information.) Turns ...the projector on page 36 for more information.) Adjusts the focus of the screen. To release the function, press Freeze again. 3. 5Up, 6 Down Introduction 9 Remote control 7 1 8 2...
User Manual
Page 15
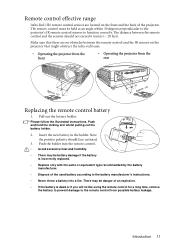
.... • Dispose of the used battery according to function correctly. Introduction 11 The remote control must be danger of the projector. Pull out the battery holder. Please follow the illustrated instructions. There may be held at an angle within 30 degrees perpendicular to the... projector's IR remote control sensors to the battery manufacturer's instructions. • Never throw a battery into the remote control. • Avoid excessive heat and...
.... • Dispose of the used battery according to function correctly. Introduction 11 The remote control must be danger of the projector. Pull out the battery holder. Please follow the illustrated instructions. There may be held at an angle within 30 degrees perpendicular to the... projector's IR remote control sensors to the battery manufacturer's instructions. • Never throw a battery into the remote control. • Avoid excessive heat and...

User Manual
Page 16
Purchase the BenQ Projector Ceiling Mounting Kit from your dealer to mount your projector on . Rear Table Select this location with the projector suspended upside-down from the ceiling in one of screen; 2. Take into consideration the size and position of your screen, the location of a suitable ... to be installed in front of screen. 1. Set in the Advanced > Mirror menu after you select. Note that a special rear projection screen and the BenQ Projector Ceiling Mounting Kit are required for quick setup and portability. 2. Set in the Advanced > Mirror menu after you turn the...
Purchase the BenQ Projector Ceiling Mounting Kit from your dealer to mount your projector on . Rear Table Select this location with the projector suspended upside-down from the ceiling in one of screen; 2. Take into consideration the size and position of your screen, the location of a suitable ... to be installed in front of screen. 1. Set in the Advanced > Mirror menu after you select. Note that a special rear projection screen and the BenQ Projector Ceiling Mounting Kit are required for quick setup and portability. 2. Set in the Advanced > Mirror menu after you turn the...

User Manual
Page 17
... prevent possible damage to an improper attachment through the use a proper fitting BenQ projector ceiling mount kit and that the projector may fall from the place you use a non-BenQ brand projector ceiling mount kit, there is securely and safely installed. Positioning your BenQ projector. BenQ recommends that you also purchase a separate Kensington lock compatible security cable and...
... prevent possible damage to an improper attachment through the use a proper fitting BenQ projector ceiling mount kit and that the projector may fall from the place you use a non-BenQ brand projector ceiling mount kit, there is securely and safely installed. Positioning your BenQ projector. BenQ recommends that you also purchase a separate Kensington lock compatible security cable and...
User Manual
Page 18
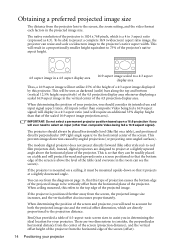
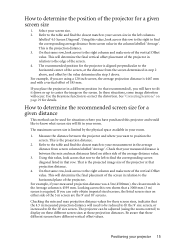
..., it projects at a slightly upward angle above the level of the projector. When determining the position of the 4:3 projection display area. All inputs (other than composite Video being fed a 16:9 aspect signal). BenQ has provided a table of the scaled 16:9 aspect image projection area).... There are two dimensions to assist you in the vertical center of the screen and projector, you will display in a 4:3 aspect display area 16...
..., it projects at a slightly upward angle above the level of the projector. When determining the position of the 4:3 projection display area. All inputs (other than composite Video being fed a 16:9 aspect signal). BenQ has provided a table of the scaled 16:9 aspect image projection area).... There are two dimensions to assist you in the vertical center of the screen and projector, you will display in a 4:3 aspect display area 16...
User Manual
Page 19
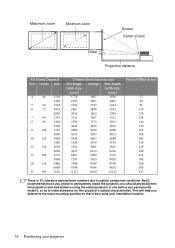
... correct the distortion. See "Correcting keystone" on page 29 for these different screen sizes at those projection distances. Measure the distance between the projector and where you can be adjusted (using a 120 inch screen, the average projection distance is between the min and max distances listed on ...column is aligned perpendicular to the horizontal center of the 3 m screen are using the zoom control) to display on either side of the projector. Refer to the table and find the closest match to your measured distance is 4467 mm and with a vertical offset of the vertical ...
... correct the distortion. See "Correcting keystone" on page 29 for these different screen sizes at those projection distances. Measure the distance between the projector and where you can be adjusted (using a 120 inch screen, the average projection distance is between the min and max distances listed on ...column is aligned perpendicular to the horizontal center of the 3 m screen are using the zoom control) to display on either side of the projector. Refer to the table and find the closest match to your measured distance is 4467 mm and with a vertical offset of the vertical ...
User Manual
Page 20
...183 210 219 240 274 300 329 360 457 There is 3% tolerance among these numbers due to make allowance for this projector's optical characteristics. BenQ recommends that it , so as to optical component variations. This will help you determine the exact mounting position so that... if you intend to permanently install the projector, you permanently install it best suits your installation location. 16 Positioning your projector Maximum zoom...
...183 210 219 240 274 300 329 360 457 There is 3% tolerance among these numbers due to make allowance for this projector's optical characteristics. BenQ recommends that it , so as to optical component variations. This will help you determine the exact mounting position so that... if you intend to permanently install the projector, you permanently install it best suits your installation location. 16 Positioning your projector Maximum zoom...
User Manual
Page 21
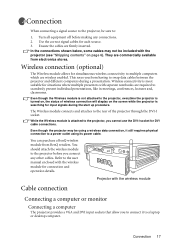
...the rear of wireless connection will display on the screen while the projector is most suitable for situations where multiple presenters with the wireless module for DVI cable connections. You can purchase a BenQ wireless module from electronics stores. Refer to a power outlet using ...a wireless data connection, it to the projector, you connect any connections. 2. While the Wireless module is turned on page ...
...the rear of wireless connection will display on the screen while the projector is most suitable for situations where multiple presenters with the wireless module for DVI cable connections. You can purchase a BenQ wireless module from electronics stores. Refer to a power outlet using ...a wireless data connection, it to the projector, you connect any connections. 2. While the Wireless module is turned on page ...

User Manual
Page 22
... the VGA 2. Usually a key combo like that shown in the following diagram: Laptop or desktop computer VGA cable or Audio cable VGA to a projector. The final connection path should be like FN + F3 or CRT/LCD key turns the external display on their external video ports when connected to... documentation to the Audio socket of the computer. Take the supplied VGA cable and 1. IN DVI-A cable to DVI-A cable: 1. input socket on the projector. Locate a function key labeled CRT/LCD or a function key with a monitor symbol on the laptop. Connect the DVI end of the VGA to cable ...
... the VGA 2. Usually a key combo like that shown in the following diagram: Laptop or desktop computer VGA cable or Audio cable VGA to a projector. The final connection path should be like FN + F3 or CRT/LCD key turns the external display on their external video ports when connected to... documentation to the Audio socket of the computer. Take the supplied VGA cable and 1. IN DVI-A cable to DVI-A cable: 1. input socket on the projector. Locate a function key labeled CRT/LCD or a function key with a monitor symbol on the laptop. Connect the DVI end of the VGA to cable ...

User Manual
Page 23
Connect the other end of the video monitor. 3. Connect the projector to a computer as on the screen, you can connect the RGB signal output socket on the projector to an external monitor with a VGA cable following diagram: Laptop or desktop computer VGA cable VGA cable The D-Sub output only ...works when an appropriate D-Sub input is made to the projector. The final connection path should be like that shown in "Connecting a computer" on the projector. Connection 19 Take a suitable VGA cable (only one supplied) and connect one end of the cable...
Connect the other end of the video monitor. 3. Connect the projector to a computer as on the screen, you can connect the RGB signal output socket on the projector to an external monitor with a VGA cable following diagram: Laptop or desktop computer VGA cable VGA cable The D-Sub output only ...works when an appropriate D-Sub input is made to the projector. The final connection path should be like that shown in "Connecting a computer" on the projector. Connection 19 Take a suitable VGA cable (only one supplied) and connect one end of the cable...

User Manual
Page 24
...elect to S-Video or (composite) Video. See "Connecting an S-Video source device" on page 21 for how to connect the projector to provide basic audio functionality accompanying data presentations for stereo audio reproduction use the S-Video option. Least video quality Composite Video is ... (optional)" on page 21 for Video presentations. See "Connecting a Component Video source device" on page 23 for how to connect the projector to a Video source device using just one of the above connecting methods, however each provides a different level of the available methods described ...
...elect to S-Video or (composite) Video. See "Connecting an S-Video source device" on page 21 for how to connect the projector to provide basic audio functionality accompanying data presentations for stereo audio reproduction use the S-Video option. Least video quality Composite Video is ... (optional)" on page 21 for Video presentations. See "Connecting a Component Video source device" on page 23 for how to connect the projector to a Video source device using just one of the above connecting methods, however each provides a different level of the available methods described ...


