
User Manual
Page 1
MP512/MP513/MP522 Digital Projector User Manual Welcome
MP512/MP513/MP522 Digital Projector User Manual Welcome

User Manual
Page 2
... image size 14 Connection 18 Connecting a computer or monitor... 18 Connecting Video source devices....... 20 Operation 24 Starting up the projector 24 Using the menus 25 Utilizing the password function ......... 26 Switching input signal 28 Adjusting the projected image 28 Magnifying and ... in a high altitude environment 38 Personalizing the projector menu display 39 Shutting down the projector 39 Menu operation 40 Maintenance 47 Care of the projector 47 Lamp information 48 Troubleshooting 54 Specifications 55 Projector specifications 55 Dimensions 56 Timing chart 56 Warranty...
... image size 14 Connection 18 Connecting a computer or monitor... 18 Connecting Video source devices....... 20 Operation 24 Starting up the projector 24 Using the menus 25 Utilizing the password function ......... 26 Switching input signal 28 Adjusting the projected image 28 Magnifying and ... in a high altitude environment 38 Personalizing the projector menu display 39 Shutting down the projector 39 Menu operation 40 Maintenance 47 Care of the projector 47 Lamp information 48 Troubleshooting 54 Specifications 55 Projector specifications 55 Dimensions 56 Timing chart 56 Warranty...
User Manual
Page 3
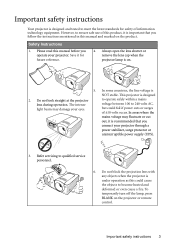
.... Save it for safety of this manual and marked on the product. Safety Instructions 1. In areas where the mains voltage may damage your projector. Please read this could fail if power cuts or surges of ±10 volts occur. To temporarily turn off the lamp, press BLANK ...cut out, it is important that you follow the instructions mentioned in this product, it is under operation as this manual before you connect your projector through a power stabilizer, surge protector or uninterruptible power supply (UPS). 3. However, to become heated and deformed or even cause a fire. ...
.... Save it for safety of this manual and marked on the product. Safety Instructions 1. In areas where the mains voltage may damage your projector. Please read this could fail if power cuts or surges of ±10 volts occur. To temporarily turn off the lamp, press BLANK ...cut out, it is important that you follow the instructions mentioned in this product, it is under operation as this manual before you connect your projector through a power stabilizer, surge protector or uninterruptible power supply (UPS). 3. However, to become heated and deformed or even cause a fire. ...
User Manual
Page 4
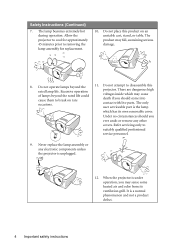
... 4 Important safety instructions contact with live parts. It is under operation, you ever undo or remove any electronic components unless the projector is the lamp which may fall, sustaining serious damage. 8. The only user serviceable part is unplugged. 12. There are dangerous high...beyond the rated life could voltages inside which has its ventilation grill. The lamp becomes extremely hot during operation. Excessive operation projector. Never replace the lamp assembly or any other covers. Under no circumstances should come into occasions. Refer servicing only to ...
... 4 Important safety instructions contact with live parts. It is under operation, you ever undo or remove any electronic components unless the projector is the lamp which may fall, sustaining serious damage. 8. The only user serviceable part is unplugged. 12. There are dangerous high...beyond the rated life could voltages inside which has its ventilation grill. The lamp becomes extremely hot during operation. Excessive operation projector. Never replace the lamp assembly or any other covers. Under no circumstances should come into occasions. Refer servicing only to ...
User Manual
Page 5
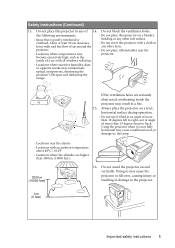
... obstructed, overheating inside of a car with all windows rolled up. - Locations where temperatures may become excessively high, such as the inside the projector may cause a malfunction of more than 10 degrees left to right, nor at least 50 cm clearance from walls and free flow of 14.... Locations near the projector. - Locations where excessive humidity, dust, or cigarette smoke may cause the projector to fall over, causing injury or resulting in any other item. - Space that is not fully horizontal...
... obstructed, overheating inside of a car with all windows rolled up. - Locations where temperatures may become excessively high, such as the inside the projector may cause a malfunction of more than 10 degrees left to right, nor at least 50 cm clearance from walls and free flow of 14.... Locations near the projector. - Locations where excessive humidity, dust, or cigarette smoke may cause the projector to fall over, causing injury or resulting in any other item. - Space that is not fully horizontal...
User Manual
Page 6
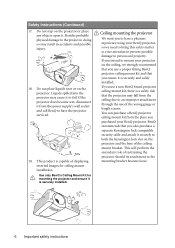
... bracket become wet, disconnect it is a safety risk that you ensure it . If the projector does become loose. 6 Important safety instructions If you use a non-BenQ brand projector ceiling mount kit, there is securely installed. This will perform the secondary role of the ceiling... mount bracket. You can purchase a BenQ projector ceiling mount kit from the power supply's wall socket and call BenQ to have a pleasant experience using your BenQ projector, so we strongly recommend that you use of displaying inverted images for mounting...
... bracket become wet, disconnect it is a safety risk that you ensure it . If the projector does become loose. 6 Important safety instructions If you use a non-BenQ brand projector ceiling mount kit, there is securely installed. This will perform the secondary role of the ceiling... mount bracket. You can purchase a BenQ projector ceiling mount kit from the power supply's wall socket and call BenQ to have a pleasant experience using your BenQ projector, so we strongly recommend that you use of displaying inverted images for mounting...
User Manual
Page 7
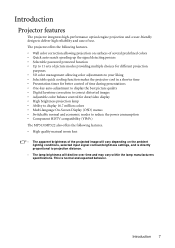
...OSD) menus • Switchable normal and economic modes to reduce the power consumption • Component HDTV compatibility (YPbPr) The MP513/MP522 also offers the following features. • High quality manual zoom lens • The apparent brightness of use. This is directly ... ambient lighting conditions, selected input signal contrast/brightness settings, and is normal and expected behavior. Introduction 7 Introduction Projector features The projector integrates high-performance optical engine projection and a user-friendly design to deliver high reliability and ease of the projected...
...OSD) menus • Switchable normal and economic modes to reduce the power consumption • Component HDTV compatibility (YPbPr) The MP513/MP522 also offers the following features. • High quality manual zoom lens • The apparent brightness of use. This is directly ... ambient lighting conditions, selected input signal contrast/brightness settings, and is normal and expected behavior. Introduction 7 Introduction Projector features The projector integrates high-performance optical engine projection and a user-friendly design to deliver high reliability and ease of the projected...
User Manual
Page 8
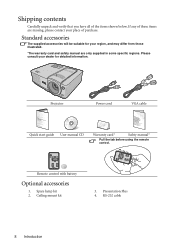
... safety manual are missing, please contact your place of the items shown below. Shipping contents Carefully unpack and verify that you have all of purchase. Projector Power cord VGA cable Quick start guide User manual CD Warranty card* Safety manual* Pull the tab before using the remote control. Spare lamp kit...
... safety manual are missing, please contact your place of the items shown below. Shipping contents Carefully unpack and verify that you have all of purchase. Projector Power cord VGA cable Quick start guide User manual CD Warranty card* Safety manual* Pull the tab before using the remote control. Spare lamp kit...

User Manual
Page 9
Projector exterior view Front/upper side 1 2 3 4 Rear/lower side 8 9 10 11 12 13 1. Projection lens 6 7 8. AC power cord inlet 9. Front IR remote sensor 5 7. RGB signal output ... Introduction 9 Focus ring and Zoom ring (Zoom ring is not available with the MP512.) 6. Quick-release foot 16. Quick-release button 4. External control panel (See "Projector" on page 10 for details.) 2. Vent (heated air exhaust) 3. RS-232 control port 10. Video input socket 13. Kensington anti-theft lock slot 15. Lamp...
Projector exterior view Front/upper side 1 2 3 4 Rear/lower side 8 9 10 11 12 13 1. Projection lens 6 7 8. AC power cord inlet 9. Front IR remote sensor 5 7. RGB signal output ... Introduction 9 Focus ring and Zoom ring (Zoom ring is not available with the MP512.) 6. Quick-release foot 16. Quick-release button 4. External control panel (See "Projector" on page 10 for details.) 2. Vent (heated air exhaust) 3. RS-232 control port 10. Video input socket 13. Kensington anti-theft lock slot 15. Lamp...
User Manual
Page 10
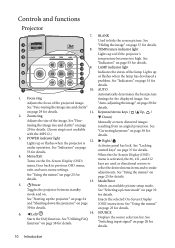
...ring Adjusts the size of the projected image. Menu/Exit Turns on page 29 for details. Starts the FAQ function. Lights up red if the projector's temperature becomes too high. Mode/Enter Selects an available picture setup mode. See "Using the menus" on page 30 for details. 13. 5.... the image size and clarity" on the On-Screen Display (OSD) menu.Goes back to make adjustments. See "Starting up or flashes when the projector is not available with the MP512.) 3. See "Indicators" on page 37 for details. See "Locking control keys" on page 53 for details. ...
...ring Adjusts the size of the projected image. Menu/Exit Turns on page 29 for details. Starts the FAQ function. Lights up red if the projector's temperature becomes too high. Mode/Enter Selects an available picture setup mode. See "Using the menus" on page 30 for details. 13. 5.... the image size and clarity" on the On-Screen Display (OSD) menu.Goes back to make adjustments. See "Starting up or flashes when the projector is not available with the MP512.) 3. See "Indicators" on page 37 for details. See "Locking control keys" on page 53 for details. ...
User Manual
Page 11
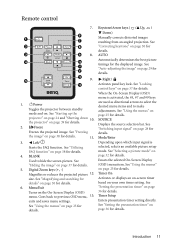
...exits and saves menu settings. SOURCE Displays the source selection bar. See "Setting the presentation timer" on page 39 for details. the projector" on page 36 for details. 6. Freeze Freezes the projected image. See "Using the menus" on page 32 for details. 5. ...-Screen Display (OSD) menu is selected, selects an available picture setup mode. See "Selecting a picture mode" on page 25 for details. 2. See "Starting up the projector" on the On-Screen Display (OSD) menu. Enacts the selected On-Screen Display (OSD) menu item. Remote control 7. 6 1 7 2 8 3 9 8. 4 10 ...
...exits and saves menu settings. SOURCE Displays the source selection bar. See "Setting the presentation timer" on page 39 for details. the projector" on page 36 for details. 6. Freeze Freezes the projected image. See "Using the menus" on page 32 for details. 5. ...-Screen Display (OSD) menu is selected, selects an available picture setup mode. See "Selecting a picture mode" on page 25 for details. 2. See "Starting up the projector" on the On-Screen Display (OSD) menu. Enacts the selected On-Screen Display (OSD) menu item. Remote control 7. 6 1 7 2 8 3 9 8. 4 10 ...

User Manual
Page 12
...battery is incorrectly replaced. • Replace only with the same or equivalent type recommended by the battery manufacturer. • Dispose of the projector. Approx. 15° Replacing the remote control battery 1. Push and hold the locking arm while pulling out the battery holder. 2. Push... the holder into a fire. There may be held at an angle within 30 degrees perpendicular to the projector's IR remote control sensor to the remote control from possible battery leakage. 12 Introduction Please follow the illustrated instructions. Insert the...
...battery is incorrectly replaced. • Replace only with the same or equivalent type recommended by the battery manufacturer. • Dispose of the projector. Approx. 15° Replacing the remote control battery 1. Push and hold the locking arm while pulling out the battery holder. 2. Push... the holder into a fire. There may be held at an angle within 30 degrees perpendicular to the projector's IR remote control sensor to the remote control from possible battery leakage. 12 Introduction Please follow the illustrated instructions. Insert the...

User Manual
Page 13
...the screen. Set Front Ceiling in the SYSTEM SETUP: Basic > Projector Position menu after you turn the projector on . Your projector is designed to mount your equipment. Note that a special rear projection screen and the BenQ Projector Ceiling Mounting Kit are required for quick setup and portability. 2. ... a location Your room layout or personal preference will dictate which installation location you turn the projector on . 3. Purchase the BenQ Projector Ceiling Mounting Kit from the ceiling behind the screen. Take into consideration the size and position of your screen,...
...the screen. Set Front Ceiling in the SYSTEM SETUP: Basic > Projector Position menu after you turn the projector on . Your projector is designed to mount your equipment. Note that a special rear projection screen and the BenQ Projector Ceiling Mounting Kit are required for quick setup and portability. 2. ... a location Your room layout or personal preference will dictate which installation location you turn the projector on . 3. Purchase the BenQ Projector Ceiling Mounting Kit from the ceiling behind the screen. Take into consideration the size and position of your screen,...

User Manual
Page 14
... image in a 4:3 aspect display area 16:9 aspect image scaled to -reel film projectors did). The modern digital projector does not project directly forward (like flat on the projector you are designed to "MP513/MP522 projection dimensions" on page 16 or "MP512 projection dimensions" on page 17 depending on... (like older style reel-to a 4:3 aspect display area Thus, a 16:9 aspect image will be mounted upside-down so that this projector. BenQ has provided a table of the 4:3 projection display area. To be vertically offset from the screen, the projected image size increases, and...
... image in a 4:3 aspect display area 16:9 aspect image scaled to -reel film projectors did). The modern digital projector does not project directly forward (like flat on the projector you are designed to "MP513/MP522 projection dimensions" on page 16 or "MP512 projection dimensions" on page 17 depending on... (like older style reel-to a 4:3 aspect display area Thus, a 16:9 aspect image will be mounted upside-down so that this projector. BenQ has provided a table of the 4:3 projection display area. To be vertically offset from the screen, the projected image size increases, and...
User Manual
Page 15
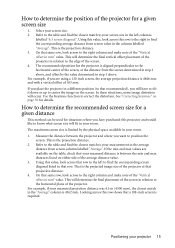
..."Average". This is the projection distance. 2. That is required. On that a 108-inch screen is the projected image size of the projector at the distance from screen value in your room. 1. Positioning your measured distance is aligned perpendicular to the horizontal center of the screen... "4:3 screen diagonal". How to determine the recommended screen size for a given distance This method can be used for the projector is between the projector and where you are available on either side of the average distance value. 3. Looking across this row shows that same row...
..."Average". This is the projection distance. 2. That is required. On that a 108-inch screen is the projected image size of the projector at the distance from screen value in your room. 1. Positioning your measured distance is aligned perpendicular to the horizontal center of the screen... "4:3 screen diagonal". How to determine the recommended screen size for a given distance This method can be used for the projector is between the projector and where you are available on either side of the average distance value. 3. Looking across this row shows that same row...

User Manual
Page 16
...8723 9138 9085 9540 9994 11538 12115 12692 Vertical offset in mm Min length Average Max length (with max. (with min. BenQ recommends that it , so as to make allowance for the center of lens dimensions of lens Vertical offset Projection distance 4:3 ...the projection size and distance using the actual projector in situ before you permanently install it best suits your installation location. 16 Positioning your projector MP513/MP522 projection dimensions Refer to "Dimensions" on page 56 for this projector before calculating the appropriate position. Maximum zoom Minimum...
...8723 9138 9085 9540 9994 11538 12115 12692 Vertical offset in mm Min length Average Max length (with max. (with min. BenQ recommends that it , so as to make allowance for the center of lens dimensions of lens Vertical offset Projection distance 4:3 ...the projection size and distance using the actual projector in situ before you permanently install it best suits your installation location. 16 Positioning your projector MP513/MP522 projection dimensions Refer to "Dimensions" on page 56 for this projector before calculating the appropriate position. Maximum zoom Minimum...

User Manual
Page 17
... is 3% tolerance among these numbers due to make allowance for this projector before you should physically test the projection size and distance using the actual projector in situ before calculating the appropriate position. 4:3 screen diagonal Screen Center of this projector's optical characteristics. BenQ recommends that it , so as to optical component variations. This will...
... is 3% tolerance among these numbers due to make allowance for this projector before you should physically test the projection size and distance using the actual projector in situ before calculating the appropriate position. 4:3 screen diagonal Screen Center of this projector's optical characteristics. BenQ recommends that it , so as to optical component variations. This will...
User Manual
Page 18
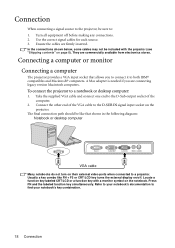
... desktop computer VGA cable Many notebooks do not turn on their external video ports when connected to find your notebook's documentation to a projector. Connect the other end of the computer. 2. Press FN and the labeled function key simultaneously. They are connecting legacy version Macintosh ...socket of the VGA cable to : 1. Locate a function key labeled CRT/LCD or a function key with the projector (see "Shipping contents" on page 8). To connect the projector to both IBM® compatibles and Macintosh® computers. Usually a key combo like that allows you are commercially ...
... desktop computer VGA cable Many notebooks do not turn on their external video ports when connected to find your notebook's documentation to a projector. Connect the other end of the computer. 2. Press FN and the labeled function key simultaneously. They are connecting legacy version Macintosh ...socket of the VGA cable to : 1. Locate a function key labeled CRT/LCD or a function key with the projector (see "Shipping contents" on page 8). To connect the projector to both IBM® compatibles and Macintosh® computers. Usually a key combo like that allows you are commercially ...
User Manual
Page 19
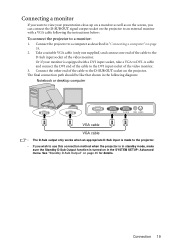
...your presentation close-up on a monitor as well as described in "Connecting a computer" on page 18. 2. See "Standby D-Sub Output" on the projector. Connection 19 Connecting a monitor If you want to view your monitor is equipped with a VGA cable following diagram: Notebook or desktop computer VGA cable ...VGA cable • The D-Sub output only works when an appropriate D-Sub input is made to the projector. • If you can connect the D-SUB OUT signal output socket on in standby mode, make sure the Standby D-Sub Output function is in...
...your presentation close-up on a monitor as well as described in "Connecting a computer" on page 18. 2. See "Standby D-Sub Output" on the projector. Connection 19 Connecting a monitor If you want to view your monitor is equipped with a VGA cable following diagram: Notebook or desktop computer VGA cable ...VGA cable • The D-Sub output only works when an appropriate D-Sub input is made to the projector. • If you can connect the D-SUB OUT signal output socket on in standby mode, make sure the Standby D-Sub Output function is in...

User Manual
Page 20
... that provide any one of the following output sockets: • Component Video • S-Video • Video (composite) You need only connect the projector to an S-Video device. Least video quality Composite Video is Component Video (not to (composite) Video. The method you choose will most likely depend ... with composite Video). Digital TV tuner and DVD players output Component Video natively, so if available on page 23 for how to connect the projector to a Video source device using just one of the above connecting methods, however each provides a different level of video quality. If you...
... that provide any one of the following output sockets: • Component Video • S-Video • Video (composite) You need only connect the projector to an S-Video device. Least video quality Composite Video is Component Video (not to (composite) Video. The method you choose will most likely depend ... with composite Video). Digital TV tuner and DVD players output Component Video natively, so if available on page 23 for how to connect the projector to a Video source device using just one of the above connecting methods, however each provides a different level of video quality. If you...


