
User Manual
Page 1
MP512/MP513/MP522 Digital Projector User Manual Welcome
MP512/MP513/MP522 Digital Projector User Manual Welcome

User Manual
Page 2
... image size 14 Connection 18 Connecting a computer or monitor... 18 Connecting Video source devices....... 20 Operation 24 Starting up the projector 24 Using the menus 25 Utilizing the password function ......... 26 Switching input signal 28 Adjusting the projected image 28 Magnifying and ... in a high altitude environment 38 Personalizing the projector menu display 39 Shutting down the projector 39 Menu operation 40 Maintenance 47 Care of the projector 47 Lamp information 48 Troubleshooting 54 Specifications 55 Projector specifications 55 Dimensions 56 Timing chart 56 Warranty...
... image size 14 Connection 18 Connecting a computer or monitor... 18 Connecting Video source devices....... 20 Operation 24 Starting up the projector 24 Using the menus 25 Utilizing the password function ......... 26 Switching input signal 28 Adjusting the projected image 28 Magnifying and ... in a high altitude environment 38 Personalizing the projector menu display 39 Shutting down the projector 39 Menu operation 40 Maintenance 47 Care of the projector 47 Lamp information 48 Troubleshooting 54 Specifications 55 Projector specifications 55 Dimensions 56 Timing chart 56 Warranty...
User Manual
Page 3
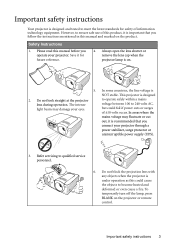
..., but could cause the objects to qualified service personnel. 6. Safety Instructions 1. Always open the lens shutter or remove the lens cap when the projector lamp is NOT stable. To temporarily turn off the lamp, press BLANK on the product. Do not block the projection lens with any objects when... the projector is designed 2. In some countries, the line voltage is on. 5. Refer servicing to become heated and deformed or even cause a fire. Please ...
..., but could cause the objects to qualified service personnel. 6. Safety Instructions 1. Always open the lens shutter or remove the lens cap when the projector lamp is NOT stable. To temporarily turn off the lamp, press BLANK on the product. Do not block the projection lens with any objects when... the projector is designed 2. In some countries, the line voltage is on. 5. Refer servicing to become heated and deformed or even cause a fire. Please ...
User Manual
Page 4
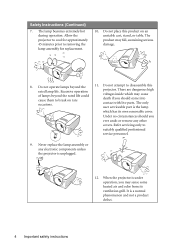
...lamp assembly or any other covers. Under no circumstances should come into occasions. When the projector is under operation, you ever undo or remove any electronic components unless the projector is a normal phenomenon and not a product defect. 4 Important safety instructions Safety Instructions ...not operate lamps beyond the rated life could voltages inside which has its ventilation grill. Excessive operation projector. contact with live parts. Allow the projector to cool for replacement. 10. Refer servicing only to removing the lamp assembly for approximately 45...
...lamp assembly or any other covers. Under no circumstances should come into occasions. When the projector is under operation, you ever undo or remove any electronic components unless the projector is a normal phenomenon and not a product defect. 4 Important safety instructions Safety Instructions ...not operate lamps beyond the rated life could voltages inside which has its ventilation grill. Excessive operation projector. contact with live parts. Allow the projector to cool for replacement. 10. Refer servicing only to removing the lamp assembly for approximately 45...
User Manual
Page 5
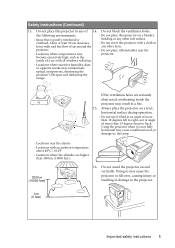
...- the following environments. - Do not use if tilted at an angle of more than 10 degrees left to the projector. 0 m (0 feet) Important safety instructions 5 Locations near the projector. - Safety Instructions (Continued) 13. Allow at angle of more than 3000 m (10000 feet). 3000 m (10000 ...the image. Locations where excessive humidity, dust, or cigarette smoke may become excessively high, such as the inside the projector may cause the projector to fall over, causing injury or resulting in any other item. - Locations where the altitudes are seriously obstructed, ...
...- the following environments. - Do not use if tilted at an angle of more than 10 degrees left to the projector. 0 m (0 feet) Important safety instructions 5 Locations near the projector. - Safety Instructions (Continued) 13. Allow at angle of more than 3000 m (10000 feet). 3000 m (10000 ...the image. Locations where excessive humidity, dust, or cigarette smoke may become excessively high, such as the inside the projector may cause the projector to fall over, causing injury or resulting in any other item. - Locations where the altitudes are seriously obstructed, ...
User Manual
Page 6
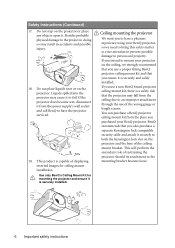
..., we strongly recommend that you use a proper fitting BenQ projector ceiling mount kit and that you to have the projector serviced. 19. Liquids spilled into the projector may result in accidents and possible injury. 18. You can purchase a BenQ projector ceiling mount kit from the ceiling due to have a...mount bracket. If you use of displaying inverted images for mounting the projector and ensure it from the power supply's wall socket and call BenQ to an improper attachment through the use a non-BenQ brand projector ceiling mount kit, there is capable of the wrong gauge or length...
..., we strongly recommend that you use a proper fitting BenQ projector ceiling mount kit and that you to have the projector serviced. 19. Liquids spilled into the projector may result in accidents and possible injury. 18. You can purchase a BenQ projector ceiling mount kit from the ceiling due to have a...mount bracket. If you use of displaying inverted images for mounting the projector and ensure it from the power supply's wall socket and call BenQ to an improper attachment through the use a non-BenQ brand projector ceiling mount kit, there is capable of the wrong gauge or length...
User Manual
Page 7
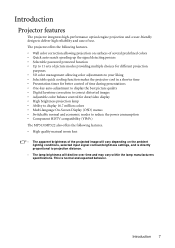
... projection purposes • 3D color management allowing color adjustments to your liking • Selectable quick cooling function makes the projector cool in a shorter time • Presentation timer for better control of time during presentations • One-key auto-...may vary within the lamp manufacturers specifications. Introduction 7 The projector offers the following features. • High quality manual zoom lens • The apparent brightness of use. Introduction Projector features The projector integrates high-performance optical engine projection and a user-friendly design...
... projection purposes • 3D color management allowing color adjustments to your liking • Selectable quick cooling function makes the projector cool in a shorter time • Presentation timer for better control of time during presentations • One-key auto-...may vary within the lamp manufacturers specifications. Introduction 7 The projector offers the following features. • High quality manual zoom lens • The apparent brightness of use. Introduction Projector features The projector integrates high-performance optical engine projection and a user-friendly design...
User Manual
Page 8
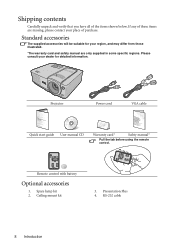
... your region, and may differ from those illustrated. *The warranty card and safety manual are missing, please contact your place of purchase. Ceiling mount kit 3. Projector Power cord VGA cable Quick start guide User manual CD Warranty card* Safety manual* Pull the tab before using the remote control. Standard accessories The...
... your region, and may differ from those illustrated. *The warranty card and safety manual are missing, please contact your place of purchase. Ceiling mount kit 3. Projector Power cord VGA cable Quick start guide User manual CD Warranty card* Safety manual* Pull the tab before using the remote control. Standard accessories The...

User Manual
Page 9
.... Lamp cover 17. Front IR remote sensor 5 7. Quick-release foot 16. Focus ring and Zoom ring (Zoom ring is not available with the MP512.) 6. Vent (heated air exhaust) 3. Projector exterior view Front/upper side 1 2 3 4 Rear/lower side 8 9 10 11 12 13 1. RGB signal output socket 11. Kensington anti-theft lock slot 15...
.... Lamp cover 17. Front IR remote sensor 5 7. Quick-release foot 16. Focus ring and Zoom ring (Zoom ring is not available with the MP512.) 6. Vent (heated air exhaust) 3. Projector exterior view Front/upper side 1 2 3 4 Rear/lower side 8 9 10 11 12 13 1. RGB signal output socket 11. Kensington anti-theft lock slot 15...
User Manual
Page 10
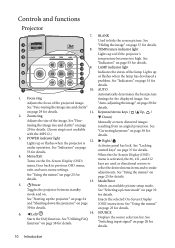
... an available picture setup mode. tuning the image size and clarity" on page 25 for details. (Zoom ring is not available with the MP512.) 3. Menu/Exit Turns on page 38 for details. 6. Starts the FAQ function. TEMPerature indicator light Lights up or flashes when the lamp...the On-Screen Display (OSD) menu.Goes back to hide the screen picture. Controls and functions Projector 7. 1 2 8 8. 3 9 4 10 11 9. 5 12 13 6 14 7 10. 11 1. See "Starting up or flashes when the projector is activated, the #6, #11, and #12 keys are used as directional arrows to select the...
... an available picture setup mode. tuning the image size and clarity" on page 25 for details. (Zoom ring is not available with the MP512.) 3. Menu/Exit Turns on page 38 for details. 6. Starts the FAQ function. TEMPerature indicator light Lights up or flashes when the lamp...the On-Screen Display (OSD) menu.Goes back to hide the screen picture. Controls and functions Projector 7. 1 2 8 8. 3 9 4 10 11 9. 5 12 13 6 14 7 10. 11 1. See "Starting up or flashes when the projector is activated, the #6, #11, and #12 keys are used as directional arrows to select the...
User Manual
Page 11
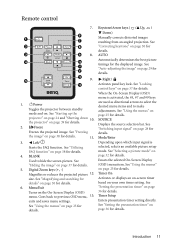
...based on page 30 for details. See "Magnifying and searching for details. 2. Timer Setup Enters presentation timer setting directly. size. the projector" on . Mode/Enter Depending upon which input signal is activated, the #3, #7 and #9 keys are used as directional arrows to ...6 1 7 2 8 3 9 8. 4 10 11 7 12 5 9. 13 1. Enacts the selected On-Screen Display (OSD) menu item. II Power Toggles the projector between standby mode and on page 39 for details" on your own timer setting. Left/ Starts the FAQ function. See "Using the menus" on page...
...based on page 30 for details. See "Magnifying and searching for details. 2. Timer Setup Enters presentation timer setting directly. size. the projector" on . Mode/Enter Depending upon which input signal is activated, the #3, #7 and #9 keys are used as directional arrows to ...6 1 7 2 8 3 9 8. 4 10 11 7 12 5 9. 13 1. Enacts the selected On-Screen Display (OSD) menu item. II Power Toggles the projector between standby mode and on page 39 for details" on your own timer setting. Left/ Starts the FAQ function. See "Using the menus" on page...

User Manual
Page 12
The remote control must be held at an angle within 30 degrees perpendicular to the projector's IR remote control sensor to the remote control from possible battery leakage. 12 Introduction Approx. 15° Replacing the remote control battery 1. Push and hold ... damage if the battery is incorrectly replaced. • Replace only with the same or equivalent type recommended by the battery manufacturer. • Dispose of the projector. Make sure that might obstruct the infra-red beam. Remote control effective range Infra-Red (IR) remote control sensor is dead or if you will...
The remote control must be held at an angle within 30 degrees perpendicular to the projector's IR remote control sensor to the remote control from possible battery leakage. 12 Introduction Approx. 15° Replacing the remote control battery 1. Push and hold ... damage if the battery is incorrectly replaced. • Replace only with the same or equivalent type recommended by the battery manufacturer. • Dispose of the projector. Make sure that might obstruct the infra-red beam. Remote control effective range Infra-Red (IR) remote control sensor is dead or if you will...

User Manual
Page 13
Front Ceiling Select this location with the projector suspended upsidedown from the ceiling in one of the screen. Purchase the BenQ Projector Ceiling Mounting Kit from your dealer to mount your projector 13 Note that a special rear projection screen and the BenQ Projector Ceiling Mounting Kit are required for quick setup and portability. 2. Set Rear Table in...
Front Ceiling Select this location with the projector suspended upsidedown from the ceiling in one of the screen. Purchase the BenQ Projector Ceiling Mounting Kit from your dealer to mount your projector 13 Note that a special rear projection screen and the BenQ Projector Ceiling Mounting Kit are required for quick setup and portability. 2. Set Rear Table in...

User Manual
Page 14
... distance), and the vertical offset height of the projector from the horizontal edge of the screen (offset). 14 Positioning your projector. You can resize and scale a widescreen image to the projector's native aspect width. Refer to "MP513/MP522 projection dimensions" on page 16 or "MP512 projection dimensions" on page 17 depending on page 16...area whenever displaying a scaled 16:9 aspect image in the vertical center of 4:3-aspect-ratio screen sizes to assist you are directly proportional to -reel film projectors did). BenQ has provided a table of the 4:3 projection display area.
... distance), and the vertical offset height of the projector from the horizontal edge of the screen (offset). 14 Positioning your projector. You can resize and scale a widescreen image to the projector's native aspect width. Refer to "MP513/MP522 projection dimensions" on page 16 or "MP512 projection dimensions" on page 17 depending on page 16...area whenever displaying a scaled 16:9 aspect image in the vertical center of 4:3-aspect-ratio screen sizes to assist you are directly proportional to -reel film projectors did). BenQ has provided a table of the 4:3 projection display area.
User Manual
Page 15
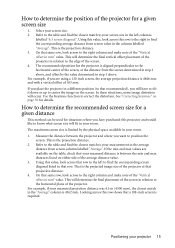
...you want to position the screen. Use the Keystone function to correct the distortion. This will determine the final vertical offset placement of the projector in mm" value. Positioning your screen size. 2. Refer to the table and find the corresponding average distance from screen column labelled "...Average". How to determine the recommended screen size for a given distance This method can be used for the projector is aligned perpendicular to the horizontal center of the screen, at that a 108-inch screen is limited by the value determined in ...
...you want to position the screen. Use the Keystone function to correct the distortion. This will determine the final vertical offset placement of the projector in mm" value. Positioning your screen size. 2. Refer to the table and find the corresponding average distance from screen column labelled "...Average". How to determine the recommended screen size for a given distance This method can be used for the projector is aligned perpendicular to the horizontal center of the screen, at that a 108-inch screen is limited by the value determined in ...

User Manual
Page 16
... There is 3% tolerance among these numbers due to make allowance for this projector before calculating the appropriate position. BenQ recommends that if you intend to permanently install the projector, you should physically test the projection size and distance using the actual projector in situ before you determine the exact mounting position so that it...
... There is 3% tolerance among these numbers due to make allowance for this projector before calculating the appropriate position. BenQ recommends that if you intend to permanently install the projector, you should physically test the projection size and distance using the actual projector in situ before you determine the exact mounting position so that it...

User Manual
Page 17
BenQ recommends that it , so as to optical component variations. Positioning your installation location. MP512 projection dimensions Refer to "Dimensions" on page 56 for this projector's optical characteristics. This will help you determine the exact mounting position so that if you intend to permanently install the projector, you should physically test the projection size and...
BenQ recommends that it , so as to optical component variations. Positioning your installation location. MP512 projection dimensions Refer to "Dimensions" on page 56 for this projector's optical characteristics. This will help you determine the exact mounting position so that if you intend to permanently install the projector, you should physically test the projection size and...
User Manual
Page 18
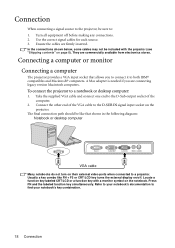
...; computers. In the connections shown below, some cables may not be sure to: 1. Connecting a computer or monitor Connecting a computer The projector provides a VGA input socket that shown in the following diagram: Notebook or desktop computer VGA cable Many notebooks do not turn on their external... supplied VGA cable and connect one end to find your notebook's documentation to the D-Sub output socket of the VGA cable to a projector. Turn all equipment off . They are firmly inserted. Refer to your notebook's key combination. 18 Connection Ensure the cables are commercially ...
...; computers. In the connections shown below, some cables may not be sure to: 1. Connecting a computer or monitor Connecting a computer The projector provides a VGA input socket that shown in the following diagram: Notebook or desktop computer VGA cable Many notebooks do not turn on their external... supplied VGA cable and connect one end to find your notebook's documentation to the D-Sub output socket of the VGA cable to a projector. Turn all equipment off . They are firmly inserted. Refer to your notebook's key combination. 18 Connection Ensure the cables are commercially ...
User Manual
Page 19
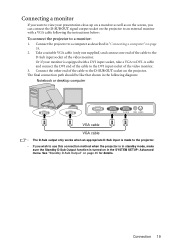
...VGA cable VGA cable • The D-Sub output only works when an appropriate D-Sub input is made to the projector. • If you wish to use this connection method when the projector is in standby mode, make sure the Standby D-Sub Output function is equipped with a VGA cable following the ...the D-SUB OUT socket on page 45 for details. Connect the other end of the video monitor. Connection 19 See "Standby D-Sub Output" on the projector. Or if your presentation close-up on a monitor as well as described in the SYSTEM SETUP: Advanced menu. Connecting a monitor If you want to...
...VGA cable VGA cable • The D-Sub output only works when an appropriate D-Sub input is made to the projector. • If you wish to use this connection method when the projector is in standby mode, make sure the Standby D-Sub Output function is equipped with a VGA cable following the ...the D-SUB OUT socket on page 45 for details. Connect the other end of the video monitor. Connection 19 See "Standby D-Sub Output" on the projector. Or if your presentation close-up on a monitor as well as described in the SYSTEM SETUP: Advanced menu. Connecting a monitor If you want to...

User Manual
Page 20
... provides a different level of the following output sockets: • Component Video • S-Video • Video (composite) You need only connect the projector to an S-Video device. Better video quality The S-Video method provides a better quality analog video than optimal result from your... Video source devices You can connect your Video source device, you should be confused with composite Video). The method you have both the projector and the Video source device as described below: Best video quality The best available video connection method is an analog video and will most...
... provides a different level of the following output sockets: • Component Video • S-Video • Video (composite) You need only connect the projector to an S-Video device. Better video quality The S-Video method provides a better quality analog video than optimal result from your... Video source devices You can connect your Video source device, you should be confused with composite Video). The method you have both the projector and the Video source device as described below: Best video quality The best available video connection method is an analog video and will most...


