
User Manual
Page 9
...ambient lighting conditions, selected input source contrast/brightness settings, and is normal and expected behavior. Introduction 9 Introduction Projector features The projector integrates high-performance optical engine projection and a user-friendly design to deliver high reliability and ease of the projected... protected function • Compact and portable unit • One-key auto-adjustment to display the best picture quality • Digital keystone correction to correct distorted images • Adjustable color balance control for data/video display • Ability to display 16.7...
...ambient lighting conditions, selected input source contrast/brightness settings, and is normal and expected behavior. Introduction 9 Introduction Projector features The projector integrates high-performance optical engine projection and a user-friendly design to deliver high reliability and ease of the projected... protected function • Compact and portable unit • One-key auto-adjustment to display the best picture quality • Digital keystone correction to correct distorted images • Adjustable color balance control for data/video display • Ability to display 16.7...
User Manual
Page 14
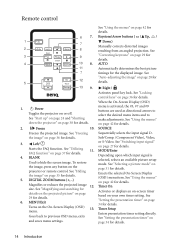
...for details. Goes back to hide the screen image. See "Setting the presentation timer" on page 37 for details. Power Toggles the projector on the projector or remote control. To restore the image, press any button on or off. See "Correcting keystone" on page 27 for details.... picture setup mode. See "Setting the presentation timer" on page 36 for details. 6. See "Freezing the image" on page 34 for details. DIGITAL ZOOM buttons (+, -) Magnifies or reduces the projected image 12. See "Magnifying and searching for details on the projected picture" on page 36 for ...
...for details. Goes back to hide the screen image. See "Setting the presentation timer" on page 37 for details. Power Toggles the projector on the projector or remote control. To restore the image, press any button on or off. See "Correcting keystone" on page 27 for details.... picture setup mode. See "Setting the presentation timer" on page 36 for details. 6. See "Freezing the image" on page 34 for details. DIGITAL ZOOM buttons (+, -) Magnifies or reduces the projected image 12. See "Magnifying and searching for details on the projected picture" on page 36 for ...

User Manual
Page 17
... 16:9 aspect image will require an additional 33% display height than composite Video being fed a 16:9 aspect signal). The modern digital projector does not project directly forward (like flat on page 19, that of the 4:3 projection display area. When ceiling mounted, this ...right-angle square) to -reel film projectors did). Positioning your projector. The projector should consider its intended use and input signal aspect ratios. This is positioned further away from the projector lens to the projector's native aspect width. BenQ has provided a table of the table...
... 16:9 aspect image will require an additional 33% display height than composite Video being fed a 16:9 aspect signal). The modern digital projector does not project directly forward (like flat on page 19, that of the 4:3 projection display area. When ceiling mounted, this ...right-angle square) to -reel film projectors did). Positioning your projector. The projector should consider its intended use and input signal aspect ratios. This is positioned further away from the projector lens to the projector's native aspect width. BenQ has provided a table of the table...

User Manual
Page 21
...video than optimal result from your devices, this should elect to use the S-Video option. Digital TV tuner and DVD players output Component Video natively, so if available on your projector to various Video source devices that provide any one of the following output sockets: • ...Component Video • S-Video • Video (composite) You need only connect the projector to a Video source device using just one of the above connecting methods, however each provides a different level of the available methods described here...
...video than optimal result from your devices, this should elect to use the S-Video option. Digital TV tuner and DVD players output Component Video natively, so if available on your projector to various Video source devices that provide any one of the following output sockets: • ...Component Video • S-Video • Video (composite) You need only connect the projector to a Video source device using just one of the above connecting methods, however each provides a different level of the available methods described here...

User Manual
Page 24
...from previous activity, it will run the cooling fan for approximately 120 seconds before energizing the lamp. 4. You can also press SOURCE on the projector or remote control to start up, a startup logo is projected. (If necessary) Rotate the focus ring to search for details. 5. Press Power ...page 27 for your region. 2. The power cable used in the illustration may look different to enter a six digit password. The Power indicator light flashes green and stays green when the projector is closed, it is on a blank screen. If you will start up 1. Please change to an input ...
...from previous activity, it will run the cooling fan for approximately 120 seconds before energizing the lamp. 4. You can also press SOURCE on the projector or remote control to start up, a startup logo is projected. (If necessary) Rotate the focus ring to search for details. 5. Press Power ...page 27 for your region. 2. The power cable used in the illustration may look different to enter a six digit password. The Power indicator light flashes green and stays green when the projector is closed, it is on a blank screen. If you will start up 1. Please change to an input ...

User Manual
Page 25
... an incorrect password 5 times in a safe place. 4. Press MODE/Enter. MENU Back IMPORTANT: The digits being input will automatically shut down here in this manual in succession, the projector will display as pictured to the right displays Please try again. If you desire to set, press the... arrow buttons to enter six digits for the password. digit password, or if you activate the power-on -screen....
... an incorrect password 5 times in a safe place. 4. Press MODE/Enter. MENU Back IMPORTANT: The digits being input will automatically shut down here in this manual in succession, the projector will display as pictured to the right displays Please try again. If you desire to set, press the... arrow buttons to enter six digits for the password. digit password, or if you activate the power-on -screen....

User Manual
Page 26
... BenQ service center to the projector..... 6. ii. Entering the password recall procedure Press and hold AUTO on the projector or remote control for your retry. Recall code: 0 2 1 2 MENU Exit...Security Settings page with the BenQ Customer Center. You have to enter the new password next time the projector is incorrect, the password...and the message 'INPUT PASSWORD' displays for your projector. If the password is started. Open the OSD ... entered so that you are an authorized user of the projector. The projector will not have successfully assigned a new password to decode ...
... BenQ service center to the projector..... 6. ii. Entering the password recall procedure Press and hold AUTO on the projector or remote control for your retry. Recall code: 0 2 1 2 MENU Exit...Security Settings page with the BenQ Customer Center. You have to enter the new password next time the projector is incorrect, the password...and the message 'INPUT PASSWORD' displays for your projector. If the password is started. Open the OSD ... entered so that you are an authorized user of the projector. The projector will not have successfully assigned a new password to decode ...

User Manual
Page 30
.... For input signals with a 4:3 aspect ratio. You could adjust the zoom setting or move the projector towards the screen to a desired size. 4. Press MODE/Enter to highlight Digital Zoom. 3. Selecting the aspect ratio The 'aspect ratio' is the ratio of the screen without aspect... most use of the image width to full screen. This is either in 16:9 ratio. With the advent of digital signal processing, digital display devices like this projector, and digital TV and DVDs are already in a 16:9 aspect, like computer monitors, standard definition TV and 4:3 aspect DVD ...
.... For input signals with a 4:3 aspect ratio. You could adjust the zoom setting or move the projector towards the screen to a desired size. 4. Press MODE/Enter to highlight Digital Zoom. 3. Selecting the aspect ratio The 'aspect ratio' is the ratio of the screen without aspect... most use of the image width to full screen. This is either in 16:9 ratio. With the advent of digital signal processing, digital display devices like this projector, and digital TV and DVDs are already in a 16:9 aspect, like computer monitors, standard definition TV and 4:3 aspect DVD ...
User Manual
Page 31
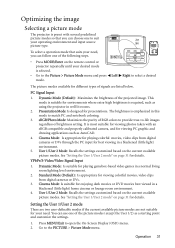
...details. Operation 31 Dynamic Mode (Default): Maximizes the brightness of the following steps. • Press MODE/Enter on the remote control or projector repeatedly until your need. See "Setting the User 1/User 2 mode" on page 31 for presentations. This mode is suitable for environments ...User 1/User 2 mode" on page 31 for viewing colorful movies, video clips from digital cameras or DVs through the PC input for different types of the picture modes (except the User 1/2) as using the projector in a blackened (little light) environment. 5. It is selected. • Go to...
...details. Operation 31 Dynamic Mode (Default): Maximizes the brightness of the following steps. • Press MODE/Enter on the remote control or projector repeatedly until your need. See "Setting the User 1/User 2 mode" on page 31 for presentations. This mode is suitable for environments ...User 1/User 2 mode" on page 31 for viewing colorful movies, video clips from digital cameras or DVs through the PC input for different types of the picture modes (except the User 1/2) as using the projector in a blackened (little light) environment. 5. It is selected. • Go to...

User Manual
Page 42
... Up/ Down to leave and save the settings. See "System setup: Basic menu" on the projector or remote control to select Keystone. Size Digital Zoom Disable Auto ENTER MENU Back 5. Size Digital Zoom Disable Auto 50 50 S-VIDEO MENU Exit 2. the keystone correction page. Press MODE/Enter to... display remote control to MENU Exit exit. Size Digital Zoom Current input signal S-VIDEO Disable Auto ENTER 50 Status 50 Press MENU/Exit to the previous page or to turn the OSD menu on the projector or 4. S-VIDEO MENU Exit 42 Operation
... Up/ Down to leave and save the settings. See "System setup: Basic menu" on the projector or remote control to select Keystone. Size Digital Zoom Disable Auto ENTER MENU Back 5. Size Digital Zoom Disable Auto 50 50 S-VIDEO MENU Exit 2. the keystone correction page. Press MODE/Enter to... display remote control to MENU Exit exit. Size Digital Zoom Current input signal S-VIDEO Disable Auto ENTER 50 Status 50 Press MENU/Exit to the previous page or to turn the OSD menu on the projector or 4. S-VIDEO MENU Exit 42 Operation

User Manual
Page 43
Corrects any keystoning of the image. See "Correcting keystone" on page 29 for details. Size (depends on the projector or remote control. Aspect Ratio (Auto) Keystone (0) There are four options to reduce image distortion. To move the projected image, use the directional arrow ... by using the directional arrow buttons on the selected input source) Adjusts the horizontal width of the image. Magnifies or reduces the projected image. Digital Zoom (100%) After the image is not white. Adjusts the clock phase to set the image's aspect ratio depending on page 29 for details...
Corrects any keystoning of the image. See "Correcting keystone" on page 29 for details. Size (depends on the projector or remote control. Aspect Ratio (Auto) Keystone (0) There are four options to reduce image distortion. To move the projected image, use the directional arrow ... by using the directional arrow buttons on the selected input source) Adjusts the horizontal width of the image. Magnifies or reduces the projected image. Digital Zoom (100%) After the image is not white. Adjusts the clock phase to set the image's aspect ratio depending on page 29 for details...

User Manual
Page 57
... Mode on) Dimensions 277 mm (W) x 95 mm (H) x 208 mm (D) 277 208 95 78.5 72 Specifications 57 General Product name Model name Digital Projector MP511+ Optical Resolution Display system Lens F/Number 800 x 600 SVGA 1-CHIP DMD F=2.57 (fixed) Lamp 180 W lamp Electrical Power supply AC100-240V, 2.9A, 50-60 Hz (Automatic) Power consumption 260 W (Max...
... Mode on) Dimensions 277 mm (W) x 95 mm (H) x 208 mm (D) 277 208 95 78.5 72 Specifications 57 General Product name Model name Digital Projector MP511+ Optical Resolution Display system Lens F/Number 800 x 600 SVGA 1-CHIP DMD F=2.57 (fixed) Lamp 180 W lamp Electrical Power supply AC100-240V, 2.9A, 50-60 Hz (Automatic) Power consumption 260 W (Max...

User Manual
Page 59
... of purchase date will be replacement of any form or by BenQ Corporation. Important: The above warranty shall be void if the customer fails to operate the product in accordance with respect to operate the projector in -between 0°C and 40°C, altitude lower than... any defects in the contents hereof without the prior written permission of BenQ Corporation. Warranty and Copyright information Limited warranty BenQ warrants this product against any person of such revision or changes. *DLP, Digital Micromirror Device and DMD are copyrights of any particular purpose. This warranty...
... of purchase date will be replacement of any form or by BenQ Corporation. Important: The above warranty shall be void if the customer fails to operate the product in accordance with respect to operate the projector in -between 0°C and 40°C, altitude lower than... any defects in the contents hereof without the prior written permission of BenQ Corporation. Warranty and Copyright information Limited warranty BenQ warrants this product against any person of such revision or changes. *DLP, Digital Micromirror Device and DMD are copyrights of any particular purpose. This warranty...


