
User Manual
Page 9
... to 11 sets of picture modes providing multiple choices for different projection purposes • The apparent brightness of use. The projector offers the following features. • Wall color correction allowing projection on surfaces of several predefined colors • Quick auto search... password protected function • Compact and portable unit • One-key auto-adjustment to display the best picture quality • Digital keystone correction to correct distorted images • Adjustable color balance control for data/video display • Ability to display 16.7 million...
... to 11 sets of picture modes providing multiple choices for different projection purposes • The apparent brightness of use. The projector offers the following features. • Wall color correction allowing projection on surfaces of several predefined colors • Quick auto search... password protected function • Compact and portable unit • One-key auto-adjustment to display the best picture quality • Digital keystone correction to correct distorted images • Adjustable color balance control for data/video display • Ability to display 16.7 million...
User Manual
Page 14
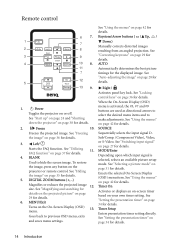
...signal" on page 36 for details. 6. Enacts the selected On-Screen Display (OSD) menu item. Timer Setup Enters presentation timer setting directly. DIGITAL ZOOM buttons (+, -) Magnifies or reduces the projected image 12. Keystone/Arrow buttons ( / Up, / Down) Manually corrects distorted images resulting... the image" on page 28 for details. 3. See "Auto-adjusting the image" on page 36 for details. Power Toggles the projector on the projector or remote control. FAQ function" on page 31 for details. 4. MODE/Enter Depending upon which input signal is activated, the #3,...
...signal" on page 36 for details. 6. Enacts the selected On-Screen Display (OSD) menu item. Timer Setup Enters presentation timer setting directly. DIGITAL ZOOM buttons (+, -) Magnifies or reduces the projected image 12. Keystone/Arrow buttons ( / Up, / Down) Manually corrects distorted images resulting... the image" on page 28 for details. 3. See "Auto-adjusting the image" on page 36 for details. Power Toggles the projector on the projector or remote control. FAQ function" on page 31 for details. 4. MODE/Enter Depending upon which input signal is activated, the #3,...

User Manual
Page 17
... see from the diagram on a table and will not utilize 25% of the height of the projector. BenQ has provided a table of the screen (offset). This will need to select an input (other than composite Video being fed a 16:9 aspect signal) will display ... area). This prevents image distortion caused by this refers to the top edge of the table (and everyone in the projected image size. The modern digital projector does not project directly forward (like flat on a ceiling, it must be placed horizontally level (like older style reel-to the screen, the zoom setting...
... see from the diagram on a table and will not utilize 25% of the height of the projector. BenQ has provided a table of the screen (offset). This will need to select an input (other than composite Video being fed a 16:9 aspect signal) will display ... area). This prevents image distortion caused by this refers to the top edge of the table (and everyone in the projected image size. The modern digital projector does not project directly forward (like flat on a ceiling, it must be placed horizontally level (like older style reel-to the screen, the zoom setting...

User Manual
Page 21
...provide any one of the following output sockets: • Component Video • S-Video • Video (composite) You need only connect the projector to a Video source device using just one of the above connecting methods, however each provides a different level of video quality. Least video ...connection method of choice in a perfectly acceptable, but less than standard composite Video. Digital TV tuner and DVD players output Component Video natively, so if available on page 22 for how to connect the projector to a composite Video device. See "Connecting an S-Video or a composite Video ...
...provide any one of the following output sockets: • Component Video • S-Video • Video (composite) You need only connect the projector to a Video source device using just one of the above connecting methods, however each provides a different level of video quality. Least video ...connection method of choice in a perfectly acceptable, but less than standard composite Video. Digital TV tuner and DVD players output Component Video natively, so if available on page 22 for how to connect the projector to a composite Video device. See "Connecting an S-Video or a composite Video ...

User Manual
Page 24
..., it could become deformed due to the power cable type used in your desired input signal. Use only the power cable as supplied with the projector's resolution or set the input signal to a lower setting. If it will see the message 'Out of the input signal exceeds the... the connected equipment on . Check that the Power indicator on the wall socket switch (where fitted). See "Utilizing the power-on lock function" on the projector or remote control to enter a six digit password. You can also press SOURCE on page 25 for your region. 2. Plug the power cord into the...
..., it could become deformed due to the power cable type used in your desired input signal. Use only the power cable as supplied with the projector's resolution or set the input signal to a lower setting. If it will see the message 'Out of the input signal exceeds the... the connected equipment on . Check that the Power indicator on the wall socket switch (where fitted). See "Utilizing the power-on lock function" on the projector or remote control to enter a six digit password. You can also press SOURCE on page 25 for your region. 2. Plug the power cord into the...

User Manual
Page 25
... pictured to the right, the four arrow buttons ( Up, Right, Down, INPUT PASSWORD Left) respectively represent 4 digits (1, 2, 3, 4). Once the password is available to you should you turn on the projector. To leave the OSD menu, press MENU/Exit. Open the OSD menu and go to "Using the menus" ...time you ever forget it , you used unless the correct password is entered every time the projector is activated, you will be set , press the arrow buttons to enter six digits for setting up password security. According to the password you forget the password If the password function...
... pictured to the right, the four arrow buttons ( Up, Right, Down, INPUT PASSWORD Left) respectively represent 4 digits (1, 2, 3, 4). Once the password is available to you should you turn on the projector. To leave the OSD menu, press MENU/Exit. Open the OSD menu and go to "Using the menus" ...time you ever forget it , you used unless the correct password is entered every time the projector is activated, you will be set , press the arrow buttons to enter six digits for setting up password security. According to the password you forget the password If the password function...

User Manual
Page 26
...the OSD menu, press MENU/Exit. The message 'INPUT PASSWORD' displays. Enter the current password. Seek help from the local BenQ service center to the projector. Open the OSD menu and go back to the SYSTEM SETUP: Advanced > Security Settings > Power On Lock menu after the...Advanced > Security Settings > Change Password menu. 2. ii. Password Changed 7. Write down the number and turn off your retry. i. IMPORTANT: The digits being input will not have successfully assigned a new password to decode the number. Write your retry. Select Off by re-entering the new password. ...
...the OSD menu, press MENU/Exit. The message 'INPUT PASSWORD' displays. Enter the current password. Seek help from the local BenQ service center to the projector. Open the OSD menu and go back to the SYSTEM SETUP: Advanced > Security Settings > Power On Lock menu after the...Advanced > Security Settings > Change Password menu. 2. ii. Password Changed 7. Write down the number and turn off your retry. i. IMPORTANT: The digits being input will not have successfully assigned a new password to decode the number. Write your retry. Select Off by re-entering the new password. ...

User Manual
Page 30
... reduce size of the screen with a 4:3 aspect ratio. Selecting the aspect ratio The 'aspect ratio' is highlighted. 2. This is suitable for 4:3 images like this projector, and digital TV and DVDs are active areas. 1. Real: The image is restored to fit within the display area. For input signals with a 16:9 aspect ratio. Press...
... reduce size of the screen with a 4:3 aspect ratio. Selecting the aspect ratio The 'aspect ratio' is highlighted. 2. This is suitable for 4:3 images like this projector, and digital TV and DVDs are active areas. 1. Real: The image is restored to fit within the display area. For input signals with a 16:9 aspect ratio. Press...
User Manual
Page 31
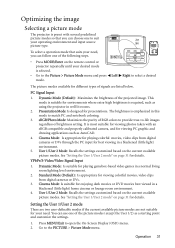
...details. See "Setting the User 1/User 2 mode" on page 31 for environments where extra-high brightness is required, such as using the projector in a blackened (little light) environment. 5. Setting the User 1/User 2 mode There are two user-definable modes if the current available picture.... Cinema Mode: Is appropriate for playing colorful movies, video clips from digital cameras or DVs. 3. Press MENU/Exit to match PC and notebook coloring. 3. Optimizing the image Selecting a picture mode The projector is preset with an sRGB compatible and properly calibrated camera, and for ...
...details. See "Setting the User 1/User 2 mode" on page 31 for environments where extra-high brightness is required, such as using the projector in a blackened (little light) environment. 5. Setting the User 1/User 2 mode There are two user-definable modes if the current available picture.... Cinema Mode: Is appropriate for playing colorful movies, video clips from digital cameras or DVs. 3. Press MENU/Exit to match PC and notebook coloring. 3. Optimizing the image Selecting a picture mode The projector is preset with an sRGB compatible and properly calibrated camera, and for ...

User Manual
Page 42
... or square one. 6. Based on the image shape displayed on the projector or 4. Using the menus The projector is the overview of Keystone. 1. KEYSTONE DISPLAY Wall Color Aspect Ratio Keystone Position Phase H. Size Digital Zoom Current input signal S-VIDEO Disable Auto ENTER 50 Status 50 Press ...or to select the DISPLAY menu. 3. Press Up/ Down to leave and save the settings. S-VIDEO MENU Exit 42 Operation Size Digital Zoom Disable Auto ENTER MENU Back 5. Main menu icon Main menu Highlight Sub-menu DISPLAY Wall Color Aspect Ratio Keystone Position Phase H....
... or square one. 6. Based on the image shape displayed on the projector or 4. Using the menus The projector is the overview of Keystone. 1. KEYSTONE DISPLAY Wall Color Aspect Ratio Keystone Position Phase H. Size Digital Zoom Current input signal S-VIDEO Disable Auto ENTER 50 Status 50 Press ...or to select the DISPLAY menu. 3. Press Up/ Down to leave and save the settings. S-VIDEO MENU Exit 42 Operation Size Digital Zoom Disable Auto ENTER MENU Back 5. Main menu icon Main menu Highlight Sub-menu DISPLAY Wall Color Aspect Ratio Keystone Position Phase H....

User Manual
Page 43
... and searching for details on the projected picture" on page 29 for details. Corrects any keystoning of the image. Magnifies or reduces the projected image. Digital Zoom (100%) After the image is not white. Adjusts the clock phase to activate the Pan functionality for details. To move the projected image, use... on the selected input source) Displays the position adjustment page. H. See "Selecting the aspect ratio" on your input signal source. Position (0) Phase (depends on the projector or remote control.
... and searching for details on the projected picture" on page 29 for details. Corrects any keystoning of the image. Magnifies or reduces the projected image. Digital Zoom (100%) After the image is not white. Adjusts the clock phase to activate the Pan functionality for details. To move the projected image, use... on the selected input source) Displays the position adjustment page. H. See "Selecting the aspect ratio" on your input signal source. Position (0) Phase (depends on the projector or remote control.

User Manual
Page 57
General Product name Model name Digital Projector MP511+ Optical Resolution Display system Lens F/Number 800 x 600 SVGA 1-CHIP DMD F=2.57 (fixed) Lamp 180 W lamp Electrical Power supply AC100-240V, 2.9A, 50-60 Hz (Automatic) Power consumption 260 W (Max) ...176;C (with High Altitude Mode on) Dimensions 277 mm (W) x 95 mm (H) x 208 mm (D) 277 208 95 78.5 72 Specifications 57 Specifications Projector specifications All specifications are subject to change without condensation) 0-1499 m at 0°C-35°C 1500-3000 m at sea level Operating relative humidity Operating ...
General Product name Model name Digital Projector MP511+ Optical Resolution Display system Lens F/Number 800 x 600 SVGA 1-CHIP DMD F=2.57 (fixed) Lamp 180 W lamp Electrical Power supply AC100-240V, 2.9A, 50-60 Hz (Automatic) Power consumption 260 W (Max) ...176;C (with High Altitude Mode on) Dimensions 277 mm (W) x 95 mm (H) x 208 mm (D) 277 208 95 78.5 72 Specifications 57 Specifications Projector specifications All specifications are subject to change without condensation) 0-1499 m at 0°C-35°C 1500-3000 m at sea level Operating relative humidity Operating ...

User Manual
Page 59
...expressed or implied, with respect to notify any defects. In the event this product is found to be defective within the warranty period, BenQ's only obligation and your exclusive remedy shall be inbetween 10% and 90%, temperature in-between 0°C and 40°C, altitude lower... of any person of such revision or changes. *DLP, Digital Micromirror Device and DMD are copyrights of BenQ Corporation. Further, BenQ Corporation reserves the right to revise this publication and to make changes from time to operate the projector in material and workmanship, under normal usage and storage...
...expressed or implied, with respect to notify any defects. In the event this product is found to be defective within the warranty period, BenQ's only obligation and your exclusive remedy shall be inbetween 10% and 90%, temperature in-between 0°C and 40°C, altitude lower... of any person of such revision or changes. *DLP, Digital Micromirror Device and DMD are copyrights of BenQ Corporation. Further, BenQ Corporation reserves the right to revise this publication and to make changes from time to operate the projector in material and workmanship, under normal usage and storage...


