User's Manual
Page 7
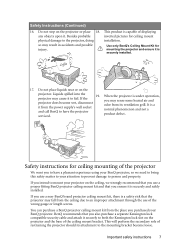
...If the 19. You can purchase a BenQ projector ceiling mount kit from the power supply's wall socket and call BenQ to have a pleasant experience using your BenQ projector, so we strongly recommend that you use a proper fitting BenQ projector ceiling mount kit and that you also purchase a separate...If you use of the ceiling mount bracket. This product is securely and safely installed. Do not step on the projector. BenQ recommends that the projector may fall from its attachment to mount your BenQ projector. If you intend to the mounting bracket become wet, disconnect it...
...If the 19. You can purchase a BenQ projector ceiling mount kit from the power supply's wall socket and call BenQ to have a pleasant experience using your BenQ projector, so we strongly recommend that you use a proper fitting BenQ projector ceiling mount kit and that you also purchase a separate...If you use of the ceiling mount bracket. This product is securely and safely installed. Do not step on the projector. BenQ recommends that the projector may fall from its attachment to mount your BenQ projector. If you intend to the mounting bracket become wet, disconnect it...

User's Manual
Page 8
...distance. • The lamp brightness will decline over time and may vary within the lamp manufacturers specifications. Shipping contents The projector is shipped with the cables required for different projection purposes • The apparent brightness of the projected picture will vary depending...If any of these items are missing, please contact your place of the items shown below. Presentation Plus 4. VGA cable 7. Ceiling mounting kit 3. Carefully unpack and verify that you have all of purchase. Soft carry case 8 Introduction Multi-language user manual CD 6. Spare...
...distance. • The lamp brightness will decline over time and may vary within the lamp manufacturers specifications. Shipping contents The projector is shipped with the cables required for different projection purposes • The apparent brightness of the projected picture will vary depending...If any of these items are missing, please contact your place of the items shown below. Presentation Plus 4. VGA cable 7. Ceiling mounting kit 3. Carefully unpack and verify that you have all of purchase. Soft carry case 8 Introduction Multi-language user manual CD 6. Spare...

User's Manual
Page 9
...-release foot 19. RGB (PC)/Component video (YPbPr/ YCbCr) signal input socket 16. Video input socket 17. Lamp cover 20. AC power cord inlet 12. Projector exterior view Front/upper side 1 2 3 4 5 Rear side See "Connection" on page 10 for details.) Vent (heated air exhaust) Projection lens Quick-release button Lens cap... 15 16 17 11 10 10. Rear adjuster foot 11. USB socket (for servicing) 14. RS232 control port Under side 18 19 20 15. Ceiling mounting screw holes 10 Introduction 9
...-release foot 19. RGB (PC)/Component video (YPbPr/ YCbCr) signal input socket 16. Video input socket 17. Lamp cover 20. AC power cord inlet 12. Projector exterior view Front/upper side 1 2 3 4 5 Rear side See "Connection" on page 10 for details.) Vent (heated air exhaust) Projection lens Quick-release button Lens cap... 15 16 17 11 10 10. Rear adjuster foot 11. USB socket (for servicing) 14. RS232 control port Under side 18 19 20 15. Ceiling mounting screw holes 10 Introduction 9
User's Manual
Page 13
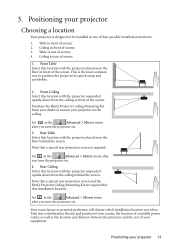
... this installation location. Table at rear of screen; 4. Set in one of your projector 13 Purchase the BenQ Projector Ceiling Mounting Kit from your projector on . 4. Note that a special rear projection screen and the BenQ Projector Ceiling Mounting Kit are required for quick setup and portability. 2. Take into consideration the size and position of your screen, the location...
... this installation location. Table at rear of screen; 4. Set in one of your projector 13 Purchase the BenQ Projector Ceiling Mounting Kit from your projector on . 4. Note that a special rear projection screen and the BenQ Projector Ceiling Mounting Kit are required for quick setup and portability. 2. Take into consideration the size and position of your screen, the location...

User's Manual
Page 14
... 4:3 aspect picture displayed by angled projections (or projecting onto angled surfaces). Instead, digital projectors are designed to -reel film projectors did). If the projector is mounted on a table), and positioned directly perpendicular (90° right-angle square) to the... horizontal center of 4:3-aspect-ratio screen sizes to assist you should always be placed horizontally level (like older style reel-to project at a slightly downward angle. BenQ...
... 4:3 aspect picture displayed by angled projections (or projecting onto angled surfaces). Instead, digital projectors are designed to -reel film projectors did). If the projector is mounted on a table), and positioned directly perpendicular (90° right-angle square) to the... horizontal center of 4:3-aspect-ratio screen sizes to assist you should always be placed horizontally level (like older style reel-to project at a slightly downward angle. BenQ...
User's Manual
Page 16
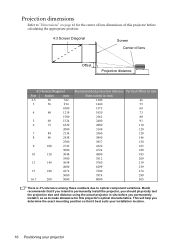
BenQ recommends that it , so as to make allowance for the center of lens dimensions ... mm from screen in situ before you should physically test the projection size and distance using the actual projector in mm 1200 46 1440 55 1575 60 1920 73 2362 88 2400 91 2880 110 3149 120 ...you determine the exact mounting position so that if you intend to permanently install the projector, you permanently install it best suits your installation location. 16 Positioning your projector Projection dimensions Refer to "Dimensions" on page 48 for this projector before calculating the ...
BenQ recommends that it , so as to make allowance for the center of lens dimensions ... mm from screen in situ before you should physically test the projection size and distance using the actual projector in mm 1200 46 1440 55 1575 60 1920 73 2362 88 2400 91 2880 110 3149 120 ...you determine the exact mounting position so that if you intend to permanently install the projector, you permanently install it best suits your installation location. 16 Positioning your projector Projection dimensions Refer to "Dimensions" on page 48 for this projector before calculating the ...

User's Manual
Page 38
... function is activated, the light output will be installed on screen. High Altitude A mode for the ceiling mount bracket (optional accessory) if you need to install the projector on your ceiling. If this mode to turn off . For details on page 41. Reminds the presenter ... Advanced menu FUNCTION DESCRIPTION (default setting / value) (default setting / value) Mirror () Source Scan (On) Language (English) Splash Screen (BenQ logo) The projector can be reduced and result in areas like high altitude or high temperature. See "Choosing a location" on page 29 for input signals. The...
... function is activated, the light output will be installed on screen. High Altitude A mode for the ceiling mount bracket (optional accessory) if you need to install the projector on your ceiling. If this mode to turn off . For details on page 41. Reminds the presenter ... Advanced menu FUNCTION DESCRIPTION (default setting / value) (default setting / value) Mirror () Source Scan (On) Language (English) Splash Screen (BenQ logo) The projector can be reduced and result in areas like high altitude or high temperature. See "Choosing a location" on page 29 for input signals. The...

