

User's Manual
Page 2
Table of contents Important safety instructions 4 Introduction 8 Projector features 8 Shipping contents 8 Projector exterior view 9 Controls and functions 10 Positioning your projector 13 Choosing a location 13 Obtaining a preferred projected picture size 14 Connection 17 Connecting a computer 17 Connecting Video source devices 18... timer 29 Hiding the picture 30 Freezing the picture 31 Operating in a high altitude environment 31 Shutting down the projector 32 Menu operation 33 Maintenance 40 Care of the projector 40 Lamp information 41 Troubleshooting 47 Specifications 48...
Table of contents Important safety instructions 4 Introduction 8 Projector features 8 Shipping contents 8 Projector exterior view 9 Controls and functions 10 Positioning your projector 13 Choosing a location 13 Obtaining a preferred projected picture size 14 Connection 17 Connecting a computer 17 Connecting Video source devices 18... timer 29 Hiding the picture 30 Freezing the picture 31 Operating in a high altitude environment 31 Shutting down the projector 32 Menu operation 33 Maintenance 40 Care of the projector 40 Lamp information 41 Troubleshooting 47 Specifications 48...

User's Manual
Page 4
...could cause the objects to ensure safe use of this product, it is on. 5. NOT stable. Important safety instructions Your BenQ projector is recommended that you operate your projector. However, to become heated and deformed or even cause a fire. Save it is designed and tested to qualified service ... that you connect your eyes. In some countries, the line voltage is under operation as this manual and marked on the projector or remote control. 4 Important safety instructions To temporarily turn off the lamp, press BLANK on the product. Please read this...
...could cause the objects to ensure safe use of this product, it is on. 5. NOT stable. Important safety instructions Your BenQ projector is recommended that you operate your projector. However, to become heated and deformed or even cause a fire. Save it is designed and tested to qualified service ... that you connect your eyes. In some countries, the line voltage is under operation as this manual and marked on the projector or remote control. 4 Important safety instructions To temporarily turn off the lamp, press BLANK on the product. Please read this...

User's Manual
Page 5
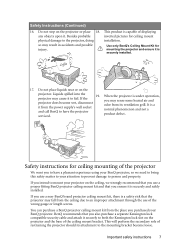
Safety Instructions (Continued) 7. Allow the projector to cool for replacement. 10. Do not attempt to break on an unstable cart, stand, or table. The only user serviceable part is unplugged. Important ... voltages inside which has its own removable cover. Never replace the lamp assembly or any other covers. projector. The product may cause death if you ever undo or remove any electronic components unless the projector is the lamp which may fall, sustaining serious damage. 11. Do not operate lamps beyond the rated...
Safety Instructions (Continued) 7. Allow the projector to cool for replacement. 10. Do not attempt to break on an unstable cart, stand, or table. The only user serviceable part is unplugged. Important ... voltages inside which has its own removable cover. Never replace the lamp assembly or any other covers. projector. The product may cause death if you ever undo or remove any electronic components unless the projector is the lamp which may fall, sustaining serious damage. 11. Do not operate lamps beyond the rated...

User's Manual
Page 6
... injury or resulting in damage to back. Doing so may cause a malfunction of, or damage to, the lamp. - Always place the projector on end vertically. Do not use if tilted at an angle of more than 10 degrees left to right, nor at least 50 cm..., dust, or cigarette smoke may result in any of air around the projector. - Locations near the projector. - Locations where temperatures may become excessively high, such as the inside the projector may contaminate optical components, shortening the projector's life span and darkening the picture. If the ventilation holes are higher...
... injury or resulting in damage to back. Doing so may cause a malfunction of, or damage to, the lamp. - Always place the projector on end vertically. Do not use if tilted at an angle of more than 10 degrees left to right, nor at least 50 cm..., dust, or cigarette smoke may result in any of air around the projector. - Locations near the projector. - Locations where temperatures may become excessively high, such as the inside the projector may contaminate optical components, shortening the projector's life span and darkening the picture. If the ventilation holes are higher...
User's Manual
Page 7
...cable and attach it is under operation, you may fall from the place you to an improper attachment through the use a non-BenQ brand projector ceiling mount kit, there is securely and safely installed. This will perform the secondary role of the wrong gauge or length screws... bracket become wet, disconnect it to mount your projector on the projector and the base of the projector We want you purchased your BenQ projector, so we strongly recommend that you use a proper fitting BenQ projector ceiling mount kit and that the projector may sense some heated air and odor from the...
...cable and attach it is under operation, you may fall from the place you to an improper attachment through the use a non-BenQ brand projector ceiling mount kit, there is securely and safely installed. This will perform the secondary role of the wrong gauge or length screws... bracket become wet, disconnect it to mount your projector on the projector and the base of the projector We want you purchased your BenQ projector, so we strongly recommend that you use a proper fitting BenQ projector ceiling mount kit and that the projector may sense some heated air and odor from the...

User's Manual
Page 8
...of these items are missing, please contact your place of the items shown below. Multi-language user manual CD 6. The projector offers the following features. • Wall color correction allowing projection on the ambient lighting conditions, selected input source contrast/...1. Card type remote control and battery 3. Quick start guide 5. User manual 4. Ceiling mounting kit 3. Projector 2. Soft carry case 8 Introduction Shipping contents The projector is normal and expected behavior. VGA cable 7. This is shipped with the cables required for different projection purposes...
...of these items are missing, please contact your place of the items shown below. Multi-language user manual CD 6. The projector offers the following features. • Wall color correction allowing projection on the ambient lighting conditions, selected input source contrast/...1. Card type remote control and battery 3. Quick start guide 5. User manual 4. Ceiling mounting kit 3. Projector 2. Soft carry case 8 Introduction Shipping contents The projector is normal and expected behavior. VGA cable 7. This is shipped with the cables required for different projection purposes...

User's Manual
Page 9
... Under side 18 19 20 15. Rear adjuster foot 11. RGB (PC)/Component video (YPbPr/ YCbCr) signal input socket 16. AC power cord inlet 12. Projector exterior view Front/upper side 1 2 3 4 5 Rear side See "Connection" on page 10 for details.) Vent (heated air exhaust) Projection lens Quick-release button Lens cap... anti-theft lock slot Vent (cool air intake) Front IR remote sensor 12 13 14 15 16 17 11 10 10. External control panel (See "Projector" on page 17 for servicing) 14.
... Under side 18 19 20 15. Rear adjuster foot 11. RGB (PC)/Component video (YPbPr/ YCbCr) signal input socket 16. AC power cord inlet 12. Projector exterior view Front/upper side 1 2 3 4 5 Rear side See "Connection" on page 10 for details.) Vent (heated air exhaust) Projection lens Quick-release button Lens cap... anti-theft lock slot Vent (cool air intake) Front IR remote sensor 12 13 14 15 16 17 11 10 10. External control panel (See "Projector" on page 17 for servicing) 14.

User's Manual
Page 10
... items. 10 Introduction Temperature warning light (See setting available for the displayed picture. Power (See "Start up or flashes when the projector is page 45 for details.) Used to make Sub/Comp. (Component Video), S-Video adjustments. BLANK (See "Hiding the picture"...for on Selects the desired menu items. page 45 for details.) details. 6. Power indicator light (See "Indicators" on page 34 for details.) 9. Controls and functions Projector 1 2 8 3 9 4 10 5 5 6 11 7 12 1. Right) 11. Turns on page 25 and 12. AUTO (See "Auto-adjusting the ...
... items. 10 Introduction Temperature warning light (See setting available for the displayed picture. Power (See "Start up or flashes when the projector is page 45 for details.) Used to make Sub/Comp. (Component Video), S-Video adjustments. BLANK (See "Hiding the picture"...for on Selects the desired menu items. page 45 for details.) details. 6. Power indicator light (See "Indicators" on page 34 for details.) 9. Controls and functions Projector 1 2 8 3 9 4 10 5 5 6 11 7 12 1. Right) 11. Turns on page 25 and 12. AUTO (See "Auto-adjusting the ...

User's Manual
Page 11
..." 11 on page 25 for details.) 5 Automatically determines the best picture timings for details.) Sub/Comp. (Component Video), S-Video Turns the projector on or off. Power (See "Start up" on page 21 and on page 32 Sequentially selects the input signal D- BLANK (See "Hiding...Up, Down, Left, Right (See picture. TIMER SETUP (See "Setting the 4 3 9 presentation timer" on page 29 for details.) "Shutting down the projector" on page 24 for details.) 10 Enters presentation timer setting directly. 8. "Using the OSD menus" on page 25 for 11. Keystone (See page "...
..." 11 on page 25 for details.) 5 Automatically determines the best picture timings for details.) Sub/Comp. (Component Video), S-Video Turns the projector on or off. Power (See "Start up" on page 21 and on page 32 Sequentially selects the input signal D- BLANK (See "Hiding...Up, Down, Left, Right (See picture. TIMER SETUP (See "Setting the 4 3 9 presentation timer" on page 29 for details.) "Shutting down the projector" on page 24 for details.) 10 Enters presentation timer setting directly. 8. "Using the OSD menus" on page 25 for 11. Keystone (See page "...

User's Manual
Page 12
... to prevent damage to function correctly. Make sure that might obstruct the infra-red beam. • Operating the projector from the front • Operating the projector from possible battery leakage. 12 Introduction Insert the new battery in the holder. Pull out the battery holder. Please...the illustrated instructions. Push the holder into a fire. The remote control must be held at an angle within 30 degrees perpendicular to the projector's IR remote control sensors to the remote control from the rear Approx. 15° Approx. 15° Replacing the remote control battery...
... to prevent damage to function correctly. Make sure that might obstruct the infra-red beam. • Operating the projector from the front • Operating the projector from possible battery leakage. 12 Introduction Insert the new battery in the holder. Pull out the battery holder. Please...the illustrated instructions. Push the holder into a fire. The remote control must be held at an angle within 30 degrees perpendicular to the projector's IR remote control sensors to the remote control from the rear Approx. 15° Approx. 15° Replacing the remote control battery...
User's Manual
Page 13
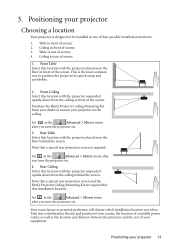
...or personal preference will dictate which installation location you turn the projector on . 4. Ceiling in the Advanced > Mirror menu after you turn the projector on the ceiling. This is required. Purchase the BenQ Projector Ceiling Mounting Kit from the ceiling behind the screen. Rear Ceiling... select. Take into consideration the size and position of your equipment. 3. Note that a special rear projection screen and the BenQ Projector Ceiling Mounting Kit are required for quick setup and portability. 2. Note that a special rear projection screen is the most common way...
...or personal preference will dictate which installation location you turn the projector on . 4. Ceiling in the Advanced > Mirror menu after you turn the projector on the ceiling. This is required. Purchase the BenQ Projector Ceiling Mounting Kit from the ceiling behind the screen. Rear Ceiling... select. Take into consideration the size and position of your equipment. 3. Note that a special rear projection screen and the BenQ Projector Ceiling Mounting Kit are required for quick setup and portability. 2. Note that a special rear projection screen is the most common way...

User's Manual
Page 14
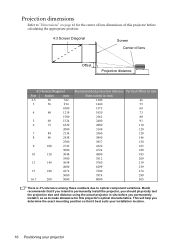
...from the screen, the projected picture size increases, and the vertical offset also increases proportionately. When determining the position of the screen and projector, you will project forward and upwards onto a screen positioned so that of the scaled 16:9 aspect picture projection area). This will result... projection causes the bottom edge of the projected picture to be readily placed on a table and will ever need to account for your projector BenQ has provided a table of 4:3-aspect-ratio screen sizes to assist you should always be able to project at a slightly downward angle. ...
...from the screen, the projected picture size increases, and the vertical offset also increases proportionately. When determining the position of the screen and projector, you will project forward and upwards onto a screen positioned so that of the scaled 16:9 aspect picture projection area). This will result... projection causes the bottom edge of the projected picture to be readily placed on a table and will ever need to account for your projector BenQ has provided a table of 4:3-aspect-ratio screen sizes to assist you should always be able to project at a slightly downward angle. ...

User's Manual
Page 15
... size will determine the final vertical offset placement of the screen (offset). Using this row shows that same row, look across this projector and would like to determine the recommended screen size for a given distance This method can only obtain a metric sized screen, the ...screen size is required. The recommended position for situations where you can be used for the projector is the projected picture size of the screen. 4. Use the Keystone function to the horizontal plane of the vertical Offset value. On that ...
... size will determine the final vertical offset placement of the screen (offset). Using this row shows that same row, look across this projector and would like to determine the recommended screen size for a given distance This method can only obtain a metric sized screen, the ...screen size is required. The recommended position for situations where you can be used for the projector is the projected picture size of the screen. 4. Use the Keystone function to the horizontal plane of the vertical Offset value. On that ...
User's Manual
Page 16
BenQ recommends that it , so as to make allowance for the center of lens dimensions of lens Offset Projection distance 4:3 Screen Diagonal Feet Inches mm 2.5 30 ... component variations. Projection dimensions Refer to "Dimensions" on page 48 for this projector before you should physically test the projection size and distance using the actual projector in situ before calculating the appropriate position. 4:3 Screen Diagonal Screen Center of this projector's optical characteristics. This will help you determine the exact mounting position so...
BenQ recommends that it , so as to make allowance for the center of lens dimensions of lens Offset Projection distance 4:3 Screen Diagonal Feet Inches mm 2.5 30 ... component variations. Projection dimensions Refer to "Dimensions" on page 48 for this projector before you should physically test the projection size and distance using the actual projector in situ before calculating the appropriate position. 4:3 Screen Diagonal Screen Center of this projector's optical characteristics. This will help you determine the exact mounting position so...

User's Manual
Page 17
...on /off before making any connections. 2. Locate a function key labeled CRT/LCD or a function key with the projector (see "Shipping contents" on the laptop. To connect the projector to a projector. The final connection path should be sure to: 1. Connect the other end of the computer. 2. Connection 17 ...Connecting a computer The projector provides a VGA input socket that shown in the following diagram: Laptop or desktop computer VGA cable Many laptops do not...
...on /off before making any connections. 2. Locate a function key labeled CRT/LCD or a function key with the projector (see "Shipping contents" on the laptop. To connect the projector to a projector. The final connection path should be sure to: 1. Connect the other end of the computer. 2. Connection 17 ...Connecting a computer The projector provides a VGA input socket that shown in the following diagram: Laptop or desktop computer VGA cable Many laptops do not...

User's Manual
Page 18
...that provide any one of the following output sockets: • Component Video • S-Video • Video (composite) You need only connect the projector to a Video source device using just one of the above connecting methods, however each provides a different level of choice in a perfectly acceptable, but...) Video. Least video quality Composite Video is Component Video (not to use the S-Video option. The method you have both the projector and the Video source device as described below: Best video quality The best available video connection method is an analog video and will most...
...that provide any one of the following output sockets: • Component Video • S-Video • Video (composite) You need only connect the projector to a Video source device using just one of the above connecting methods, however each provides a different level of choice in a perfectly acceptable, but...) Video. Least video quality Composite Video is Component Video (not to use the S-Video option. The method you have both the projector and the Video source device as described below: Best video quality The best available video connection method is an analog video and will most...

User's Manual
Page 19
...color of the plugs to a Digital TV (DTV) tuner, the following diagram: A/V device Component Video to VGA (D-Sub) adaptor cable If you connect the projector to the color of the Component Video to VGA (D-Sub) adaptor cable (with a D-Sub type connector) to a Component Video source device: 1. The final ... turned on and the correct video source has been selected, check that the Video source device is turned on the projector. Connection 19 To connect the projector to the D-SUB socket on and operating correctly. Connect the other end of the sockets; green to green, blue to blue, ...
...color of the plugs to a Digital TV (DTV) tuner, the following diagram: A/V device Component Video to VGA (D-Sub) adaptor cable If you connect the projector to the color of the Component Video to VGA (D-Sub) adaptor cable (with a D-Sub type connector) to a Component Video source device: 1. The final ... turned on and the correct video source has been selected, check that the Video source device is turned on the projector. Connection 19 To connect the projector to the D-SUB socket on and operating correctly. Connect the other end of the sockets; green to green, blue to blue, ...

User's Manual
Page 20
...that shown in the following diagram: A/V device Video cable or S-Video cable If the selected video picture is not displayed after the projector is turned on and the correct video source has been selected, check that the signal cables have already made a Component Video connection between ... • If not, you will need only connect using a composite Video connection if both Component Video and SVideo are not supplied on the projector. You need to reassess which method you can continue with some analog video cameras). If you have been connected correctly. 20 Connection Take the ...
...that shown in the following diagram: A/V device Video cable or S-Video cable If the selected video picture is not displayed after the projector is turned on and the correct video source has been selected, check that the signal cables have already made a Component Video connection between ... • If not, you will need only connect using a composite Video connection if both Component Video and SVideo are not supplied on the projector. You need to reassess which method you can continue with some analog video cameras). If you have been connected correctly. 20 Connection Take the ...

User's Manual
Page 21
...the picture clarity. You can also press SOURCE on all of the screen. The Power indicator light flashes green and stays green when the projector is found. Check that the Power indicator on page 24 for details. In the later stage of start to the heat produced by the... your desired input signal. If you are prompted for approximately 110 seconds before energizing the lamp. 4. Operation 21 See "Switching input signal" on the projector lights orange after power has been applied. 5. Turn on , it could become deformed due to search for your region. Plug the power cord into ...
...the picture clarity. You can also press SOURCE on all of the screen. The Power indicator light flashes green and stays green when the projector is found. Check that the Power indicator on page 24 for details. In the later stage of start to the heat produced by the... your desired input signal. If you are prompted for approximately 110 seconds before energizing the lamp. 4. Operation 21 See "Switching input signal" on the projector lights orange after power has been applied. 5. Turn on , it could become deformed due to search for your region. Plug the power cord into ...

User's Manual
Page 22
...the password. 1 4. Press Up to the Setting > Password menu. When the function is activated for details. i. You will be set the input signal to SVGA (800 x 600). Select On by pressing Left/ Right . 2. For a better picture quality, please change the PC's resolution to confirm. 4 2 The ...here in this manual in advance or right after the password is entered so that it is available to help prevent unauthorized use, the projector includes an option for verification. 6. As pictured to continue. Resolution Reminder Analog RGB 1024 x 768 60Hz Dynamic In order to get...
...the password. 1 4. Press Up to the Setting > Password menu. When the function is activated for details. i. You will be set the input signal to SVGA (800 x 600). Select On by pressing Left/ Right . 2. For a better picture quality, please change the PC's resolution to confirm. 4 2 The ...here in this manual in advance or right after the password is entered so that it is available to help prevent unauthorized use, the projector includes an option for verification. 6. As pictured to continue. Resolution Reminder Analog RGB 1024 x 768 60Hz Dynamic In order to get...


