

User Manual
Page 1
GW Series LCD Monitor User Manual
GW Series LCD Monitor User Manual
User Manual
Page 2
...glass cleaners. • Slots and openings on the marked label. Your monitor should be blocked or covered. No part of this publication and to make changes from the type of BenQ Corporation. They must be affected by external factors such as a power disconnect...by any means, electronic, mechanical, magnetic, optical, chemical, manual or otherwise, without obligation of BenQ Corporation to the contents hereof and specifically disclaims any warranties, merchantability or fitness for your monitor. • The AC plug isolates this product. 2 Always unplug your dealer or local power...
...glass cleaners. • Slots and openings on the marked label. Your monitor should be blocked or covered. No part of this publication and to make changes from the type of BenQ Corporation. They must be affected by external factors such as a power disconnect...by any means, electronic, mechanical, magnetic, optical, chemical, manual or otherwise, without obligation of BenQ Corporation to the contents hereof and specifically disclaims any warranties, merchantability or fitness for your monitor. • The AC plug isolates this product. 2 Always unplug your dealer or local power...
User Manual
Page 4
...Getting to know your monitor 7 Front view...7 Back view ...7 Input and output ports...8 How to assemble your monitor hardware 9 How to detach the stand base ...13 Using the monitor wall mounting kit (selected models only 14 Getting the most from your BenQ monitor 15 How to install the monitor on a new ...computer 16 How to upgrade the monitor on an existing computer 17...
...Getting to know your monitor 7 Front view...7 Back view ...7 Input and output ports...8 How to assemble your monitor hardware 9 How to detach the stand base ...13 Using the monitor wall mounting kit (selected models only 14 Getting the most from your BenQ monitor 15 How to install the monitor on a new ...computer 16 How to upgrade the monitor on an existing computer 17...

User Manual
Page 5
Getting started When unpacking please check you have the following items. If any are missing or damaged, please contact the place of purchase for your region.) Getting started 5 BenQ LCD Monitor Monitor Stand Monitor Base Quick Start Guide CD-ROM Power Cord (Picture may differ from product supplied for a replacement.
Getting started When unpacking please check you have the following items. If any are missing or damaged, please contact the place of purchase for your region.) Getting started 5 BenQ LCD Monitor Monitor Stand Monitor Base Quick Start Guide CD-ROM Power Cord (Picture may differ from product supplied for a replacement.

User Manual
Page 6
...(Optional accessory) Video Cable: HDMI (Optional accessory, sold separately) • Available accessories and the pictures shown here may need to transport the monitor. The fitted foam packing is ideal for your product, you can purchase them separately. • Consider keeping the box and packaging in storage for... use in the future when you may differ from the actual contents and the product supplied for protecting the monitor during transport. Always keep the product and accessories out of reach of small children. 6 Getting started For cables that are not ...
...(Optional accessory) Video Cable: HDMI (Optional accessory, sold separately) • Available accessories and the pictures shown here may need to transport the monitor. The fitted foam packing is ideal for your product, you can purchase them separately. • Consider keeping the box and packaging in storage for... use in the future when you may differ from the actual contents and the product supplied for protecting the monitor during transport. Always keep the product and accessories out of reach of small children. 6 Getting started For cables that are not ...

User Manual
Page 7
Getting to know your region. Release button 4. Getting to know your monitor 7 Control buttons 2. Input and output ports (vary by model, see Input and output ports on the model. • Picture may differ from product supplied for your monitor Front view Back view 1 2 1. Power button 3. Kensington lock slot 3 4 5 • Above diagram may vary depending on page 8) 5.
Getting to know your region. Release button 4. Getting to know your monitor 7 Control buttons 2. Input and output ports (vary by model, see Input and output ports on the model. • Picture may differ from product supplied for your monitor Front view Back view 1 2 1. Power button 3. Kensington lock slot 3 4 5 • Above diagram may vary depending on page 8) 5.

User Manual
Page 8
Audio Line In 1 23 4 5 6 Models with HDMI inputs 1. AC power input jack 2. D-Sub socket 1 56 8 Getting to know your purchased model. Input and output ports Available input and output ports may vary depending on the provided CD for details. Models with dual inputs and speakers 3. Headphone jack 4. DVI-D socket 1 23 56 Models with dual inputs 6. Check the Specification document on your monitor HDMI socket 5.
Audio Line In 1 23 4 5 6 Models with HDMI inputs 1. AC power input jack 2. D-Sub socket 1 56 8 Getting to know your purchased model. Input and output ports Available input and output ports may vary depending on the provided CD for details. Models with dual inputs and speakers 3. Headphone jack 4. DVI-D socket 1 23 56 Models with dual inputs 6. Check the Specification document on your monitor HDMI socket 5.

User Manual
Page 9
... may vary depending on you must turn it locks in or turn-on the power to the monitor until instructed to do so. • The following illustrations are for padding. Sliding or scraping the monitor around on the right to assemble your desk and placing a soft item like a stapler or a ... bag on a flat clean padded surface. Placing the screen surface on the bottom of the monitor base as illustrated until they click and lock into place. Attach the monitor base. How to attach the monitor stand and the base. Gently lay the screen face down on the desk for your warranty. ...
... may vary depending on you must turn it locks in or turn-on the power to the monitor until instructed to do so. • The following illustrations are for padding. Sliding or scraping the monitor around on the right to assemble your desk and placing a soft item like a stapler or a ... bag on a flat clean padded surface. Placing the screen surface on the bottom of the monitor base as illustrated until they click and lock into place. Attach the monitor base. How to attach the monitor stand and the base. Gently lay the screen face down on the desk for your warranty. ...

User Manual
Page 10
...use both cables can be used is if they have properly engaged. Connect the PC video cable Do not use . You should position the monitor and angle the screen to minimize unwanted reflections from accidently falling out during use. Connect the other end of the cable (at the end without... the ferrite filter) to the monitor video socket. To Connect the DVI-D Cable Connect the plug of the DVI-D cable (at the end with the ferrite filter) to the computer...
...use both cables can be used is if they have properly engaged. Connect the PC video cable Do not use . You should position the monitor and angle the screen to minimize unwanted reflections from accidently falling out during use. Connect the other end of the cable (at the end without... the ferrite filter) to the monitor video socket. To Connect the DVI-D Cable Connect the plug of the DVI-D cable (at the end with the ferrite filter) to the computer...

User Manual
Page 11
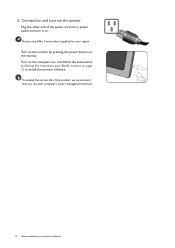
... more than one end of the power cord into consideration before making the connection. - You may vary depending on the rear of the monitor (Line In) and your package and the socket illustrations on the right may connect headphones to the headphone jack found next to a power ...Sub The video cables included in your computer audio outlet. Connect the audio cable (for your monitor hardware 11 Do not connect the other end of each video cable into the socket labelled on the monitor. Better quality: HDMI / DVI-D - Connect the audio cable between the socket on the ...
... more than one end of the power cord into consideration before making the connection. - You may vary depending on the rear of the monitor (Line In) and your package and the socket illustrations on the right may connect headphones to the headphone jack found next to a power ...Sub The video cables included in your computer audio outlet. Connect the audio cable (for your monitor hardware 11 Do not connect the other end of each video cable into the socket labelled on the monitor. Better quality: HDMI / DVI-D - Connect the audio cable between the socket on the ...
User Manual
Page 12
Plug the other end of the product, we recommend that you use your computer's power management function. 12 How to assemble your region. Turn on the computer too, and follow the instructions in Getting the most from product supplied for your monitor hardware Turn on the monitor by pressing the power button on the power. Picture may differ from your BenQ monitor on . 5. To extend the service life of the power cord into a power outlet and turn it on page 15 to and turn-on the monitor. Connect-to install the monitor software.
Plug the other end of the product, we recommend that you use your computer's power management function. 12 How to assemble your region. Turn on the computer too, and follow the instructions in Getting the most from product supplied for your monitor hardware Turn on the monitor by pressing the power button on the power. Picture may differ from your BenQ monitor on . 5. To extend the service life of the power cord into a power outlet and turn it on page 15 to and turn-on the monitor. Connect-to install the monitor software.

User Manual
Page 13
If the screen size is 27 inches, follow the illustration on the bottom of the monitor base and detach the monitor base as a screwdriver to detach the monitor base. How to the monitor. Protect the monitor and screen by clearing a flat open area on your desk and placing a soft item like ... cable. Please be careful to prevent damage to detach the stand base 1. Prepare the monitor and area. Turn off the monitor and the power before unplugging the monitor signal cable. Remove the monitor stand. Placing the screen surface on an object like a towel on the desk for padding...
If the screen size is 27 inches, follow the illustration on the bottom of the monitor base and detach the monitor base as a screwdriver to detach the monitor base. How to the monitor. Protect the monitor and screen by clearing a flat open area on your desk and placing a soft item like ... cable. Please be careful to prevent damage to detach the stand base 1. Prepare the monitor and area. Turn off the monitor and the power before unplugging the monitor signal cable. Remove the monitor stand. Placing the screen surface on an object like a towel on the desk for padding...
User Manual
Page 14
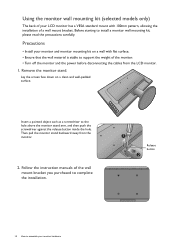
...to complete the installation. 1 Release button 2 14 How to assemble your monitor and monitor mounting kit on a clean and well-padded surface. Before starting to the hole above the monitor stand arm, and then push the screwdriver against the release button inside the ...Insert a pointed object such as a screwdriver to install a monitor wall mounting kit, please read the precautions carefully. Precautions • Install your monitor hardware Then pull the monitor stand backward away from the LCD monitor. 1. Using the monitor wall mounting kit (selected models only) The back of your...
...to complete the installation. 1 Release button 2 14 How to assemble your monitor and monitor mounting kit on a clean and well-padded surface. Before starting to the hole above the monitor stand arm, and then push the screwdriver against the release button inside the ...Insert a pointed object such as a screwdriver to install a monitor wall mounting kit, please read the precautions carefully. Precautions • Install your monitor hardware Then pull the monitor stand backward away from the LCD monitor. 1. Using the monitor wall mounting kit (selected models only) The back of your...
User Manual
Page 15
... and install your computer (after connecting the monitor to select a monitor model. At that point, click the Have Disk button, insert the BenQ LCD Monitor CD-ROM and select the appropriate monitor model. Getting the most benefit from your BenQ monitor 15 The circumstances under which you are upgrading...-by-step instructions for either case however, the very next time you need to follow to the specification label on the BenQ LCD Monitor CD-ROM. Furthermore, if your computer is connected to a network which process you turn on your computer), Windows will automatically...
... and install your computer (after connecting the monitor to select a monitor model. At that point, click the Have Disk button, insert the BenQ LCD Monitor CD-ROM and select the appropriate monitor model. Getting the most benefit from your BenQ monitor 15 The circumstances under which you are upgrading...-by-step instructions for either case however, the very next time you need to follow to the specification label on the BenQ LCD Monitor CD-ROM. Furthermore, if your computer is connected to a network which process you turn on your computer), Windows will automatically...
User Manual
Page 16
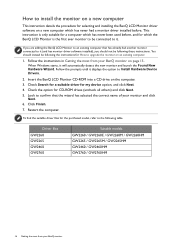
... / GW2260M / GW2260HM GW2265 / GW2265M / GW2265HM GW2460 / GW2460HM GW2760 / GW2760HM 16 Getting the most from your monitor and click Next. 6. Restart the computer. Insert the BenQ LCD Monitor CD-ROM into a CD drive on the computer. 3. To find the suitable driver files for the purchased model, ...driver for CD-ROM drives (uncheck all others) and click Next. 5. How to install the monitor on a new computer This instruction details the procedure for selecting and installing the BenQ LCD Monitor driver software on a new computer which has never been used before . You should not be...
... / GW2260M / GW2260HM GW2265 / GW2265M / GW2265HM GW2460 / GW2460HM GW2760 / GW2760HM 16 Getting the most from your monitor and click Next. 6. Restart the computer. Insert the BenQ LCD Monitor CD-ROM into a CD drive on the computer. 3. To find the suitable driver files for the purchased model, ...driver for CD-ROM drives (uncheck all others) and click Next. 5. How to install the monitor on a new computer This instruction details the procedure for selecting and installing the BenQ LCD Monitor driver software on a new computer which has never been used before . You should not be...
User Manual
Page 17
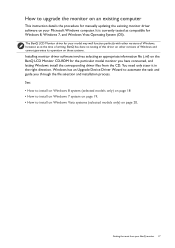
... Windows 7 system on page 19. • How to install on Windows Vista systems (selected models only) on the BenQ LCD Monitor CD-ROM for the particular model monitor you through the file selection and installation process. It is currently tested as at the time of writing... as compatible for manually updating the existing monitor driver software on your BenQ monitor 17 How to upgrade the monitor on an existing computer This instruction details the procedure for Windows 8, Windows 7, and Windows Vista Operating System (OS). The BenQ LCD Monitor driver for your model may well function...
... Windows 7 system on page 19. • How to install on Windows Vista systems (selected models only) on the BenQ LCD Monitor CD-ROM for the particular model monitor you through the file selection and installation process. It is currently tested as at the time of writing... as compatible for manually updating the existing monitor driver software on your BenQ monitor 17 How to upgrade the monitor on an existing computer This instruction details the procedure for Windows 8, Windows 7, and Windows Vista Operating System (OS). The BenQ LCD Monitor driver for your model may well function...
User Manual
Page 18
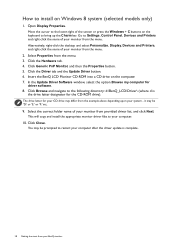
... and Printers, and right-click the name of the screen or press the Windows + C buttons on the keyboard to the lower-right of your BenQ monitor Insert the BenQ LCD Monitor CD-ROM into a CD drive on Windows 8 system (selected models only) 1. This will copy and install the appropriate... monitor driver files to restart your computer after the driver update is the drive letter designator for your computer. 10. Select Properties from the menu. 2....
... and Printers, and right-click the name of the screen or press the Windows + C buttons on the keyboard to the lower-right of your BenQ monitor Insert the BenQ LCD Monitor CD-ROM into a CD drive on Windows 8 system (selected models only) 1. This will copy and install the appropriate... monitor driver files to restart your computer after the driver update is the drive letter designator for your computer. 10. Select Properties from the menu. 2....

User Manual
Page 19
...for driver software. 8. This will copy and install the appropriate monitor driver files to restart your monitor from the menu. Click Close. Go to the following directory: d:\BenQ_LCD\Driver\ (where d is complete. Insert the BenQ LCD Monitor CD-ROM into a CD drive on Windows 7 system 1. You... may be prompted to your BenQ monitor 19 Getting the most from provided driver list, and click Next. In the Update Driver ...
...for driver software. 8. This will copy and install the appropriate monitor driver files to restart your monitor from the menu. Click Close. Go to the following directory: d:\BenQ_LCD\Driver\ (where d is complete. Insert the BenQ LCD Monitor CD-ROM into a CD drive on Windows 7 system 1. You... may be prompted to your BenQ monitor 19 Getting the most from provided driver list, and click Next. In the Update Driver ...
User Manual
Page 20
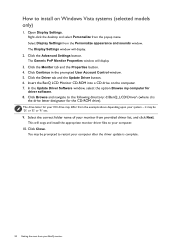
... the desktop and select Personalize from the Personalize appearance and sounds window. Select Display Settings from the popup menu. Insert the BenQ LCD Monitor CD-ROM into a CD drive on Windows Vista systems (selected models only) 1. it may be prompted to restart your ...8. Click the Advanced Settings button. In the Update Driver Software window, select the option Browse my computer for your BenQ monitor This will copy and install the appropriate monitor driver files to the following directory: d:\BenQ_LCD\Driver\ (where d is complete. 20 Getting the most from provided ...
... the desktop and select Personalize from the Personalize appearance and sounds window. Select Display Settings from the popup menu. Insert the BenQ LCD Monitor CD-ROM into a CD drive on Windows Vista systems (selected models only) 1. it may be prompted to restart your ...8. Click the Advanced Settings button. In the Update Driver Software window, select the option Browse my computer for your BenQ monitor This will copy and install the appropriate monitor driver files to the following directory: d:\BenQ_LCD\Driver\ (where d is complete. 20 Getting the most from provided ...

User Manual
Page 21
Name 1. Control keys 2. Turns the power on the screen, right next to each key. How to adjust your monitor The control panel 1 2 No. Power key Description Accesses the functions or menu items displayed on or off. How to adjust your monitor 21
Name 1. Control keys 2. Turns the power on the screen, right next to each key. How to adjust your monitor The control panel 1 2 No. Power key Description Accesses the functions or menu items displayed on or off. How to adjust your monitor 21

