
GW50 Series User Manual
Page 6
... in storage for protecting the monitor during transport. Video Cable: DVI-D (Optional accessory for models with DVI inputs, sold separately) Video Cable: HDMI (Optional accessory for models with HDMI inputs, sold separately) Audio Cable (Optional accessory for models with your product, you may differ from the actual contents and the product supplied...
... in storage for protecting the monitor during transport. Video Cable: DVI-D (Optional accessory for models with DVI inputs, sold separately) Video Cable: HDMI (Optional accessory for models with HDMI inputs, sold separately) Audio Cable (Optional accessory for models with your product, you may differ from the actual contents and the product supplied...
GW50 Series User Manual
Page 8
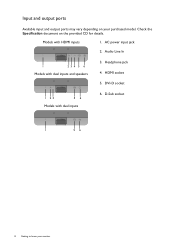
Models with dual inputs and speakers 3. D-Sub socket 1 56 8 Getting to know your purchased model. Headphone jack 4. Input and output ports Available input and output ports may vary depending on the provided CD for details. AC power input jack 2. Audio Line In 1 23 4 5 6 Models with HDMI inputs 1. HDMI socket 5. Check the Specification document on your monitor DVI-D socket 1 23 56 Models with dual inputs 6.
Models with dual inputs and speakers 3. D-Sub socket 1 56 8 Getting to know your purchased model. Headphone jack 4. Input and output ports Available input and output ports may vary depending on the provided CD for details. AC power input jack 2. Audio Line In 1 23 4 5 6 Models with HDMI inputs 1. HDMI socket 5. Check the Specification document on your monitor DVI-D socket 1 23 56 Models with dual inputs 6.
GW50 Series User Manual
Page 11
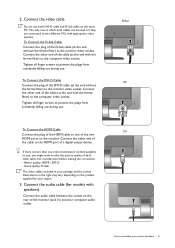
... Tighten all finger screws to the monitor video socket. To Connect the DVI-D Cable Connect the plug of a digital output device. Better quality: HDMI / DVI-D - Tighten all finger screws to the monitor video socket. Connect the audio cable between the socket on the monitor. Connect the video...and D-Sub cable on the product supplied for models with appropriate video systems. To Connect the D-Sub Cable Connect the plug of the two HDMI ports on the rear of each video cable into consideration before making the connection. - 2. The only case in your computer audio outlet....
... Tighten all finger screws to the monitor video socket. To Connect the DVI-D Cable Connect the plug of a digital output device. Better quality: HDMI / DVI-D - Tighten all finger screws to the monitor video socket. Connect the audio cable between the socket on the monitor. Connect the video...and D-Sub cable on the product supplied for models with appropriate video systems. To Connect the D-Sub Cable Connect the plug of the two HDMI ports on the rear of each video cable into consideration before making the connection. - 2. The only case in your computer audio outlet....

GW50 Series User Manual
Page 21
.... 3. Press the MENU key to the screen. If you connect a digital video output using geometry menu items. To assist you in this endeavour, BenQ has provided a screen test image utility which you run auto.exe, a test pattern displays. 2. Press the AUTO key to optimize the currently displayed ...5. You could also use the AUTO key function. If you wish, you can always adjust the screen geometric settings manually using a digital (DVI or HDMI) cable to your operating system. Picture optimization 21 If you use to check for screen color, grayscale and line gradient display. 1. Use the or...
.... 3. Press the MENU key to the screen. If you connect a digital video output using geometry menu items. To assist you in this endeavour, BenQ has provided a screen test image utility which you run auto.exe, a test pattern displays. 2. Press the AUTO key to optimize the currently displayed ...5. You could also use the AUTO key function. If you wish, you can always adjust the screen geometric settings manually using a digital (DVI or HDMI) cable to your operating system. Picture optimization 21 If you use to check for screen color, grayscale and line gradient display. 1. Use the or...

GW50 Series User Manual
Page 25
... MODE: Standard 10 12 1 12 ENTER Select MENU Exit 1. The AUTO key is a 'hot key' for you connect a digital video output using a digital (DVI or HDMI) cable to your monitor 25 Press the or keys to select that are not available will be disabled. To return to synchronize with the analog...
... MODE: Standard 10 12 1 12 ENTER Select MENU Exit 1. The AUTO key is a 'hot key' for you connect a digital video output using a digital (DVI or HDMI) cable to your monitor 25 Press the or keys to select that are not available will be disabled. To return to synchronize with the analog...
GW50 Series User Manual
Page 30
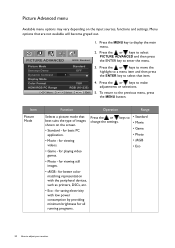
... the or keys to the previous menu, press the MENU button. PICTURE ADVANCED MODE: Standard Picture Mode Senseye Demo Dynamic Contrast Display Mode Color Format HDMI RGB PC Range Standard OFF 5 YUV RGB (16~235) Move ENTER Select MENU Exit 1. To return to • Standard change the settings. • Movie •...
... the or keys to the previous menu, press the MENU button. PICTURE ADVANCED MODE: Standard Picture Mode Senseye Demo Dynamic Contrast Display Mode Color Format HDMI RGB PC Range Standard OFF 5 YUV RGB (16~235) Move ENTER Select MENU Exit 1. To return to • Standard change the settings. • Movie •...

GW50 Series User Manual
Page 32
...select this option. Select an option that matches the RGB range setting on the monitor screen do not display properly. • DVI (for models with HDMI inputs) Determines the range of color scales. Press the or keys to change the settings. • RGB • YUV You might need to ...manually set the Color Format if colors shown on the connected HDMI device. In other words, Color Format is not selectable. Item Function Operation Range Color Format Determines the color space (RGB or YUV) based on...
...select this option. Select an option that matches the RGB range setting on the monitor screen do not display properly. • DVI (for models with HDMI inputs) Determines the range of color scales. Press the or keys to change the settings. • RGB • YUV You might need to ...manually set the Color Format if colors shown on the connected HDMI device. In other words, Color Format is not selectable. Item Function Operation Range Color Format Determines the color space (RGB or YUV) based on...

GW50 Series User Manual
Page 33
...on the input sources, functions and settings. Item Volume Function Adjusts the audio volume Mute Mutes the audio input Audio Select (for models with HDMI inputs) Allow users to select the audio source or let the monitor detect it automatically Operation Range Press the key to increase the volume and...keys to • ON change the settings. • OFF Press the or keys to • Auto Detect change the settings. • PC Audio • HDMI Audio How to enter the menu. Menu options that item. Press the or keys to select MODE: Standard 10 AUDIO and then press the ENTER...
...on the input sources, functions and settings. Item Volume Function Adjusts the audio volume Mute Mutes the audio input Audio Select (for models with HDMI inputs) Allow users to select the audio source or let the monitor detect it automatically Operation Range Press the key to increase the volume and...keys to • ON change the settings. • OFF Press the or keys to • Auto Detect change the settings. • PC Audio • HDMI Audio How to enter the menu. Menu options that item. Press the or keys to select MODE: Standard 10 AUDIO and then press the ENTER...

GW50 Series User Manual
Page 34
... video cable connection type. System menu Available menu options may vary depending on the input sources, functions and settings. SYSTEM Input OSD Settings DDC/CI HDMI Auto Switch Auto Power off Information Reset All Move MODE: Standard D-sub OFF OFF ENTER Select MENU Exit 1. Press the MENU key to make adjustments... this to your monitor Press the or keys to change the input to that appropriate to change the settings. • DVI • D-sub (VGA) • HDMI (for models with HDMI inputs) OSD Settings -
... video cable connection type. System menu Available menu options may vary depending on the input sources, functions and settings. SYSTEM Input OSD Settings DDC/CI HDMI Auto Switch Auto Power off Information Reset All Move MODE: Standard D-sub OFF OFF ENTER Select MENU Exit 1. Press the MENU key to make adjustments... this to your monitor Press the or keys to change the input to that appropriate to change the settings. • DVI • D-sub (VGA) • HDMI (for models with HDMI inputs) OSD Settings -

GW50 Series User Manual
Page 36
... option. Information Reset All Displays the current monitor property settings. • Input • Current Resolution • Optimum Resolution (best with HDMI inputs) When this function is activated, the OSD controls and hotkey operations will be in the OSD Lock submenu from being accidentally changed. ...change the settings. • OFF • 10min. • 20min. • 30min. Press MENU to leave the OSD Settings menu. Otherwise, HDMI can only be locked, press and hold the MENU key for models with the monitor) • Model Name Resets all OSD controls will be set...
... option. Information Reset All Displays the current monitor property settings. • Input • Current Resolution • Optimum Resolution (best with HDMI inputs) When this function is activated, the OSD controls and hotkey operations will be in the OSD Lock submenu from being accidentally changed. ...change the settings. • OFF • 10min. • 20min. • 30min. Press MENU to leave the OSD Settings menu. Otherwise, HDMI can only be locked, press and hold the MENU key for models with the monitor) • Model Name Resets all OSD controls will be set...