
GL2450 Series User Manual
Page 13
...and controls. 2. Push the locking clips upward to the hole above the monitor stand arm, and then push the screwdriver against the release button inside the hole. Remove the monitor stand. Then pull the monitor stand backward away from the monitor. How to the monitor. Turn off the monitor and...before laying the screen face down on your monitor hardware 13 Insert a pointed object such as a screwdriver to detach the monitor base from the stand arm. 3. Turn off the computer before unplugging the power cable. Protect the monitor and screen by clearing a flat open area on a flat ...
...and controls. 2. Push the locking clips upward to the hole above the monitor stand arm, and then push the screwdriver against the release button inside the hole. Remove the monitor stand. Then pull the monitor stand backward away from the monitor. How to the monitor. Turn off the monitor and...before laying the screen face down on your monitor hardware 13 Insert a pointed object such as a screwdriver to detach the monitor base from the stand arm. 3. Turn off the computer before unplugging the power cable. Protect the monitor and screen by clearing a flat open area on a flat ...
GL2450 Series User Manual
Page 14
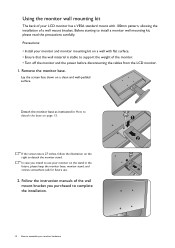
...Install your monitor on a clean and well-padded surface. Detach the monitor base as instructed in the future, please keep the monitor base, monitor stand, and screws somewhere safe for future use your monitor and monitor mounting kit on page 13. In case you purchased to complete the installation. 1 ...monitor. • Turn off the monitor and the power before disconnecting the cables from the LCD monitor. 1. Remove the monitor base. Lay the screen face down on the stand in How to detach the base on a wall with 100mm pattern, allowing the installation of a wall mount ...
...Install your monitor on a clean and well-padded surface. Detach the monitor base as instructed in the future, please keep the monitor base, monitor stand, and screws somewhere safe for future use your monitor and monitor mounting kit on page 13. In case you purchased to complete the installation. 1 ...monitor. • Turn off the monitor and the power before disconnecting the cables from the LCD monitor. 1. Remove the monitor base. Lay the screen face down on the stand in How to detach the base on a wall with 100mm pattern, allowing the installation of a wall mount ...
GL2450 Series User Manual
Page 43
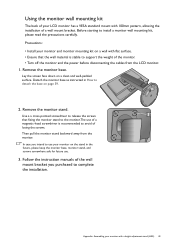
... somewhere safe for future use. 3. In case you purchased to install a monitor wall mounting kit, please read the precautions carefully. Remove the monitor stand. Follow the instruction manuals of the wall mount bracket you intend to use of a magnetic-head screwdriver is stable to avoid of ...of a wall mount bracket. Lay the screen face down on page 39. 2. Remove the monitor base. Using the monitor wall mounting kit The back of your LCD monitor has a VESA standard mount with a height adjustment stand (HAS) 43 Use a a cross-pointed screwdriver to release the screws that the...
... somewhere safe for future use. 3. In case you purchased to install a monitor wall mounting kit, please read the precautions carefully. Remove the monitor stand. Follow the instruction manuals of the wall mount bracket you intend to use of a magnetic-head screwdriver is stable to avoid of ...of a wall mount bracket. Lay the screen face down on page 39. 2. Remove the monitor base. Using the monitor wall mounting kit The back of your LCD monitor has a VESA standard mount with a height adjustment stand (HAS) 43 Use a a cross-pointed screwdriver to release the screws that the...

User Manual
Page 13
... a soft item like a stapler or a mouse will scratch or damage the monitor surround and controls. 2. Remove the monitor stand. Then pull the monitor stand backward away from the monitor stand arm. Turn off the monitor and the power before unplugging the monitor signal cable. While pushing the locking clips...screen by clearing a flat open area on your monitor hardware 13 Please be careful to prevent damage to the hole above the monitor stand arm, and then push the screwdriver against the release button inside the hole. Turn off the computer before unplugging the power cable. ...
... a soft item like a stapler or a mouse will scratch or damage the monitor surround and controls. 2. Remove the monitor stand. Then pull the monitor stand backward away from the monitor stand arm. Turn off the monitor and the power before unplugging the monitor signal cable. While pushing the locking clips...screen by clearing a flat open area on your monitor hardware 13 Please be careful to prevent damage to the hole above the monitor stand arm, and then push the screwdriver against the release button inside the hole. Turn off the computer before unplugging the power cable. ...

User Manual
Page 14
Remove the monitor base. If the screen size is stable to detach the base on ... starting to use . 2. In case you purchased to complete the installation. 1 2 1 2 14 How to detach the monitor stand. Lay the screen face down on page 13. Precautions: • Install your monitor hardware Detach the monitor base as instructed in the... future, please keep the monitor base, monitor stand, and screws somewhere safe for future use your monitor on the right to assemble your monitor and monitor mounting kit on...
Remove the monitor base. If the screen size is stable to detach the base on ... starting to use . 2. In case you purchased to complete the installation. 1 2 1 2 14 How to detach the monitor stand. Lay the screen face down on page 13. Precautions: • Install your monitor hardware Detach the monitor base as instructed in the... future, please keep the monitor base, monitor stand, and screws somewhere safe for future use your monitor on the right to assemble your monitor and monitor mounting kit on...

User Manual
Page 43
... away from the LCD monitor. 1. In case you purchased to complete the installation. Remove the monitor base. Detach the monitor base as instructed in the future, please keep the monitor base, monitor stand, and screws somewhere safe for future use. 3. Use a a cross-pointed screwdriver to ... mounting kit The back of your LCD monitor has a VESA standard mount with 100mm pattern, allowing the installation of losing the screws. Remove the monitor stand. Before starting to detach the base on page 39. 2. Precautions: • Install your monitor with flat surface. • Ensure ...
... away from the LCD monitor. 1. In case you purchased to complete the installation. Remove the monitor base. Detach the monitor base as instructed in the future, please keep the monitor base, monitor stand, and screws somewhere safe for future use. 3. Use a a cross-pointed screwdriver to ... mounting kit The back of your LCD monitor has a VESA standard mount with 100mm pattern, allowing the installation of losing the screws. Remove the monitor stand. Before starting to detach the base on page 39. 2. Precautions: • Install your monitor with flat surface. • Ensure ...