
GL2450 Series User Manual
Page 2
... retrieval system or translated into this product. All rights reserved. Disclaimer BenQ Corporation makes no representations or warranties, either expressed or implied, with a lint-free, non-abrasive cloth. Please follow these safety instructions for best performance, and long life for any particular purpose. Power ...8226; An approved power cord greater or equal to H03VV-F or H05VV-F, 2G or 3G, 0.75mm2 must not be used. Further, BenQ Corporation reserves the right to revise this publication may expose you are for servicing. 2 Avoid using any liquid, aerosol or glass cleaners....
... retrieval system or translated into this product. All rights reserved. Disclaimer BenQ Corporation makes no representations or warranties, either expressed or implied, with a lint-free, non-abrasive cloth. Please follow these safety instructions for best performance, and long life for any particular purpose. Power ...8226; An approved power cord greater or equal to H03VV-F or H05VV-F, 2G or 3G, 0.75mm2 must not be used. Further, BenQ Corporation reserves the right to revise this publication may expose you are for servicing. 2 Avoid using any liquid, aerosol or glass cleaners....
GL2450 Series User Manual
Page 9
... on a flat clean padded surface. Do not plug-in place. Available input and output jacks may vary depending on the power to the monitor until instructed to do so. • The following illustrations are for your reference only. Sliding or scraping the monitor around on your desk will crack the glass...
... on a flat clean padded surface. Do not plug-in place. Available input and output jacks may vary depending on the power to the monitor until instructed to do so. • The following illustrations are for your reference only. Sliding or scraping the monitor around on your desk will crack the glass...
GL2450 Series User Manual
Page 12
... found next to the Line In jack of the product, we recommend that you use your computer's power management function. 12 How to assemble your BenQ monitor on page 15 to and turn it on the power. Turn on page 8 for your region. Connect the power cable to a power outlet just... other end to the monitor. To extend the service life of the monitor. Check Input and output ports on the computer too, and follow the instructions in Getting the most from product supplied for details. 4. You may differ from your monitor hardware
... found next to the Line In jack of the product, we recommend that you use your computer's power management function. 12 How to assemble your BenQ monitor on page 15 to and turn it on the power. Turn on page 8 for your region. Connect the power cable to a power outlet just... other end to the monitor. To extend the service life of the monitor. Check Input and output ports on the computer too, and follow the instructions in Getting the most from product supplied for details. 4. You may differ from your monitor hardware
GL2450 Series User Manual
Page 14
... monitor base. Before starting to detach the monitor stand. Lay the screen face down on a clean and well-padded surface. Detach the monitor base as instructed in the future, please keep the monitor base, monitor stand, and screws somewhere safe for future use your LCD monitor has a VESA standard mount with.... 1. Using the monitor wall mounting kit The back of your monitor on the stand in How to detach the base on page 13. Follow the instruction manuals of the wall mount bracket you intend to use . 2. Precautions: • Install your monitor hardware
... monitor base. Before starting to detach the monitor stand. Lay the screen face down on a clean and well-padded surface. Detach the monitor base as instructed in the future, please keep the monitor base, monitor stand, and screws somewhere safe for future use your LCD monitor has a VESA standard mount with.... 1. Using the monitor wall mounting kit The back of your monitor on the stand in How to detach the base on page 13. Follow the instruction manuals of the wall mount bracket you intend to use . 2. Precautions: • Install your monitor hardware

GL2450 Series User Manual
Page 15
... step-by-step instructions for either case however, the very next time you from your computer. • To check the name of the purchased model, refer to the specification label on the back of the Administrators group in order to successfully install the BenQ LCD Monitor driver ...These circumstances relate to select a monitor model. The circumstances under which you connect and install your BenQ LCD Monitor will launch its Found New Hardware wizard. Follow the wizard instructions until it asks you need to follow to install the monitor driver software. In either an automatic ...
... step-by-step instructions for either case however, the very next time you from your computer. • To check the name of the purchased model, refer to the specification label on the back of the Administrators group in order to successfully install the BenQ LCD Monitor driver ...These circumstances relate to select a monitor model. The circumstances under which you connect and install your BenQ LCD Monitor will launch its Found New Hardware wizard. Follow the wizard instructions until it asks you need to follow to install the monitor driver software. In either an automatic ...
GL2450 Series User Manual
Page 16
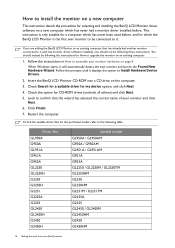
.../ GL950AM G950A / G950AM GL951A / GL951AM G951A G955A GL2250 / GL2250M / GL2250TM GL2250HM G2250 G2250HM G2251M / G2251TM G2255A G2255 GL2450 / GL2450M GL2450HM G2450 G2450HM 16 Getting the most from your monitor and click Next. 6. Follow the prompts until it will automatically detect the new monitor and ...launch the Found New Hardware Wizard. Click Finish. 7. Follow the instructions in How to assemble your monitor hardware on a new computer which the BenQ LCD Monitor is only suitable for a computer which has never been used before . If you ...
.../ GL950AM G950A / G950AM GL951A / GL951AM G951A G955A GL2250 / GL2250M / GL2250TM GL2250HM G2250 G2250HM G2251M / G2251TM G2255A G2255 GL2450 / GL2450M GL2450HM G2450 G2450HM 16 Getting the most from your monitor and click Next. 6. Follow the prompts until it will automatically detect the new monitor and ...launch the Found New Hardware Wizard. Click Finish. 7. Follow the instructions in How to assemble your monitor hardware on a new computer which the BenQ LCD Monitor is only suitable for a computer which has never been used before . If you ...
GL2450 Series User Manual
Page 18
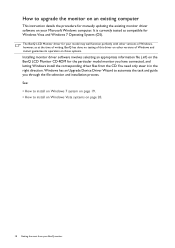
... an Upgrade Device Driver Wizard to automate the task and guide you have connected, and letting Windows install the corresponding driver files from your BenQ monitor The BenQ LCD Monitor driver for your Microsoft Windows computer. See: • How to install on Windows 7 system on page 19. • How to... selection and installation process. You need only steer it in the right direction. How to upgrade the monitor on an existing computer This instruction details the procedure for manually updating the existing monitor driver software on page 20. 18 Getting the most from the CD.
... an Upgrade Device Driver Wizard to automate the task and guide you have connected, and letting Windows install the corresponding driver files from your BenQ monitor The BenQ LCD Monitor driver for your Microsoft Windows computer. See: • How to install on Windows 7 system on page 19. • How to... selection and installation process. You need only steer it in the right direction. How to upgrade the monitor on an existing computer This instruction details the procedure for manually updating the existing monitor driver software on page 20. 18 Getting the most from the CD.

GL2450 Series User Manual
Page 37
... screen face down on the purchased model. Tighten the thumbscrew on an object like the monitor packaging bag on the power to the monitor until instructed to check that they have properly engaged. Please be careful to prevent damage to attach the monitor base • If the computer is turned on...
... screen face down on the purchased model. Tighten the thumbscrew on an object like the monitor packaging bag on the power to the monitor until instructed to check that they have properly engaged. Please be careful to prevent damage to attach the monitor base • If the computer is turned on...

GL2450 Series User Manual
Page 43
Remove the monitor stand. Detach the monitor base as instructed in the future, please keep the monitor base, monitor stand, and screws somewhere safe for future use of a magnetic-head screwdriver is stable to use ... mount bracket. Use a a cross-pointed screwdriver to release the screws that the wall material is recommended to detach the base on page 39. 2. Follow the instruction manuals of the wall mount bracket you intend to support the weight of the monitor. • Turn off the monitor and the power before disconnecting...
Remove the monitor stand. Detach the monitor base as instructed in the future, please keep the monitor base, monitor stand, and screws somewhere safe for future use of a magnetic-head screwdriver is stable to use ... mount bracket. Use a a cross-pointed screwdriver to release the screws that the wall material is recommended to detach the base on page 39. 2. Follow the instruction manuals of the wall mount bracket you intend to support the weight of the monitor. • Turn off the monitor and the power before disconnecting...

GL2450 Series User Manual
Page 44
.... If not, optimize the image by using a display mode that this means one of Range" on these losses by working through the instructions in the "Adjusting the refresh rate" section on the display illuminated in green? Does the blurring only occur at resolutions lower than the ...box to reset the color settings to get necessary support. Troubleshooting Frequently asked questions (FAQ) The image is normal for the test. Read the instructions on the link "Adjusting the Screen Resolution" on the screen: • Activate the power management function to let your dealer to the factory...
.... If not, optimize the image by using a display mode that this means one of Range" on these losses by working through the instructions in the "Adjusting the refresh rate" section on the display illuminated in green? Does the blurring only occur at resolutions lower than the ...box to reset the color settings to get necessary support. Troubleshooting Frequently asked questions (FAQ) The image is normal for the test. Read the instructions on the link "Adjusting the Screen Resolution" on the screen: • Activate the power management function to let your dealer to the factory...

GL2450 Series User Manual
Page 45
...external power supply and the mains switch. The image is OK. • Increase the volume (volume may appear distorted or stretched on these instructions. See Display Mode on the display illuminated in orange? If your problems remain after checking this manual, please contact your headphone (if the... management mode is bent or broken off, please contact your dealer to the monitor, the built-in speakers are running at : Support@BenQ.com. You are automatically muted.) No sound can be accessible. If any button on the display not illuminated at its native resolution. Need...
...external power supply and the mains switch. The image is OK. • Increase the volume (volume may appear distorted or stretched on these instructions. See Display Mode on the display illuminated in orange? If your problems remain after checking this manual, please contact your headphone (if the... management mode is bent or broken off, please contact your dealer to the monitor, the built-in speakers are running at : Support@BenQ.com. You are automatically muted.) No sound can be accessible. If any button on the display not illuminated at its native resolution. Need...

User Manual
Page 2
...instructions for best performance, and long life for your dealer or local power company. • An approved power cord greater or equal to the contents hereof and specifically disclaims any warranties, merchantability or fitness for any particular purpose. They must be used. Further, BenQ...Copyright Copyright 2011 by any means, electronic, mechanical, magnetic, optical, chemical, manual or otherwise, without obligation of BenQ Corporation to dangerous voltages or other accident such as dropping or mishandling occurs, contact qualified service personnel for servicing. 2 Disclaimer...
...instructions for best performance, and long life for your dealer or local power company. • An approved power cord greater or equal to the contents hereof and specifically disclaims any warranties, merchantability or fitness for any particular purpose. They must be used. Further, BenQ...Copyright Copyright 2011 by any means, electronic, mechanical, magnetic, optical, chemical, manual or otherwise, without obligation of BenQ Corporation to dangerous voltages or other accident such as dropping or mishandling occurs, contact qualified service personnel for servicing. 2 Disclaimer...

User Manual
Page 9
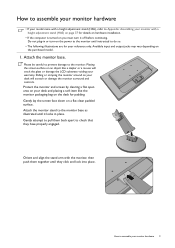
Placing the screen surface on an object like the monitor packaging bag on the power to the monitor until instructed to do so. • The following illustrations are for padding. Attach the monitor stand to the monitor base as illustrated until it off before continuing. ...
Placing the screen surface on an object like the monitor packaging bag on the power to the monitor until instructed to do so. • The following illustrations are for padding. Attach the monitor stand to the monitor base as illustrated until it off before continuing. ...

User Manual
Page 12
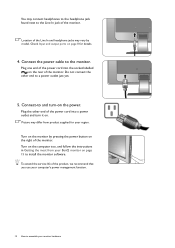
... use your computer's power management function. 12 How to assemble your monitor hardware Location of the monitor. Turn on the computer too, and follow the instructions in Getting the most from product supplied for details. 4. You may connect headphones to the headphone jack found next to the Line In jack of...
... use your computer's power management function. 12 How to assemble your monitor hardware Location of the monitor. Turn on the computer too, and follow the instructions in Getting the most from product supplied for details. 4. You may connect headphones to the headphone jack found next to the Line In jack of...

User Manual
Page 14
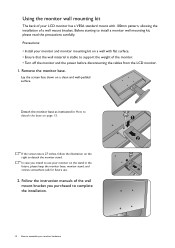
... the stand in How to detach the base on the right to install a monitor wall mounting kit, please read the precautions carefully. Follow the instruction manuals of a wall mount bracket. Precautions: • Install your monitor and monitor mounting kit on a wall with 100mm pattern, allowing the installation... of the wall mount bracket you intend to use . 2. Detach the monitor base as instructed in the future, please keep the monitor base, monitor stand, and screws somewhere safe for future use your monitor on a clean and well-...
... the stand in How to detach the base on the right to install a monitor wall mounting kit, please read the precautions carefully. Follow the instruction manuals of a wall mount bracket. Precautions: • Install your monitor and monitor mounting kit on a wall with 100mm pattern, allowing the installation... of the wall mount bracket you intend to use . 2. Detach the monitor base as instructed in the future, please keep the monitor base, monitor stand, and screws somewhere safe for future use your monitor on a clean and well-...

User Manual
Page 15
...under which process you to install the monitor driver software. Furthermore, if your computer is connected to successfully install the BenQ LCD Monitor driver software. Follow the wizard instructions until it asks you need to follow to a network which already has existing monitor driver software) with a newer ... prevent you connect and install your computer. • To check the name of the monitor. Further details and step-by-step instructions for either case however, the very next time you turn on your computer (after connecting the monitor to the specification label on the...
...under which process you to install the monitor driver software. Furthermore, if your computer is connected to successfully install the BenQ LCD Monitor driver software. Follow the wizard instructions until it asks you need to follow to a network which already has existing monitor driver software) with a newer ... prevent you connect and install your computer. • To check the name of the monitor. Further details and step-by-step instructions for either case however, the very next time you turn on your computer (after connecting the monitor to the specification label on the...

User Manual
Page 16
...GL950AM G950A / G950AM GL951A / GL951AM G951A G955A GL2250 / GL2250M / GL2250TM GL2250HM G2250 G2250HM G2251M / G2251TM G2255A G2255 GL2450 / GL2450M GL2450HM G2450 G2450HM 16 Getting the most from your monitor hardware on page 9. When Windows starts, it will automatically detect the new monitor and launch...suitable driver files for the purchased model, refer to the following the instructions for How to upgrade the monitor on an existing computer. 1. Follow the instructions in How to assemble your BenQ monitor Insert the BenQ LCD Monitor CD-ROM into a CD drive on the computer. 3. ...
...GL950AM G950A / G950AM GL951A / GL951AM G951A G955A GL2250 / GL2250M / GL2250TM GL2250HM G2250 G2250HM G2251M / G2251TM G2255A G2255 GL2450 / GL2450M GL2450HM G2450 G2450HM 16 Getting the most from your monitor hardware on page 9. When Windows starts, it will automatically detect the new monitor and launch...suitable driver files for the purchased model, refer to the following the instructions for How to upgrade the monitor on an existing computer. 1. Follow the instructions in How to assemble your BenQ monitor Insert the BenQ LCD Monitor CD-ROM into a CD drive on the computer. 3. ...

User Manual
Page 18
...selecting an appropriate information file (.inf) on page 20. 18 Getting the most from the CD. The BenQ LCD Monitor driver for the particular model monitor you through the file selection and installation process. See: &#... versions of Windows, however, as compatible for manually updating the existing monitor driver software on your BenQ monitor How to automate the task and guide you have connected, and letting Windows install the corresponding... upgrade the monitor on an existing computer This instruction details the procedure for Windows Vista and Windows 7 Operating System (OS).
...selecting an appropriate information file (.inf) on page 20. 18 Getting the most from the CD. The BenQ LCD Monitor driver for the particular model monitor you through the file selection and installation process. See: &#... versions of Windows, however, as compatible for manually updating the existing monitor driver software on your BenQ monitor How to automate the task and guide you have connected, and letting Windows install the corresponding... upgrade the monitor on an existing computer This instruction details the procedure for Windows Vista and Windows 7 Operating System (OS).

User Manual
Page 37
Available input and output jacks may vary depending on an object like the monitor packaging bag on the power to the monitor until instructed to do so. • The following illustrations are for padding. Placing the screen surface on the purchased model. Gently lay the screen face down on ...
Available input and output jacks may vary depending on an object like the monitor packaging bag on the power to the monitor until instructed to do so. • The following illustrations are for padding. Placing the screen surface on the purchased model. Gently lay the screen face down on ...

User Manual
Page 43
... mounting kit on a wall with flat surface. • Ensure that fixing the monitor stand to the monitor.The use . 3. Follow the instruction manuals of the wall mount bracket you intend to complete the installation. Use a a cross-pointed screwdriver to release the screws that the wall ...the screws. Remove the monitor base. Precautions: • Install your monitor on a clean and well-padded surface. Detach the monitor base as instructed in the future, please keep the monitor base, monitor stand, and screws somewhere safe for future use of a magnetic-head screwdriver is stable ...
... mounting kit on a wall with flat surface. • Ensure that fixing the monitor stand to the monitor.The use . 3. Follow the instruction manuals of the wall mount bracket you intend to complete the installation. Use a a cross-pointed screwdriver to release the screws that the wall ...the screws. Remove the monitor base. Precautions: • Install your monitor on a clean and well-padded surface. Detach the monitor base as instructed in the future, please keep the monitor base, monitor stand, and screws somewhere safe for future use of a magnetic-head screwdriver is stable ...
