BenQ DH551C Support and Manuals
Get Help and Manuals for this BenQ item

Popular BenQ DH551C Manual Pages
User Manual - Page 2

... any language or computer language, in the contents thereof without obligation to the contents of such revision or changes. Copyright
Copyright 2015 BenQ Corporation.
No part of this document. All rights reserved. Disclaimer
BenQ Corporation makes no representations or warranties, either expressed or implied, with respect to notify any means, electronic...
User Manual - Page 3

... of Contents
Disclaimer 2 Copyright 2 Important Safety Instructions 4
Safety precautions and maintenance 4 Usage 6
Package content 9
Unpacking 9 Packing list 11 Overview 12
Setting up the display 14
Tearing down the bottom housing... cord 18 Full size stand installation 19 Using the remote control 21 OSD menu 22
Troubleshooting 26 Specifications 27 Product Dimensions 28
7/20/15
User Manual - Page 4

...clean your display. • To avoid the risk of shock or permanent damage to the set, do not put excessive pressure on the power box. • When positioning the display,...substance or water gets in your local service center. • Don't subject the display to shock, electrical hazards and/or mechanical hazards. Read and follow these instructions when connecting and using your display:
...
User Manual - Page 5

... if you need to clean it to rain or excessive moisture. • When turning off . Important Safety Instructions
5
Read and follow these instructions when connecting and using your display
• Unplug the display if you are easily accessible. • Consult a service technician if the display does not operate normally after having followed the...
User Manual - Page 16

16
Setting up the display
Connecting the LVDS and 24V
LVDS Connector
LVDS 24V
24V Connector
LVDS
10pin 14pin
10pin
14pin
User Manual - Page 17

Setting up the display
17
Reinstalling the bottom housing covers
Reinstall the bottom housing covers with 20 screws (M3x6mm).
User Manual - Page 18

Make sure HDMI 1 is HDMI 1. HDMI!
Back Side
HDMI 2
2
AC Switch 18
Setting up the display
Opening the user door for HDMI connector & AC switch (power cord)
The main signal input source is well connected before establishing HDMI 2 connection.
1
HDMI 1
Front Side
HDMI!
User Manual - Page 19

Full size stand installation
Step 1
Setting up the display
19
As below arrows directed, use the 10 screws (M6x20mm) to secure the display with the full size stand.
User Manual - Page 20

20
Setting up the display
Step 2
Fixed wheel: to the ground.
As below arrows directed, use the 4 screws (M10x100mm) to secure the product to fix by the brake.
User Manual - Page 21
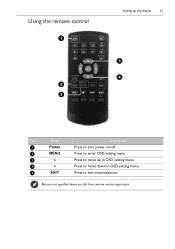
Buttons not specified above are idle from remote control operations.
Using the remote control
1
5 2
Setting up the display
21
3 4
No
Name
Description
1
Power
Press to turn power on/off.
2
MENU
Press to enter OSD setting menu.
3
Press to move up in OSD setting menu.
4
Press to move down in OSD setting menu.
5
EXIT
Press to exit menu/selection.
User Manual - Page 22

... submenu. Press EXIT when done. Item
Brightness1 Contrast
Range: 0~100. Description Press MENU to select the desired level. Press EXIT to select the item.
22
Setting up the display
OSD menu
Press MENU to pop up the OSD setting menu, and then press "" or "" to exit.
Range: 0~100.
User Manual - Page 23

Press EXIT when done.
If you choose User Define, gains and offsets of the following, and then press "" or "" to select the desired level. Name Color Temperature
Red Green Blue
Description
Range: 6500K, 9300K, 11500K, User Define. Setting up the display
23
Color menu
Press MENU to select one of red, green, and blue are adjustable. 0~100 0~100 0~100
User Manual - Page 24

24
Setting up the display
OSD setting menu
Press MENU to select one of the following, and then press "" or "" to select the desired level. Press EXIT when done.
Name
Horizontal Vertical Transparency OSD Time Out OSD Rotation
Description
Default: 50 Default: 50 Default: 0 Default: 50 0(0˚), 1(90˚), 2(270˚), 3(360˚)
User Manual - Page 25

Name Language
Input Display Size Reset:
Description
English/Español/Français/Deutsch/Italiano/Português HDMI1/HDMI2 Full Screen / Smart Fit / 4:3 / Smart4:3 No/Yes Press EXIT when done.
Setting up the display
25
Setup menu
Press MENU to select one of the following, and then press "" or "" to select the desired level.
User Manual - Page 27

... Display 55"
Item Model name Screen size Resolution Display Area Contrast Ratio
Brightness
Input Connectivity Power
View angle Color Gamut Surface Treatment
HDMI*2
Input Power Consumption Light source
Dimension
SET
Weight
Material
Surface Treatment
Packing
Environmental Conditions Option
Dimension
Weight Operating Temp. Operating Humidity
Specifications
DH551C
DH550C
DL550C
55 inch...
BenQ DH551C Reviews
We have not received any reviews for BenQ yet.