
User Manual
Page 2
... to scan images and save them as files, copy a photo or e-mail, or put them on before using the "Copy a photo/document" function. Welcome to Mirascan 6! In the "For Beginners" section, we will walk you want to use the "Scan to E-mail", "Scan to Application", "Scan to OCR" and "Scan to...
... to scan images and save them as files, copy a photo or e-mail, or put them on before using the "Copy a photo/document" function. Welcome to Mirascan 6! In the "For Beginners" section, we will walk you want to use the "Scan to E-mail", "Scan to Application", "Scan to OCR" and "Scan to...

User Manual
Page 4
on your desktop. Open Mirascan 6 (Wizard Mode) Double-click the MiraScan icon screen in "Job Occasion". For Beginners 3 Mirascan 6 will open to the Now you are ready to use the scan functions listed in Wizard mode.
on your desktop. Open Mirascan 6 (Wizard Mode) Double-click the MiraScan icon screen in "Job Occasion". For Beginners 3 Mirascan 6 will open to the Now you are ready to use the scan functions listed in Wizard mode.

User Manual
Page 9
Then click the scan button on the screen. For Beginners 8 Mirascan 6 will scan the original and transfer the scanned image to a new e-mail as an attachment.
Then click the scan button on the screen. For Beginners 8 Mirascan 6 will scan the original and transfer the scanned image to a new e-mail as an attachment.

User Manual
Page 11
Click this button to print your printer. Click this button Then click the scan button on the screen. For Beginners 10 Mirascan 6 will be printed by the printer you can select a printer to set your scanned photo. When finished, the image will start scanning the original. In this occasion information menu, you select.
Click this button to print your printer. Click this button Then click the scan button on the screen. For Beginners 10 Mirascan 6 will be printed by the printer you can select a printer to set your scanned photo. When finished, the image will start scanning the original. In this occasion information menu, you select.

User Manual
Page 13
Click this button to print your printer. When finished, the scanned document will start scanning the original. In this occasion information menu, you select. For Beginners 12 Mirascan 6 will be printed out by the printer you can select a printer to set your scanned document. Click this button Then click the scan button on the screen.
Click this button to print your printer. When finished, the scanned document will start scanning the original. In this occasion information menu, you select. For Beginners 12 Mirascan 6 will be printed out by the printer you can select a printer to set your scanned document. Click this button Then click the scan button on the screen.
User Manual
Page 15
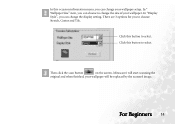
In "Display Style", you can choose to change the size of your wallpaper. For Beginners 14 In " Wallpaper Size" item, you can change the display setting. Then click the scan button on the screen. In this button to select. Click this occasion information menu, you to select. Click this button to choose: Stretch, Center and Tile. There are 3 options for you can change your wallpaper will start scanning the original and when finished, your wallpaper setup. Mirascan 6 will be replaced by the scanned image.
In "Display Style", you can choose to change the size of your wallpaper. For Beginners 14 In " Wallpaper Size" item, you can change the display setting. Then click the scan button on the screen. In this button to select. Click this occasion information menu, you to select. Click this button to choose: Stretch, Center and Tile. There are 3 options for you can change your wallpaper will start scanning the original and when finished, your wallpaper setup. Mirascan 6 will be replaced by the scanned image.

User Manual
Page 16
For AP editing If you have installed application programs that Mirascan 6 can recognize and work with, you can use this button. For Beginners 15 Choose "For AP editing". Click this function to scan and transfer the scanned images to those application programs. Click the button indicated below and a list of job occasion will appear on the screen.
For AP editing If you have installed application programs that Mirascan 6 can recognize and work with, you can use this button. For Beginners 15 Choose "For AP editing". Click this function to scan and transfer the scanned images to those application programs. Click the button indicated below and a list of job occasion will appear on the screen.

User Manual
Page 17
In this occasion information menu, you can choose the application program to which you want to the application program of your choice. Mirascan 6 will start scanning the original and transfer the scanned image to scan and transfer the scanned images. For Beginners 16 Then click the scan button on the button bar. Click an icon on the screen.
In this occasion information menu, you can choose the application program to which you want to the application program of your choice. Mirascan 6 will start scanning the original and transfer the scanned image to scan and transfer the scanned images. For Beginners 16 Then click the scan button on the button bar. Click an icon on the screen.
User Manual
Page 19
... to Microsoft Excel or Microsoft Word. In "File Format" item, you can set the file format of the scanned document. Click this button to select. Mirascan 6 will start scanning the document and save as a Microsoft Office program file. For Beginners 18 In "OCR Engine" item, you can select a proper OCR engine...
... to Microsoft Excel or Microsoft Word. In "File Format" item, you can set the file format of the scanned document. Click this button to select. Mirascan 6 will start scanning the document and save as a Microsoft Office program file. For Beginners 18 In "OCR Engine" item, you can select a proper OCR engine...

User Manual
Page 21
Click this occasion information menu, you can select an proper OCR engine which is already installed in your system to do Optical Character Recognition. A dialogue box will start scanning the image. Mirascan 6 will then appear to show the scanning process. In this button to select. For Beginners 20 Then click the scan button on the screen.
Click this occasion information menu, you can select an proper OCR engine which is already installed in your system to do Optical Character Recognition. A dialogue box will start scanning the image. Mirascan 6 will then appear to show the scanning process. In this button to select. For Beginners 20 Then click the scan button on the screen.

User Manual
Page 24
Mirascan 6 will see the link status between your PDA. When finished, press the Sync button on the screen. Then click the scan button on cradle to transfer the scanned image to your PDA and PC.. For Beginners 23 In this occasion information menu, you will start scanning the original.
Mirascan 6 will see the link status between your PDA. When finished, press the Sync button on the screen. Then click the scan button on cradle to transfer the scanned image to your PDA and PC.. For Beginners 23 In this occasion information menu, you will start scanning the original.

User Manual
Page 26
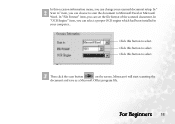
Please register a free membership at the web site.. Click this occasion information menu shown below, we provide you a web site (http:// www.Clubphoto.com) for sharing your own password For Beginners 25 When finished, the following dialogue box will start scanning the original. Mirascan 6 will appear. In this button Then click the scan button on the screen. Enter your e-mail address Specify your photos.
Please register a free membership at the web site.. Click this occasion information menu shown below, we provide you a web site (http:// www.Clubphoto.com) for sharing your own password For Beginners 25 When finished, the following dialogue box will start scanning the original. Mirascan 6 will appear. In this button Then click the scan button on the screen. Enter your e-mail address Specify your photos.

User Manual
Page 28
Click this button to exit. For Beginners 27 Closing Mirascan 6 To close Mirascan 6, click the button .
Click this button to exit. For Beginners 27 Closing Mirascan 6 To close Mirascan 6, click the button .

User Manual
Page 29
For Beginners 28 Additional Operations Click this button to minimize Mirascan 6 Click this button to switch to classic mode Click this button to preview scanned image For more information on how to access other powerful and convenient features provided by Mirascan 6, you can go to the "For Experienced Users" section for details.
For Beginners 28 Additional Operations Click this button to minimize Mirascan 6 Click this button to switch to classic mode Click this button to preview scanned image For more information on how to access other powerful and convenient features provided by Mirascan 6, you can go to the "For Experienced Users" section for details.
User Manual
Page 30
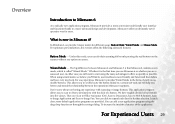
...application program using the many advantages it is more advanced design and development. In MiraScan 6, we believe you'll find its user interface is the first time you use Mirascan 6 or whether you to scan to diverse destinations with scanning or image formats. ... or through the settings dialog. Under this version offers the following advanced features: Button Mode --- Overview Introduction to Mirascan 6 As a radically new application program, Mirascan 6 provides a more convenient and friendly user interface and functions thanks to a more friendly and functional than before ...
...application program using the many advantages it is more advanced design and development. In MiraScan 6, we believe you'll find its user interface is the first time you use Mirascan 6 or whether you to scan to diverse destinations with scanning or image formats. ... or through the settings dialog. Under this version offers the following advanced features: Button Mode --- Overview Introduction to Mirascan 6 As a radically new application program, Mirascan 6 provides a more convenient and friendly user interface and functions thanks to a more friendly and functional than before ...
User Manual
Page 31
All you have no any UI mode is available in this application program. is opened. Nearly all prompts are shown in MiraScan 6 is to click the switch button in the settings tabs. The Job List offers you can directly change the button setting. It's the standard of ...
All you have no any UI mode is available in this application program. is opened. Nearly all prompts are shown in MiraScan 6 is to click the switch button in the settings tabs. The Job List offers you can directly change the button setting. It's the standard of ...

User Manual
Page 32
Frame selection Zoom in Zoom out Add Delete Clockwise 90 degree Flip Horizontal Invert Help File Show Ruler Flip Vertical Mirascan 6 user interfaces Hand The Wizard Mode Zoom Scan Refresh Copy Ruler Minimize MiraScan 6 Close MiraScan 6 Job Occasion Resource Type Scan Option Setting Next frame Counterclockwise 90 degree Scan area Occasion Information Hint Exit Preview area Scan Preview Switch button For Experienced Users 31
Frame selection Zoom in Zoom out Add Delete Clockwise 90 degree Flip Horizontal Invert Help File Show Ruler Flip Vertical Mirascan 6 user interfaces Hand The Wizard Mode Zoom Scan Refresh Copy Ruler Minimize MiraScan 6 Close MiraScan 6 Job Occasion Resource Type Scan Option Setting Next frame Counterclockwise 90 degree Scan area Occasion Information Hint Exit Preview area Scan Preview Switch button For Experienced Users 31

User Manual
Page 35
For Experienced Users 34 Getting Help To help you better understand and operate Mirascan 6, you can access the Help system by clicking the Help button.
For Experienced Users 34 Getting Help To help you better understand and operate Mirascan 6, you can access the Help system by clicking the Help button.

User Manual
Page 39
Copy Refresh Zoom Scan Hand Frame selection Zoom in Zoom out Add Delete Clockwise 90 degree Flip Horizontal Invert Help File Show Ruler Flip Vertical Counterclockwise 90 degree Next frame The Classic Mode Common File Configuration Special setting Help Job Settings Color Adjust Job Occasion Close MiraScan 6 Minimize MiraScan 6 Ruler Scan area Preview area Setting Menu Area (Menus and Items shown here change by different setting mode you choose.) Exit Scan Preview Switch button For Experienced Users 38
Copy Refresh Zoom Scan Hand Frame selection Zoom in Zoom out Add Delete Clockwise 90 degree Flip Horizontal Invert Help File Show Ruler Flip Vertical Counterclockwise 90 degree Next frame The Classic Mode Common File Configuration Special setting Help Job Settings Color Adjust Job Occasion Close MiraScan 6 Minimize MiraScan 6 Ruler Scan area Preview area Setting Menu Area (Menus and Items shown here change by different setting mode you choose.) Exit Scan Preview Switch button For Experienced Users 38

User Manual
Page 41
... the scaling of seleted area. Scan Resolution Selects scan resolution. Output Size Selects the exact size which you to be covered by tiny screen patterns. Mirascan 6 will find that the scanned image appears to define the various items. There are four items in this screen pattern, you can use the options...
... the scaling of seleted area. Scan Resolution Selects scan resolution. Output Size Selects the exact size which you to be covered by tiny screen patterns. Mirascan 6 will find that the scanned image appears to define the various items. There are four items in this screen pattern, you can use the options...