Owner's Manual
Page 6
Table of Contents Quick Overview Installation • Power Connection • Mounting Location • Windshield /Visor Mounting Controls and Features • Power up Test Sequence/ Operating Mode 4-5 6-7 6 6 7 8-11 8 Programming • Which Selectable Features Can I Program? • How to Program • Selectable Features ...
Table of Contents Quick Overview Installation • Power Connection • Mounting Location • Windshield /Visor Mounting Controls and Features • Power up Test Sequence/ Operating Mode 4-5 6-7 6 6 7 8-11 8 Programming • Which Selectable Features Can I Program? • How to Program • Selectable Features ...
Owner's Manual
Page 7
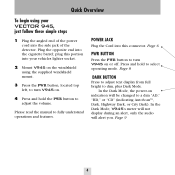
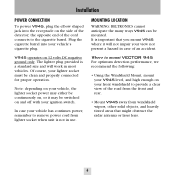
...full bright to fully understand operations and features. Page 9 4 plug this connector. WINDSHIELD/VISOR MOUNT Remove cover on top of the detector to i POWER JACK Plug the Cord into this portion into your VECTOR 945, just follow these simple steps 1 Plug the angled end of the detector. In... only the audio will be changed to select operating mode. Quick Overview To begin using your vehicles lighter socket. 2 Mount V945 on the windshield using the supplied windshield mount. 3 Press the PWR button, located top left, to turn V945 on or off. Plug the opposite end into ...
...full bright to fully understand operations and features. Page 9 4 plug this connector. WINDSHIELD/VISOR MOUNT Remove cover on top of the detector to i POWER JACK Plug the Cord into this portion into your VECTOR 945, just follow these simple steps 1 Plug the angled end of the detector. In... only the audio will be changed to select operating mode. Quick Overview To begin using your vehicles lighter socket. 2 Mount V945 on the windshield using the supplied windshield mount. 3 Press the PWR button, located top left, to turn V945 on or off. Plug the opposite end into ...
Owner's Manual
Page 8
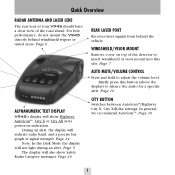
... TEXT DISPLAY V945's display will also show Highway, AutoScanTM, City X or City All as its power-on top of the detector to insert windshield or visor mount into this button (above the display) to adjust the volume level. Page 9 The display will show Safety Radar Category messages. Briefly...ANTENNA AND LASER LENS The rear lens of your V945 should have a clear view of signal strength. For best performance, do not mount the V945 directly behind the vehicle. During an alert, the display will not light during an alert. WINDSHIELD/VISOR MOUNT Remove cover on indication.
... TEXT DISPLAY V945's display will also show Highway, AutoScanTM, City X or City All as its power-on top of the detector to insert windshield or visor mount into this button (above the display) to adjust the volume level. Page 9 The display will show Safety Radar Category messages. Briefly...ANTENNA AND LASER LENS The rear lens of your V945 should have a clear view of signal strength. For best performance, do not mount the V945 directly behind the vehicle. During an alert, the display will not light during an alert. WINDSHIELD/VISOR MOUNT Remove cover on indication.
Owner's Manual
Page 9
... socket when unit is not in use. It is important that might obstruct the radar antenna or laser lens. 6 MOUNTING LOCATION WARNING: BELTRONICS cannot anticipate the many ways V945 can be clean and properly connected for proper operation. The lighter plug provided is a... shaped jack into your lighter socket must be mounted. In case your V945 level, and high enough on the side of an accident. Where to mount VECTOR 945 For optimum detection performance, we recommend the following: • Using the Windshield Mount, mount your vehicle has continues power, remember to the...
... socket when unit is not in use. It is important that might obstruct the radar antenna or laser lens. 6 MOUNTING LOCATION WARNING: BELTRONICS cannot anticipate the many ways V945 can be clean and properly connected for proper operation. The lighter plug provided is a... shaped jack into your lighter socket must be mounted. In case your V945 level, and high enough on the side of an accident. Where to mount VECTOR 945 For optimum detection performance, we recommend the following: • Using the Windshield Mount, mount your vehicle has continues power, remember to the...
Owner's Manual
Page 10
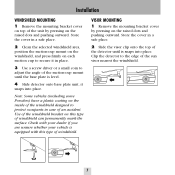
... into place. Clip the detector to adjust the angle of the suction-cup mount until is equipped with this type of windshield can permanently mark the surface. VISOR MOUNTING 1 Remove the mounting bracket cover by pressing on the raised dots and pushing outward. Store the ... driver or a small coin to the edge of the sun visor nearest the windshield. 7 Note: Some vehicles (including some Porsches) have a plastic coating on this type of windshield. Installation WINDSHIELD MOUNTING 1 Remove the mounting bracket cover on top of the unit by pressing on the raised dots and ...
... into place. Clip the detector to adjust the angle of the suction-cup mount until is equipped with this type of windshield can permanently mark the surface. VISOR MOUNTING 1 Remove the mounting bracket cover by pressing on the raised dots and pushing outward. Store the ... driver or a small coin to the edge of the sun visor nearest the windshield. 7 Note: Some vehicles (including some Porsches) have a plastic coating on this type of windshield. Installation WINDSHIELD MOUNTING 1 Remove the mounting bracket cover on top of the unit by pressing on the raised dots and ...


