Installation Instructions
Page 1
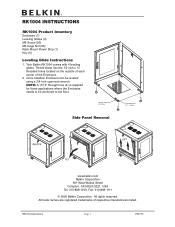
... Enclosure needs to the floor. RK1004 Instructions Page 1 P35772 Side Panel Removal Threaded Holes 1/2" - 13 thds. Fax: 310-898-1111 © 2005 Belkin Corporation. Once installed, Enclosure can be anchored to be leveled using a 3/4 inch open-end wrench. Thread these into the 1/2 inch x 13 threaded holes located on the outside of each corner of respective manufacturers listed. RK1004 INSTRUCTIONS RK1004 Product Inventory Enclosure (1) Leveling...
... Enclosure needs to the floor. RK1004 Instructions Page 1 P35772 Side Panel Removal Threaded Holes 1/2" - 13 thds. Fax: 310-898-1111 © 2005 Belkin Corporation. Once installed, Enclosure can be anchored to be leveled using a 3/4 inch open-end wrench. Thread these into the 1/2 inch x 13 threaded holes located on the outside of each corner of respective manufacturers listed. RK1004 INSTRUCTIONS RK1004 Product Inventory Enclosure (1) Leveling...

Installation Instructions
Page 2
... re-install to desired location then re-tightening the hex nut using a 7/16" wrench or socket. Remove the male and female hinge parts from the Enclosure and the door. 3. Fax: 310-898-1111 © 2005 Belkin Corporation. The doors on your RK1004 Enclosure are registered trademarks of its hinges. 2. Mounting Rails Rails can be adjusted front to rear by...
... re-install to desired location then re-tightening the hex nut using a 7/16" wrench or socket. Remove the male and female hinge parts from the Enclosure and the door. 3. Fax: 310-898-1111 © 2005 Belkin Corporation. The doors on your RK1004 Enclosure are registered trademarks of its hinges. 2. Mounting Rails Rails can be adjusted front to rear by...