
User Manual
Page 2
(This page is left intentionally blank.) Belkin Enclosure - User Manual v 1.0.0 P74789
(This page is left intentionally blank.) Belkin Enclosure - User Manual v 1.0.0 P74789
User Manual
Page 3
... 5 Before you Install ...6 Unpacking your Enclosure 7 Unpacking Instructions 7 Installing your Belkin Enclosure 8 Leveling you Enclosure 8 Removing your Casters and Levelers 8 Removing and Installing your Side Panels 9 Removing and Installing your Top Panel 10 Ganging or Networking your Enclosures 11 Reversing your Front Door 12 Reversing your Front Door 13 Reversing your Front Door 14 Adjusting your Vertical Mounting Rails 15 Installing your Equipment 16...
... 5 Before you Install ...6 Unpacking your Enclosure 7 Unpacking Instructions 7 Installing your Belkin Enclosure 8 Leveling you Enclosure 8 Removing your Casters and Levelers 8 Removing and Installing your Side Panels 9 Removing and Installing your Top Panel 10 Ganging or Networking your Enclosures 11 Reversing your Front Door 12 Reversing your Front Door 13 Reversing your Front Door 14 Adjusting your Vertical Mounting Rails 15 Installing your Equipment 16...
User Manual
Page 4
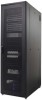
... Enclosure comes with 50 Metric 6mm Black Screws with hardware included. Part Number RK5009 Description Side Panels for those Enclosures ordered without sides. If you require more, please see part number below: Part Number RK5034 Description Metric 6mm Black Screw with servers, voice, data, networking, internetworking, cable management, power distribution, and power protection equipment. User Manual v 1.0.0 Page 1 P74789 The Belkin Enclosure is an industrial-grade, high...
... Enclosure comes with 50 Metric 6mm Black Screws with hardware included. Part Number RK5009 Description Side Panels for those Enclosures ordered without sides. If you require more, please see part number below: Part Number RK5034 Description Metric 6mm Black Screw with servers, voice, data, networking, internetworking, cable management, power distribution, and power protection equipment. User Manual v 1.0.0 Page 1 P74789 The Belkin Enclosure is an industrial-grade, high...

User Manual
Page 5
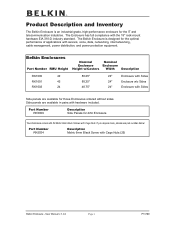
User Manual v 1.0.0 Page 2 9 9 P74789 Product Inventory Features of the Enclosure 9 8 7 1 9 2 9 3 6 4 5 1 Side Panels with Locks 2 Vertical Rails (Adjustable) 3 Reversible Front Doors 4 Fully Welded Frame 5 Leveling Feet (Adjustable) 6 Casters 7 Split Rear Doors 8 Vented Top Panels 9 Cable Access Belkin Enclosure -
User Manual v 1.0.0 Page 2 9 9 P74789 Product Inventory Features of the Enclosure 9 8 7 1 9 2 9 3 6 4 5 1 Side Panels with Locks 2 Vertical Rails (Adjustable) 3 Reversible Front Doors 4 Fully Welded Frame 5 Leveling Feet (Adjustable) 6 Casters 7 Split Rear Doors 8 Vented Top Panels 9 Cable Access Belkin Enclosure -

User Manual
Page 6
When this caution symbol appears in this User Manual, the information that accompanies it is critical to your safety and the prevention of damage to product. User Manual v 1.0.0 Page 3 P74789 Before you have the following tools: Phillips Screwdriver Utility Knife Level 3/4" Open Ended Wrench 1/2", 3/8" and 7/16" Hex Sockets Belkin Enclosure - Before unpacking, please make sure you Install Instructions must be read completely before installation.
When this caution symbol appears in this User Manual, the information that accompanies it is critical to your safety and the prevention of damage to product. User Manual v 1.0.0 Page 3 P74789 Before you have the following tools: Phillips Screwdriver Utility Knife Level 3/4" Open Ended Wrench 1/2", 3/8" and 7/16" Hex Sockets Belkin Enclosure - Before unpacking, please make sure you Install Instructions must be read completely before installation.
User Manual
Page 7
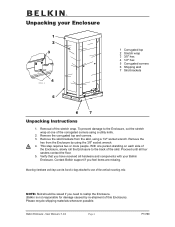
... Instructions 1. Mounting hardware and keys can be saved if you feel items are missing. Removal of the vertical mounting rails. Remove the corrugated top and corners. 3. To prevent damage to the Enclosure, cut the stretch wrap at one of the skid. Remove the hex from the skid, using a 1/2" socket wrench. With one of the stretch wrap. Contact Belkin support...
... Instructions 1. Mounting hardware and keys can be saved if you feel items are missing. Removal of the vertical mounting rails. Remove the corrugated top and corners. 3. To prevent damage to the Enclosure, cut the stretch wrap at one of the skid. Remove the hex from the skid, using a 1/2" socket wrench. With one of the stretch wrap. Contact Belkin support...

User Manual
Page 8
User Manual v 1.0.0 Page 5 P74789 Using a level and your wrench, adjust the levelers so that your 3/4" wrench to lower the adjustable levelers so that the weight of the Enclosure is level. Once in place use your Enclosure is taken off of the casters. 3. Using a 1/2" hex socket, remove the 5/6" nuts holding the casters 4. Removing your Casters and Levelers The following steps require two...
User Manual v 1.0.0 Page 5 P74789 Using a level and your wrench, adjust the levelers so that your 3/4" wrench to lower the adjustable levelers so that the weight of the Enclosure is level. Once in place use your Enclosure is taken off of the casters. 3. Using a 1/2" hex socket, remove the 5/6" nuts holding the casters 4. Removing your Casters and Levelers The following steps require two...

User Manual
Page 9
Slide both latches toward the center of the side panel, and carefully pull side panel toward you. 3. Belkin Enclosure - Removing and Installing your Side Panels 1. To re-install, reverse above steps. User Manual v 1.0.0 Page 6 P74789 If side panel is locked, please unlock. 2. Lift side panel up and remove from Enclosure. 4.
Slide both latches toward the center of the side panel, and carefully pull side panel toward you. 3. Belkin Enclosure - Removing and Installing your Side Panels 1. To re-install, reverse above steps. User Manual v 1.0.0 Page 6 P74789 If side panel is locked, please unlock. 2. Lift side panel up and remove from Enclosure. 4.

User Manual
Page 10
User Manual v 1.0.0 Page 7 P74789 Please see chart below. #10-32 Phillips Pan Head Screw Part Number RK5003 RK5004 RK5005 RK5006 Description Perforated top 3 muffin fan top, 225 CFM Single 10" fan top, 500 CFM Double 10" fan top, 1100 CFM Tools required: Phillips Pan Head Screw Driver Belkin Enclosure - This top panel can be replaced with four #10-32 Phillips pan head screws. Removing and Installing your Top Panel The center portion of the top of your Enclosure is attached with optional fan tops by removing the four #10-32 screws.
User Manual v 1.0.0 Page 7 P74789 Please see chart below. #10-32 Phillips Pan Head Screw Part Number RK5003 RK5004 RK5005 RK5006 Description Perforated top 3 muffin fan top, 225 CFM Single 10" fan top, 500 CFM Double 10" fan top, 1100 CFM Tools required: Phillips Pan Head Screw Driver Belkin Enclosure - This top panel can be replaced with four #10-32 Phillips pan head screws. Removing and Installing your Top Panel The center portion of the top of your Enclosure is attached with optional fan tops by removing the four #10-32 screws.
User Manual
Page 11
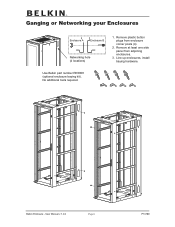
Remove at least one side panel from enclosure corner posts (4). 2. Use Belkin part number RK5008 (optional enclosure baying kit). User Manual v 1.0.0 Page 8 P74789 Line up enclosures, install baying hardware. No additional tools required. Belkin Enclosure - Remove plastic button plugs from adjoining enclosures. 3. Ganging or Networking your Enclosures Enclosure A Enclosure B Networking hole (4 locations) 1.
Remove at least one side panel from enclosure corner posts (4). 2. Use Belkin part number RK5008 (optional enclosure baying kit). User Manual v 1.0.0 Page 8 P74789 Line up enclosures, install baying hardware. No additional tools required. Belkin Enclosure - Remove plastic button plugs from adjoining enclosures. 3. Ganging or Networking your Enclosures Enclosure A Enclosure B Networking hole (4 locations) 1.
User Manual
Page 12
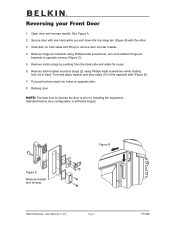
...Remove handle and reverse Figure B Belkin Enclosure - Remove button plugs by pushing from the back side and retain for reuse. 6. Turn and place bracket and door stops (2) on opposite side. 8. Standard factory door configuration is prior to remove door and set it aside. 4. Remove latch bracket and door stops (2) using...other. 3. User Manual v 1.0.0 Page 9 P74789 NOTE: The best time to reverse the door is left-hand hinged. Open door and reverse handle. Grab door on both sides and lift up to installing the equipment. Remove hinge pin brackets using Phillips head screwdriver...
...Remove handle and reverse Figure B Belkin Enclosure - Remove button plugs by pushing from the back side and retain for reuse. 6. Turn and place bracket and door stops (2) on opposite side. 8. Standard factory door configuration is prior to remove door and set it aside. 4. Remove latch bracket and door stops (2) using...other. 3. User Manual v 1.0.0 Page 9 P74789 NOTE: The best time to reverse the door is left-hand hinged. Open door and reverse handle. Grab door on both sides and lift up to installing the equipment. Remove hinge pin brackets using Phillips head screwdriver...
User Manual
Page 15
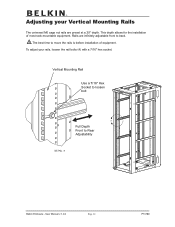
The best time to Rear Adjustability Belkin Enclosure - To adjust your Vertical Mounting Rails The universal M6 cage nut rails are infinitely adjustable front to back. Vertical Mounting Rail Use a 7/16" Hex Socket to loosen bolt Full Depth Front to move the rails is before installation of most rack-mountable equipment. Rails are preset at a 29" depth. Adjusting your rails, loosen the rail bolts (4) with a 7/16" hex socket. User Manual v 1.0.0 Page 12 P74789 This depth allows for the installation of equipment.
The best time to Rear Adjustability Belkin Enclosure - To adjust your Vertical Mounting Rails The universal M6 cage nut rails are infinitely adjustable front to back. Vertical Mounting Rail Use a 7/16" Hex Socket to loosen bolt Full Depth Front to move the rails is before installation of most rack-mountable equipment. Rails are preset at a 29" depth. Adjusting your rails, loosen the rail bolts (4) with a 7/16" hex socket. User Manual v 1.0.0 Page 12 P74789 This depth allows for the installation of equipment.
User Manual
Page 16
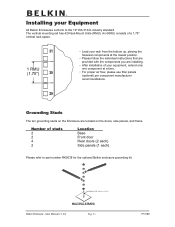
... are located on the doors, side panels, and frame. Installing your equipment, extend only one component at the lowest position. • Please follow the individual instructAions that are provided with the components you are installing. • After installation of your Equipment All Belkin Enclosures conform to part number RK5038 for the optional Belkin enclosure grounding kit. User Manual v 1.0.0 Page 13 C P74789
... are located on the doors, side panels, and frame. Installing your equipment, extend only one component at the lowest position. • Please follow the individual instructAions that are provided with the components you are installing. • After installation of your Equipment All Belkin Enclosures conform to part number RK5038 for the optional Belkin enclosure grounding kit. User Manual v 1.0.0 Page 13 C P74789
User Manual
Page 18
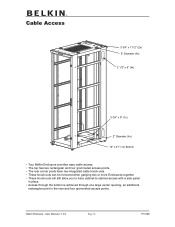
... - User Manual v 1.0.0 Page 15 P74789 Cable Access 3 3/4" x 7 1/2" (2x) 2" Diameter (4x) 2 1/2" x 6" (4x) 3 3/4" x 9" (1x) 2" Diameter (4x) 13" x 21" (1x) Bottom • Your Belkin Enclosure provides easy cable access. • The top has two rectangular and four grommeted access points. • The rear corner posts have two integrated cable knock-outs. • These knock-outs can be removed...
... - User Manual v 1.0.0 Page 15 P74789 Cable Access 3 3/4" x 7 1/2" (2x) 2" Diameter (4x) 2 1/2" x 6" (4x) 3 3/4" x 9" (1x) 2" Diameter (4x) 13" x 21" (1x) Bottom • Your Belkin Enclosure provides easy cable access. • The top has two rectangular and four grommeted access points. • The rear corner posts have two integrated cable knock-outs. • These knock-outs can be removed...
User Manual
Page 19
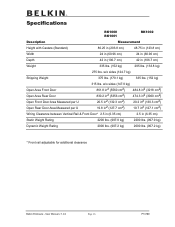
...96 cm) Depth 42 in (106.7 cm) 42 in (6.35 cm) Static Weight Rating 2200 lbs. (997.9 kg) 2200 lbs. (997.9 kg) Dynamic Weight Rating 2000 lbs. (907.2 kg) 2000 lbs. (907.2 kg) * Front rail adjustable for additional clearance Belkin Enclosure - w/o sides (147.9 kg) 861.8 in2 (5560 cm2) 484.8 ...* 2.5 in (6.35 cm) 2.5 in (106.7 cm) Weight 335 lbs. (152 kg) 295 lbs. (133.8 kg) 275 lbs. User Manual v 1.0.0 Page 16 P74789 w/o sides (124.7 kg) Shipping Weight 375 lbs. (170.1 kg) 335 lbs. (152 kg) Open Area Front Door Open Area Rear Door Open Front Door Area Measured per U Open...
...96 cm) Depth 42 in (106.7 cm) 42 in (6.35 cm) Static Weight Rating 2200 lbs. (997.9 kg) 2200 lbs. (997.9 kg) Dynamic Weight Rating 2000 lbs. (907.2 kg) 2000 lbs. (907.2 kg) * Front rail adjustable for additional clearance Belkin Enclosure - w/o sides (147.9 kg) 861.8 in2 (5560 cm2) 484.8 ...* 2.5 in (6.35 cm) 2.5 in (106.7 cm) Weight 335 lbs. (152 kg) 295 lbs. (133.8 kg) 275 lbs. User Manual v 1.0.0 Page 16 P74789 w/o sides (124.7 kg) Shipping Weight 375 lbs. (170.1 kg) 335 lbs. (152 kg) Open Area Front Door Open Area Rear Door Open Front Door Area Measured per U Open...

User Manual
Page 20
... local Belkin representative for ordering information. Capacity Stationary Front Mount Shelf Filler Panel Kit - 2 ea. User Manual v 1.0.0 Page 17 P74789 of 1U/2U/3U 1U Filler Panel (set of 2) 2U Filler Panel (set of 2) 3U Filler Panel (set of 2) Package of 25 M6 Cage Nuts w/Screws Casters, Set of 4, Non-locking Set of Side Panels Mesh Front Door Split Mesh Rear Door 26" Deep Sliding Shelf, 110 lb. Accessories Part...
... local Belkin representative for ordering information. Capacity Stationary Front Mount Shelf Filler Panel Kit - 2 ea. User Manual v 1.0.0 Page 17 P74789 of 1U/2U/3U 1U Filler Panel (set of 2) 2U Filler Panel (set of 2) 3U Filler Panel (set of 2) Package of 25 M6 Cage Nuts w/Screws Casters, Set of 4, Non-locking Set of Side Panels Mesh Front Door Split Mesh Rear Door 26" Deep Sliding Shelf, 110 lb. Accessories Part...
User Manual
Page 21
... and from such repair facility and of defects in its sole discretion, that it . Where you purchased the Enclosure. Warranty and Service LIMITED LIFETIME WARRANTY What this Warranty? Belkin Corporation warrants to the original purchaser of any Belkin enclosure, that the Belkin Enclosure has been improperly installed, altered in its option, any defective Enclosure free of the purchaser, Belkin Corporation determines...
... and from such repair facility and of defects in its sole discretion, that it . Where you purchased the Enclosure. Warranty and Service LIMITED LIFETIME WARRANTY What this Warranty? Belkin Corporation warrants to the original purchaser of any Belkin enclosure, that the Belkin Enclosure has been improperly installed, altered in its option, any defective Enclosure free of the purchaser, Belkin Corporation determines...
User Manual
Page 22
... BE LIABLE FOR INCIDENTAL, SPECIAL, DIRECT, INDIRECT, CONSEQUENTIAL OR MULTIPLE DAMAGES SUCH AS, BUT NOT LIMITED TO, LOST BUSINESS OR PROFITS ARISING OUT OF THE SALE OR USE OF ANY BELKIN ENCLOSURE, EVEN IF ADVISED OF THE POSSIBILITY OF SUCH DAMAGES. User Manual v 1.0.0 Page 19 P74789 This Warranty gives you specific legal rights, and you may also...
... BE LIABLE FOR INCIDENTAL, SPECIAL, DIRECT, INDIRECT, CONSEQUENTIAL OR MULTIPLE DAMAGES SUCH AS, BUT NOT LIMITED TO, LOST BUSINESS OR PROFITS ARISING OUT OF THE SALE OR USE OF ANY BELKIN ENCLOSURE, EVEN IF ADVISED OF THE POSSIBILITY OF SUCH DAMAGES. User Manual v 1.0.0 Page 19 P74789 This Warranty gives you specific legal rights, and you may also...
User Manual
Page 23
... registered trademarks of respective manufacturers listed. Express Business Park, Shipton Way Rushden, NN10 6GL, United Kingdom +44 (0) 1933 35 2000 +44 (0) 1933 31 2000 fax Belkin B.V. User Manual v 1.0.0 Page 20 P74789 Belkin Enclosure - All rights reserved. Contact Information www.belkin.com Belkin Corporation 501 West Walnut Street ...654 7349 fax Belkin Ltd. 7 Bowen Crescent, West Gosford NSW 2250, Australia +61 (0) 2 4372 8600 +61 (0) 2 4372 8603 fax Tech Support US: 310-898-1100 ext. 2263 800-223-5546 ext. 2263 Europe: 00 800 223 55 460 Australia: 1800 235 546 New Zealand: 0800...
... registered trademarks of respective manufacturers listed. Express Business Park, Shipton Way Rushden, NN10 6GL, United Kingdom +44 (0) 1933 35 2000 +44 (0) 1933 31 2000 fax Belkin B.V. User Manual v 1.0.0 Page 20 P74789 Belkin Enclosure - All rights reserved. Contact Information www.belkin.com Belkin Corporation 501 West Walnut Street ...654 7349 fax Belkin Ltd. 7 Bowen Crescent, West Gosford NSW 2250, Australia +61 (0) 2 4372 8600 +61 (0) 2 4372 8603 fax Tech Support US: 310-898-1100 ext. 2263 800-223-5546 ext. 2263 Europe: 00 800 223 55 460 Australia: 1800 235 546 New Zealand: 0800...

User Manual
Page 24
(This page is left intentionally blank.) Belkin Enclosure - User Manual v 1.0.0 Page 21 P74789
(This page is left intentionally blank.) Belkin Enclosure - User Manual v 1.0.0 Page 21 P74789