User Manual
Page 3
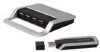
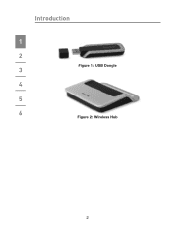
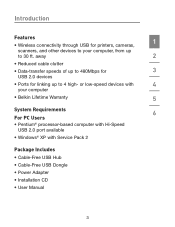
Introduction 1 2 Figure 1: USB Dongle 3 4 5 6 Figure 2: Wireless Hub 2
Introduction 1 2 Figure 1: USB Dongle 3 4 5 6 Figure 2: Wireless Hub 2
User Manual
Page 4
..., cameras, scanners, and other devices to your computer • Belkin Lifetime Warranty 5 System Requirements 6 For PC Users • Pentium® processor-based computer with Hi-Speed USB 2.0 port available • Windows® XP with Service Pack 2 Package Includes • Cable-Free USB Hub • Cable-Free USB Dongle • Power Adapter • Installation CD •...
..., cameras, scanners, and other devices to your computer • Belkin Lifetime Warranty 5 System Requirements 6 For PC Users • Pentium® processor-based computer with Hi-Speed USB 2.0 port available • Windows® XP with Service Pack 2 Package Includes • Cable-Free USB Hub • Cable-Free USB Dongle • Power Adapter • Installation CD •...
User Manual
Page 5
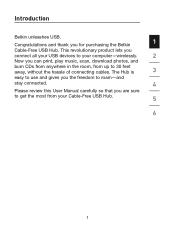
Introduction Belkin unleashes USB. Congratulations and thank you can print, play music, scan, download photos, and burn CDs from anywhere in the room, from up to get the most from your computer-wirelessly. 2 Now you for purchasing the Belkin 1 Cable-Free USB Hub. The Hub is 3 easy to use and gives you the freedom to roam-and stay connected. 4 Please review this User Manual carefully so that you are sure to 30 feet away, without the hassle of connecting cables. This revolutionary product lets you connect all your USB devices to your Cable-Free USB Hub. 5 6 1
Introduction Belkin unleashes USB. Congratulations and thank you can print, play music, scan, download photos, and burn CDs from anywhere in the room, from up to get the most from your computer-wirelessly. 2 Now you for purchasing the Belkin 1 Cable-Free USB Hub. The Hub is 3 easy to use and gives you the freedom to roam-and stay connected. 4 Please review this User Manual carefully so that you are sure to 30 feet away, without the hassle of connecting cables. This revolutionary product lets you connect all your USB devices to your Cable-Free USB Hub. 5 6 1
User Manual
Page 8
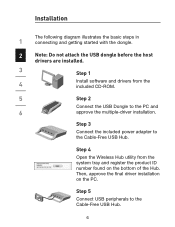
Step 3 Connect the included power adapter to the Cable-Free USB Hub. 6 Then, approve the final driver installation on the bottom of the Hub. Step 5 Connect USB peripherals to the Cable-Free USB Hub. Step 4 Open the Wireless Hub utility from the included CD-ROM. 5 Step 2 Connect the USB Dongle to the PC and 6 approve the multiple-driver installation...
Step 3 Connect the included power adapter to the Cable-Free USB Hub. 6 Then, approve the final driver installation on the bottom of the Hub. Step 5 Connect USB peripherals to the Cable-Free USB Hub. Step 4 Open the Wireless Hub utility from the included CD-ROM. 5 Step 2 Connect the USB Dongle to the PC and 6 approve the multiple-driver installation...
User Manual
Page 10
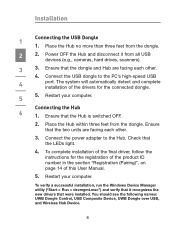
...("Start > Run > devmgmt.msc") and verify that it from all USB devices (e.g., cameras, hard drives, scanners). 3 3. You should see the following names: UWB Dongle Control, USB Composite Device, UWB Dongle over USB, and Wireless Hub Device. 8 Ensure that the two units are facing each other . 4.... Connect the power adapter to the PC's high-speed USB 4 port. Ensure that the dongle and Hub are facing each other . 3. To complete installation of this User Manual. 5. Installation Connecting the USB Dongle 1 1. Place the Hub no more than three feet from the dongle. The system...
...("Start > Run > devmgmt.msc") and verify that it from all USB devices (e.g., cameras, hard drives, scanners). 3 3. You should see the following names: UWB Dongle Control, USB Composite Device, UWB Dongle over USB, and Wireless Hub Device. 8 Ensure that the two units are facing each other . 4.... Connect the power adapter to the PC's high-speed USB 4 port. Ensure that the dongle and Hub are facing each other . 3. To complete installation of this User Manual. 5. Installation Connecting the USB Dongle 1 1. Place the Hub no more than three feet from the dongle. The system...
User Manual
Page 11
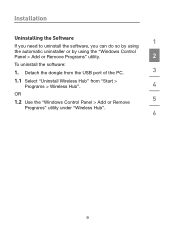
Installation Uninstalling the Software 1 If you need to uninstall the software, you can do so by using the automatic uninstaller or by using the "Windows Control Panel > Add or Remove Programs" utility. 2 To uninstall the software: 1. Detach the dongle from the USB port of the PC. 3 1.1 Select "Uninstall Wireless Hub" from "Start > Programs > Wireless Hub". 4 OR 1.2 Use the "Windows Control Panel > Add or Remove 5 Programs" utility under "Wireless Hub". 6 9
Installation Uninstalling the Software 1 If you need to uninstall the software, you can do so by using the automatic uninstaller or by using the "Windows Control Panel > Add or Remove Programs" utility. 2 To uninstall the software: 1. Detach the dongle from the USB port of the PC. 3 1.1 Select "Uninstall Wireless Hub" from "Start > Programs > Wireless Hub". 4 OR 1.2 Use the "Windows Control Panel > Add or Remove 5 Programs" utility under "Wireless Hub". 6 9
User Manual
Page 12
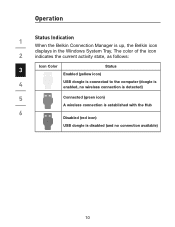
Operation Status Indication 1 When the Belkin Connection Manager is disabled (and no connection available) 10 The color of the icon 2 indicates the current activity state, as follows: Icon Color Status 3 Enabled (yellow icon) 4 USB dongle is connected to the computer (dongle is enabled, no wireless connection is detected) 5 Connected (green icon) A wireless connection is established with the Hub 6 Disabled (red icon) USB dongle is up, the Belkin icon displays in the Windows System Tray.
Operation Status Indication 1 When the Belkin Connection Manager is disabled (and no connection available) 10 The color of the icon 2 indicates the current activity state, as follows: Icon Color Status 3 Enabled (yellow icon) 4 USB dongle is connected to the computer (dongle is enabled, no wireless connection is detected) 5 Connected (green icon) A wireless connection is established with the Hub 6 Disabled (red icon) USB dongle is up, the Belkin icon displays in the Windows System Tray.
User Manual
Page 13
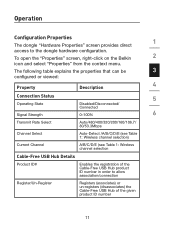
To open the "Properties" screen, right-click on the Belkin 2 icon and select "Properties" from the context menu. The following table explains the properties that can be 3 configured or viewed: Property Description 4... Auto-Detect /A/B/C/D/E (see Table 1: Wireless channel selection) Current Channel A/B/C/D/E (see Table 1: Wireless channel selection Cable-Free USB Hub Details Product ID# Enables the registration of the Cable-Free USB Hub product ID number in order to the dongle hardware configuration. Operation Configuration Properties 1 The dongle "Hardware Properties" ...
To open the "Properties" screen, right-click on the Belkin 2 icon and select "Properties" from the context menu. The following table explains the properties that can be 3 configured or viewed: Property Description 4... Auto-Detect /A/B/C/D/E (see Table 1: Wireless channel selection) Current Channel A/B/C/D/E (see Table 1: Wireless channel selection Cable-Free USB Hub Details Product ID# Enables the registration of the Cable-Free USB Hub product ID number in order to the dongle hardware configuration. Operation Configuration Properties 1 The dongle "Hardware Properties" ...
User Manual
Page 14
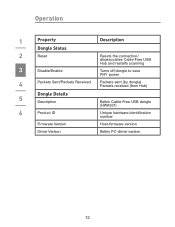
Operation 1 Property Dongle Status 2 Reset 3 Disable/Enable Description Resets the connection/ disassociates Cable-Free USB Hub and restarts scanning Turns off dongle to save PHY power 4 Packets Sent/Packets Received Packets sent (by dongle) Packets received (from Hub) Dongle Details 5 Description 6 Product ID Belkin Cable-Free USB dongle (HWA531) Unique hardware identification number Firmware Version Host-firmware version Driver Version Belkin PC-driver version 12
Operation 1 Property Dongle Status 2 Reset 3 Disable/Enable Description Resets the connection/ disassociates Cable-Free USB Hub and restarts scanning Turns off dongle to save PHY power 4 Packets Sent/Packets Received Packets sent (by dongle) Packets received (from Hub) Dongle Details 5 Description 6 Product ID Belkin Cable-Free USB dongle (HWA531) Unique hardware identification number Firmware Version Host-firmware version Driver Version Belkin PC-driver version 12

User Manual
Page 15
Operation Table 1: Wireless channel selection 1 Belkin TFC Band Search Pattern Channel Channel Name 2 A TFC1 F1 F2 F3 F1 F2 F3 B TFC2 F1 F3 F2 F1 F3 F2 3 C TFC5 F1 F1 F1 F1 F1 F1 4 D TFC6 F2 F2 F2 F2 F2 F2 E TFC7 F3 F3 F3 F3 F3 F3 5 6 Figure 3: Cable-Free USB Hub Connection Status screen 13
Operation Table 1: Wireless channel selection 1 Belkin TFC Band Search Pattern Channel Channel Name 2 A TFC1 F1 F2 F3 F1 F2 F3 B TFC2 F1 F3 F2 F1 F3 F2 3 C TFC5 F1 F1 F1 F1 F1 F1 4 D TFC6 F2 F2 F2 F2 F2 F2 E TFC7 F3 F3 F3 F3 F3 F3 5 6 Figure 3: Cable-Free USB Hub Connection Status screen 13
User Manual
Page 16
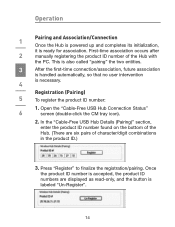
... association is handled automatically, so that no user intervention is ready for association. In the "Cable-Free USB Hub Details (Pairing)" section, enter the product ID number found on the bottom of the Hub. (There are displayed as read-only, and the button is labeled "Un-Register". 14 Once the product... ID number is accepted, the product ID numbers are six pairs of the Hub with the PC. Open the "Cable-Free USB Hub Connection Status" 6 screen (double-...
... association is handled automatically, so that no user intervention is ready for association. In the "Cable-Free USB Hub Details (Pairing)" section, enter the product ID number found on the bottom of the Hub. (There are displayed as read-only, and the button is labeled "Un-Register". 14 Once the product... ID number is accepted, the product ID numbers are six pairs of the Hub with the PC. Open the "Cable-Free USB Hub Connection Status" 6 screen (double-...
User Manual
Page 17
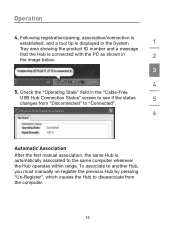
... must manually un-register the previous Hub by pressing "Un-Register", which causes the Hub to the same computer whenever the Hub operates within range. Operation 4. Check the "Operating State" field in the "Cable-Free USB Hub Connection Status" screen to see if the status 5 changes from "Disconnected..." to "Connected". 6 Automatic Association After the first manual association, the same Hub is connected with the PC as shown in the System 1 ...
... must manually un-register the previous Hub by pressing "Un-Register", which causes the Hub to the same computer whenever the Hub operates within range. Operation 4. Check the "Operating State" field in the "Cable-Free USB Hub Connection Status" screen to see if the status 5 changes from "Disconnected..." to "Connected". 6 Automatic Association After the first manual association, the same Hub is connected with the PC as shown in the System 1 ...

User Manual
Page 18
A tool tip is displayed in the System Tray area, containing the product ID and a message that the Hub is now connected with the PC. 4. Operation Changing Association/Registration (Pairing) 1 To change the association/registration from "Disconnected" to "Connected". 16 In the "Hub Connection Status" screen, click "Un-Register". 3 4 5 2. Check the "Operating State" field to see if the status changes from one Hub to associate and press "Register". 6 3. Enter the product ID number of the Hub to which you want to another: 2 1.
A tool tip is displayed in the System Tray area, containing the product ID and a message that the Hub is now connected with the PC. 4. Operation Changing Association/Registration (Pairing) 1 To change the association/registration from "Disconnected" to "Connected". 16 In the "Hub Connection Status" screen, click "Un-Register". 3 4 5 2. Check the "Operating State" field to see if the status changes from one Hub to associate and press "Register". 6 3. Enter the product ID number of the Hub to which you want to another: 2 1.
User Manual
Page 20
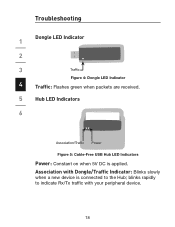
blinks rapidly to the Hub; Association with Dongle/Traffic Indicator: Blinks slowly when a new device is applied. Troubleshooting Dongle LED Indicator 1 2 3 Traffic Figure 4: Dongle LED Indicator 4 Traffic: Flashes green when packets are received. 5 Hub LED Indicators 6 Association/Traffic Power Figure 5: Cable-Free USB Hub LED Indicators Power: Constant on when 5V DC is connected to indicate Rx/Tx traffic with your peripheral device. 18
blinks rapidly to the Hub; Association with Dongle/Traffic Indicator: Blinks slowly when a new device is applied. Troubleshooting Dongle LED Indicator 1 2 3 Traffic Figure 4: Dongle LED Indicator 4 Traffic: Flashes green when packets are received. 5 Hub LED Indicators 6 Association/Traffic Power Figure 5: Cable-Free USB Hub LED Indicators Power: Constant on when 5V DC is connected to indicate Rx/Tx traffic with your peripheral device. 18
User Manual
Page 21
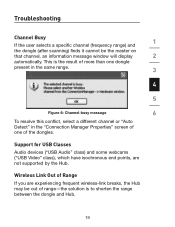
Support for USB Classes Audio devices ("USB Audio" class) and some webcams ("USB Video" class), which have isochronous end points, are experiencing frequent wireless-link breaks, the Hub may be the master on that channel, an information message window will display 2 automatically. Troubleshooting Channel Busy 1 If the user selects a specific channel (... select a different channel or "Auto Detect" in the "Connection Manager Properties" screen of one of Range If you are not supported by the Hub. Wireless Link Out of the dongles. This is to shorten the range between the dongle and...
Support for USB Classes Audio devices ("USB Audio" class) and some webcams ("USB Video" class), which have isochronous end points, are experiencing frequent wireless-link breaks, the Hub may be the master on that channel, an information message window will display 2 automatically. Troubleshooting Channel Busy 1 If the user selects a specific channel (... select a different channel or "Auto Detect" in the "Connection Manager Properties" screen of one of Range If you are not supported by the Hub. Wireless Link Out of the dongles. This is to shorten the range between the dongle and...
User Manual
Page 22
Troubleshooting Extended or External Wired USB Hub Connections 1 If you are connecting the dongle to a PC via an external wired USB hub, we recommend that you: 2 • Apply external power to the wired USB hub. • Do not use the external hub during initial connect and 3 driver installation. 4 5 6 20
Troubleshooting Extended or External Wired USB Hub Connections 1 If you are connecting the dongle to a PC via an external wired USB hub, we recommend that you: 2 • Apply external power to the wired USB hub. • Do not use the external hub during initial connect and 3 driver installation. 4 5 6 20
User Manual
Page 23
...firmware version in the "Cable-Free USB Dongle Details" section. Read the "Firmware version" field in the command prompt of each component as follows: 2 Belkin application In "Control Panel > Add or Remove Programs > 3 Cable-Free USB Hub > Click here for support information" ...4 for the automatically installed application. Cable-Free USB Hub firmware version Use a serial connector to ensure that ...
...firmware version in the "Cable-Free USB Dongle Details" section. Read the "Firmware version" field in the command prompt of each component as follows: 2 Belkin application In "Control Panel > Add or Remove Programs > 3 Cable-Free USB Hub > Click here for support information" ...4 for the automatically installed application. Cable-Free USB Hub firmware version Use a serial connector to ensure that ...
User Manual
Page 24
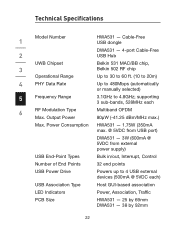
Output Power Multiband OFDM 80µW (-41.25 dBm/MHz max.) Max. Cable-Free USB dongle DWA531 - 4-port Cable-Free 2 USB Hub UWB Chipset 3 Operational Range Belkin 531 MAC/BB chip, Belkin 502 RF chip Up to 30 to 60 ft. (10 to 20m) 4 PHY Data Rate Up to 480Mbps (automatically or... manually selected) 5 Frequency Range 3.1GHz to 4 USB external devices (500mA @ 5VDC each 6 RF ...
Output Power Multiband OFDM 80µW (-41.25 dBm/MHz max.) Max. Cable-Free USB dongle DWA531 - 4-port Cable-Free 2 USB Hub UWB Chipset 3 Operational Range Belkin 531 MAC/BB chip, Belkin 502 RF chip Up to 30 to 60 ft. (10 to 20m) 4 PHY Data Rate Up to 480Mbps (automatically or... manually selected) 5 Frequency Range 3.1GHz to 4 USB external devices (500mA @ 5VDC each 6 RF ...
User Manual
Page 25
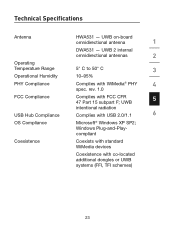
... with FCC CFR 47 Part 15 subpart F; rev. 1.0 Complies with WiMedia® PHY 4 spec. Windows Plug-and-Playcompliant Coexists with standard WiMedia devices Coexistence with USB 2.0/1.1 6 Microsoft® Windows XP SP2; UWB on-board omnidirectional antenna 1 DWA531 - UWB 5 intentional radiation Complies with co-located additional dongles or UWB systems (FFI, TFI...
... with FCC CFR 47 Part 15 subpart F; rev. 1.0 Complies with WiMedia® PHY 4 spec. Windows Plug-and-Playcompliant Coexists with standard WiMedia devices Coexistence with USB 2.0/1.1 6 Microsoft® Windows XP SP2; UWB on-board omnidirectional antenna 1 DWA531 - UWB 5 intentional radiation Complies with co-located additional dongles or UWB systems (FFI, TFI...

User Manual
Page 29
.... 4 Pioneer Avenue Tuggerah Business Park Tuggerah, NSW 2259, Australia +61 (0) 2 4350 4600 +61 (0) 2 4350 4700 fax © 2007 Belkin International, Inc. Cable-Free USB Hub Belkin Tech Support US: 310-898-1100, ext. 2263 800-223-5546, ext. 2263 UK: 0845 607 77 87 Australia: 1800 235 546 New Zealand...: 0800 235 546 Europe: www.belkin.com/support Belkin International, Inc. 501 West Walnut Street Los Angeles, CA 90220, USA 310-898-...
.... 4 Pioneer Avenue Tuggerah Business Park Tuggerah, NSW 2259, Australia +61 (0) 2 4350 4600 +61 (0) 2 4350 4700 fax © 2007 Belkin International, Inc. Cable-Free USB Hub Belkin Tech Support US: 310-898-1100, ext. 2263 800-223-5546, ext. 2263 UK: 0845 607 77 87 Australia: 1800 235 546 New Zealand...: 0800 235 546 Europe: www.belkin.com/support Belkin International, Inc. 501 West Walnut Street Los Angeles, CA 90220, USA 310-898-...


