
User Manual
Page 1
USB BusStation™ MODELS F5U100, F5U100-BLU, F5U100-SLV, F5U100-ORG User Manual P73281
USB BusStation™ MODELS F5U100, F5U100-BLU, F5U100-SLV, F5U100-ORG User Manual P73281
User Manual
Page 2
... of the many available Belkin USB modules, including SCSI ports, Ethernet ports, serial ports and more. It comes standard as a 7 port hub and is the best 7 port USB hub available because it 's USB, you to connect up to seven USB keyboards, mice, joysticks, printers, scanners, modems, or other USB devices to a single USB port on your Mac® or PC. The base is a 4 port hub and comes with three removable modules, each having one...
... of the many available Belkin USB modules, including SCSI ports, Ethernet ports, serial ports and more. It comes standard as a 7 port hub and is the best 7 port USB hub available because it 's USB, you to connect up to seven USB keyboards, mice, joysticks, printers, scanners, modems, or other USB devices to a single USB port on your Mac® or PC. The base is a 4 port hub and comes with three removable modules, each having one...
User Manual
Page 3
... with three removable modules each having one USB port. • Customizable. drivers are built into Windows® and Mac® OS. • Includes 4.0 Amp power supply to provide true 500ma per-port downstream current. • Per-port overcurrent protection prevents damage to fit your computer and device. • Fully compliant with current USB specifications. • LEDs indicate power and port status. • Supports all high-speed and low-speed USB devices...
... with three removable modules each having one USB port. • Customizable. drivers are built into Windows® and Mac® OS. • Includes 4.0 Amp power supply to provide true 500ma per-port downstream current. • Per-port overcurrent protection prevents damage to fit your computer and device. • Fully compliant with current USB specifications. • LEDs indicate power and port status. • Supports all high-speed and low-speed USB devices...

User Manual
Page 5
B, Windows® 98, Windows® 2000, Mac® OS 8.1 or higher PACKAGE INCLUDES • Belkin BusStation™ • USB Device Cable • 5 Volt 4 Amp power adapter • User Guide Installation 1. Your computer will instantly recognize that you connected a USB device. 5. You can now begin connecting your USB devices to the power jack of the BusStation™. 5 Connect the USB-B connector of the USB Device Cable into the Root Port of another hub. (See Figure 4). 4. Connect the...
B, Windows® 98, Windows® 2000, Mac® OS 8.1 or higher PACKAGE INCLUDES • Belkin BusStation™ • USB Device Cable • 5 Volt 4 Amp power adapter • User Guide Installation 1. Your computer will instantly recognize that you connected a USB device. 5. You can now begin connecting your USB devices to the power jack of the BusStation™. 5 Connect the USB-B connector of the USB Device Cable into the Root Port of another hub. (See Figure 4). 4. Connect the...

User Manual
Page 6
... be removed. 6 Configure it 's true Plug-and-Play! Unique stacking design of the BusStation™ and modules • Add modules to the BusStation™ from bottom to top. • Remove modules from the BusStation™ from a complete selection of modules that cover virtually every possible configuration. Need Ethernet? Need more . because it's USB, it to fit your own custom-configured multi-function USB hub or docking station. Add a 4 Port USB hub. Installation (cont...
... be removed. 6 Configure it 's true Plug-and-Play! Unique stacking design of the BusStation™ and modules • Add modules to the BusStation™ from bottom to top. • Remove modules from the BusStation™ from a complete selection of modules that cover virtually every possible configuration. Need Ethernet? Need more . because it's USB, it to fit your own custom-configured multi-function USB hub or docking station. Add a 4 Port USB hub. Installation (cont...
User Manual
Page 7
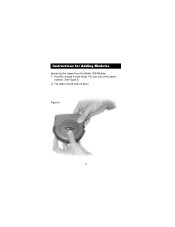
Pull one side of the sleeve outward. (See Figure 5). 2. Figure 5 7 Instructions for Adding Modules Removing the sleeve from the Belkin USB Module: 1. The sleeve should slide off easily. Hold the module in both hands.
Pull one side of the sleeve outward. (See Figure 5). 2. Figure 5 7 Instructions for Adding Modules Removing the sleeve from the Belkin USB Module: 1. The sleeve should slide off easily. Hold the module in both hands.
User Manual
Page 8
.... 8 More complex devices such as mice and keyboards will include a 2.1A power supply necessary for each port on Power Consumption USB specifies that each port, that's a total of current. Instruction for Adding Modules (cont'd.) When attaching additional modules to the BusStation™, there is no need to add a 4-port hub module, you must provide that 4-port hub with other non-hub modules poses no power issues. Replacing the one-port modules with additional...
.... 8 More complex devices such as mice and keyboards will include a 2.1A power supply necessary for each port on Power Consumption USB specifies that each port, that's a total of current. Instruction for Adding Modules (cont'd.) When attaching additional modules to the BusStation™, there is no need to add a 4-port hub module, you must provide that 4-port hub with other non-hub modules poses no power issues. Replacing the one-port modules with additional...

User Manual
Page 9
... the module into the BusStation™. Place the module you attached to add in Figure 5. 2. Figure 6 Modules should fit evenly on top of the USB module you wish to the BusStation™. 7. As you connected a USB device. The modules should ONLY be added starting from the USB module following the instructions in the first empty slot directly above the 4 Port hub. 3. Remove the sleeve from the 4 Port Hub base...
... the module into the BusStation™. Place the module you attached to add in Figure 5. 2. Figure 6 Modules should fit evenly on top of the USB module you wish to the BusStation™. 7. As you connected a USB device. The modules should ONLY be added starting from the USB module following the instructions in the first empty slot directly above the 4 Port hub. 3. Remove the sleeve from the 4 Port Hub base...
User Manual
Page 10
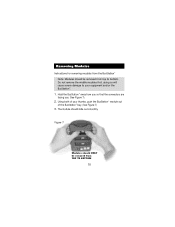
Hold the BusStation™ away from you so that the connectors are facing you. (See Figure 7). 2. Using both of your equipment and/or the BusStation™. 1. Figure 7 Modules should slide out smoothly. The module should ONLY be removed from top to your thumbs, push the BusStation™ module out of the BusStation™ bay. (See Figure 7) 3. Removing Modules Instructions for removing modules from the BusStation™ Note: Modules should be removed from TOP TO BOTTOM 10 Do not remove the middle modules first, doing so will cause severe damage to bottom.
Hold the BusStation™ away from you so that the connectors are facing you. (See Figure 7). 2. Using both of your equipment and/or the BusStation™. 1. Figure 7 Modules should slide out smoothly. The module should ONLY be removed from top to your thumbs, push the BusStation™ module out of the BusStation™ bay. (See Figure 7) 3. Removing Modules Instructions for removing modules from the BusStation™ Note: Modules should be removed from TOP TO BOTTOM 10 Do not remove the middle modules first, doing so will cause severe damage to bottom.
User Manual
Page 11
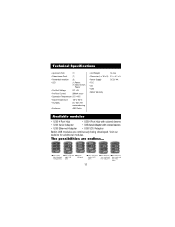
Visit our website for additional modules. s Seven port s Two serial and s Sixteen hub (standard eight USB USB ports configuration) ports s One serial and twelve USB ports s One Ethernet, s One Ethernet, one serial and two serial and five USB ports four USB ports 11 The possibilities are continuously being developed. Technical Specifications • Upstream Ports (1) • Downstream Ports (7) • Removable modules (3) • LED (1) Power, (7) Downstream Power • Per-Port Voltage DC +5V • Per-Port Current 500mA (max) • Operation Temperature ...
Visit our website for additional modules. s Seven port s Two serial and s Sixteen hub (standard eight USB USB ports configuration) ports s One serial and twelve USB ports s One Ethernet, s One Ethernet, one serial and two serial and five USB ports four USB ports 11 The possibilities are continuously being developed. Technical Specifications • Upstream Ports (1) • Downstream Ports (7) • Removable modules (3) • LED (1) Power, (7) Downstream Power • Per-Port Voltage DC +5V • Per-Port Current 500mA (max) • Operation Temperature ...

User Manual
Page 12
belkin.com Belkin Components 501 West Walnut Street Compton • CA • 90220 • USA Tel: 310.898.1100 Fax: 310.898.1111 Belkin Components, Ltd. All Trade Names Are Registered Trademarks Of Respective Manufacturers Listed. Diamantlaan 8 • 2132 WV Hoofddorp • The Netherlands Tel: +31 (0) 235698765 Fax: +31 (0) 235612694 © 2000 Belkin Components. P73281 Unit 13 • Gatelodge Close • Round Spinney Northampton • Northants • NN3 8RX • UK Tel: +44 (0) 1604678300 Fax: +44 (0) 1604678330 Belkin Components B.V. All Rights Reserved.
belkin.com Belkin Components 501 West Walnut Street Compton • CA • 90220 • USA Tel: 310.898.1100 Fax: 310.898.1111 Belkin Components, Ltd. All Trade Names Are Registered Trademarks Of Respective Manufacturers Listed. Diamantlaan 8 • 2132 WV Hoofddorp • The Netherlands Tel: +31 (0) 235698765 Fax: +31 (0) 235612694 © 2000 Belkin Components. P73281 Unit 13 • Gatelodge Close • Round Spinney Northampton • Northants • NN3 8RX • UK Tel: +44 (0) 1604678300 Fax: +44 (0) 1604678330 Belkin Components B.V. All Rights Reserved.


