
User Manual
Page 1
...1100 ext. 2263 800.223.5546 ext. 2263 Europe: 00 800 223 55 460 Australia: 1800 666 040 P74178 © 2002 Belkin Corporation. and other countries. All rights reserved. All trade names are trademarks of respective manufacturers listed. Mac and Mac OS are registered ... • CA • 90220 • USA Tel: 310.898.1100 Fax: 310.898.1111 Belkin Components, Ltd. OmniView™ KVM Switch Control up to four computers from one PS/2 console User Manual SE Plus Series F1DZ102T F1DZ104T Express Business Park • Shipton Way • Rushden NN10 6GL • United Kingdom Tel: +...
...1100 ext. 2263 800.223.5546 ext. 2263 Europe: 00 800 223 55 460 Australia: 1800 666 040 P74178 © 2002 Belkin Corporation. and other countries. All rights reserved. All trade names are trademarks of respective manufacturers listed. Mac and Mac OS are registered ... • CA • 90220 • USA Tel: 310.898.1100 Fax: 310.898.1111 Belkin Components, Ltd. OmniView™ KVM Switch Control up to four computers from one PS/2 console User Manual SE Plus Series F1DZ102T F1DZ104T Express Business Park • Shipton Way • Rushden NN10 6GL • United Kingdom Tel: +...

User Manual
Page 2
... • OmniView SE Plus Series KVM Switch • DB25-to delivering high-quality, durable products at a reasonable price. The Switch is the OmniView SE Plus Series KVM Switch, which surpasses any other switch on your purchase of this KVM Switch with the server administrator in the unlikely event of capacities suitable for all configurations, large or small. This manual will soon see for purchasing the Belkin OmniView SE Plus Series KVM Switch. Thank...
... • OmniView SE Plus Series KVM Switch • DB25-to delivering high-quality, durable products at a reasonable price. The Switch is the OmniView SE Plus Series KVM Switch, which surpasses any other switch on your purchase of this KVM Switch with the server administrator in the unlikely event of capacities suitable for all configurations, large or small. This manual will soon see for purchasing the Belkin OmniView SE Plus Series KVM Switch. Thank...

User Manual
Page 3
.... A flashing port LED indicates that there is no computer connected to obtain the latest firmware upgrades for your Switch. OVERVIEW OmniView SE Plus Series KVM Switches allow for simple, manual port-selection. The time interval allotted for each individual computer, preventing unintended information exchange.... preserve signal integrity at belkin.com for the life of four switches to set your Switch requires 75-Ohm coaxial VGA cabling. You can add more ports to indicate that port. 7-Segment LED Display When daisy-chaining multiple KVM Switches together, the 7-segment LED...
.... A flashing port LED indicates that there is no computer connected to obtain the latest firmware upgrades for your Switch. OVERVIEW OmniView SE Plus Series KVM Switches allow for simple, manual port-selection. The time interval allotted for each individual computer, preventing unintended information exchange.... preserve signal integrity at belkin.com for the life of four switches to set your Switch requires 75-Ohm coaxial VGA cabling. You can add more ports to indicate that port. 7-Segment LED Display When daisy-chaining multiple KVM Switches together, the 7-segment LED...

User Manual
Page 4
... • SVGA • MultiSync® 5 nickel-plated connectors for added durability; OmniView Cables are available in feet) 4 OVERVIEW Operating Systems OmniView SE Plus Series KVM Switches are recommended for your OmniView SE Plus Series KVM Switch: OmniView All-In-One PRO Series Plus F3X1105-XX (PS/2 Style) F3X1962-XX (USB Style) OmniView All-In-One Gold Series F3X1835-XX-GLD (PS/2 Style) F3X1895-XX-GLD (USB Style) (-XX...
... • SVGA • MultiSync® 5 nickel-plated connectors for added durability; OmniView Cables are available in feet) 4 OVERVIEW Operating Systems OmniView SE Plus Series KVM Switches are recommended for your OmniView SE Plus Series KVM Switch: OmniView All-In-One PRO Series Plus F3X1105-XX (PS/2 Style) F3X1962-XX (USB Style) OmniView All-In-One Gold Series F3X1835-XX-GLD (PS/2 Style) F3X1895-XX-GLD (USB Style) (-XX...

User Manual
Page 5
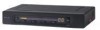
... identification 7-segment LED for selected BANK identification Direct-access port selector Manual BANK scroll buttons The Side of the OmniView SE Plus Series KVM Switch: BANK DIP switch FLASH DIP switch ON ON BANK 1 2 3 4 5 6 1 2 3 4 FLASH 6 OVERVIEW The Back of the OmniView SE Plus Series KVM Switch: Console VGA Computer VGA port Computer USB port Flash upgrade port Slave Input Master Input/Slave Output Console...
... identification 7-segment LED for selected BANK identification Direct-access port selector Manual BANK scroll buttons The Side of the OmniView SE Plus Series KVM Switch: BANK DIP switch FLASH DIP switch ON ON BANK 1 2 3 4 5 6 1 2 3 4 FLASH 6 OVERVIEW The Back of the OmniView SE Plus Series KVM Switch: Console VGA Computer VGA port Computer USB port Flash upgrade port Slave Input Master Input/Slave Output Console...

User Manual
Page 6
... best retained when transmitted up to 15 feet between the Switch and the CPU. Note: If you intend to use to connect your computers to the Switch. By using the Belkin CAT5 Extender (F1D084) with a standard CAT5 UPT cable....F1DZ104T) Keyboard Emulation: PS/2 Mouse Emulation: PS/2 Monitor Supported: VGA, SVGA, MultiSync, and LCD (optional adapter may increase the distance between your Switch and your PS/2 keyboard, PS/2 mouse, and monitor by as much as 500 feet without notice. 8 INSTALLATION Pre-Configuration Where to Place the Switch The enclosure of the OmniView SE Plus Series KVM Switch...
... best retained when transmitted up to 15 feet between the Switch and the CPU. Note: If you intend to use to connect your computers to the Switch. By using the Belkin CAT5 Extender (F1D084) with a standard CAT5 UPT cable....F1DZ104T) Keyboard Emulation: PS/2 Mouse Emulation: PS/2 Monitor Supported: VGA, SVGA, MultiSync, and LCD (optional adapter may increase the distance between your Switch and your PS/2 keyboard, PS/2 mouse, and monitor by as much as 500 feet without notice. 8 INSTALLATION Pre-Configuration Where to Place the Switch The enclosure of the OmniView SE Plus Series KVM Switch...

User Manual
Page 7
Belkin is ready for connecting...to the side of a single SE Plus Series KVM Switch. Note: If this User Manual labeled "Connecting Multiple KVM Switches (Daisy-Chaining)". 1. Attach the bracket to your Switch with the Phillips screws provided. (Refer to diagram below.) 4. Mount the Switch to the KVM Switch 1. Attach the power supply ...F1DZ104T). Connect the PS/2 keyboard cable to the keyboard port on may cause irreversible damage to the back. 10 INSTALLATION Single KVM Switch Installation This section provides complete instructions for the hardware setup of your Switch...
Belkin is ready for connecting...to the side of a single SE Plus Series KVM Switch. Note: If this User Manual labeled "Connecting Multiple KVM Switches (Daisy-Chaining)". 1. Attach the bracket to your Switch with the Phillips screws provided. (Refer to diagram below.) 4. Mount the Switch to the KVM Switch 1. Attach the power supply ...F1DZ104T). Connect the PS/2 keyboard cable to the keyboard port on may cause irreversible damage to the back. 10 INSTALLATION Single KVM Switch Installation This section provides complete instructions for the hardware setup of your Switch...

User Manual
Page 8
...other end (the female connector) of the VGA cable to the back of the Switch for the appropriate port you attach the KVM cable directly to the back of the Switch (for example, "VGA 02"). 2. Using an OmniView KVM Cable (F3X1962-XX or F3X1895-XX-GLD), plug in the male VGA connector ... and mouse connected directly to the VGA port on the Switch (F3X1105-XX or F3X1835-XX-GLD). 3. Connect the other end of the cables to the corresponding port on your computer. INSTALLATION Connect the Computer PS/2 Installation 1. Using an OmniView KVM Cable (F3X1105-XX or F3X1835-XX-GLD), plug in ...
...other end (the female connector) of the VGA cable to the back of the Switch for the appropriate port you attach the KVM cable directly to the back of the Switch (for example, "VGA 02"). 2. Using an OmniView KVM Cable (F3X1962-XX or F3X1895-XX-GLD), plug in the male VGA connector ... and mouse connected directly to the VGA port on the Switch (F3X1105-XX or F3X1835-XX-GLD). 3. Connect the other end of the cables to the corresponding port on your computer. INSTALLATION Connect the Computer PS/2 Installation 1. Using an OmniView KVM Cable (F3X1105-XX or F3X1835-XX-GLD), plug in ...

User Manual
Page 9
...be set to a unique BANK address (from 01 through your Belkin reseller or online at belkin.com. Example: Four OmniView SE Plus Series KVM Switches (F1DZ104T) are referred to as the "Master" switch. INSTALLATION DIP Switch Configuration Chart DIP SWITCH# 1234 56 ON ON ON ON ON ON ON ON OFF ...address 00". BANKs 01 through 03 are each unit is set the BANK DIP switch on the Master unit is referred to as "Slave" switches. All OmniView SE Plus Series KVM Switches feature a "BANK DIP" switch. Refer to the chart below for proper identification and usage of 16 computers. ...
...be set to a unique BANK address (from 01 through your Belkin reseller or online at belkin.com. Example: Four OmniView SE Plus Series KVM Switches (F1DZ104T) are referred to as the "Master" switch. INSTALLATION DIP Switch Configuration Chart DIP SWITCH# 1234 56 ON ON ON ON ON ON ON ON OFF ...address 00". BANKs 01 through 03 are each unit is set the BANK DIP switch on the Master unit is referred to as "Slave" switches. All OmniView SE Plus Series KVM Switches feature a "BANK DIP" switch. Refer to the chart below for proper identification and usage of 16 computers. ...

User Manual
Page 10
... all occupied ports to them and that the keyboard, monitor, and mouse are detected properly, the LED display on the monitor. Place Master and Slave switches in this manual titled "Single KVM Switch Installation" for additional switches you have the correct BANK address assigned to verify that each unit's power supply. Each...
... all occupied ports to them and that the keyboard, monitor, and mouse are detected properly, the LED display on the monitor. Place Master and Slave switches in this manual titled "Single KVM Switch Installation" for additional switches you have the correct BANK address assigned to verify that each unit's power supply. Each...

User Manual
Page 12
...your firmware only if you through the process of the RJ45 to the Switch's flash-upgrade jack. An available parallel port on the Switch will need assistance. Firmware update files. 20 USING YOUR KVM SWITCH Connecting Computers 1. Connect the custom flash cable (DB25 male-to prevent ...not be adjusted. Please contact Belkin Tech Support if you prepared for 10 seconds, before switching to update the particular firmware. This computer must run Windows XP, 2000, NT, 95, 98, or Me. 2. Updating Firmware To update your Switch. USING YOUR KVM SWITCH AutoScan Mode Pressing the AutoScan...
...your firmware only if you through the process of the RJ45 to the Switch's flash-upgrade jack. An available parallel port on the Switch will need assistance. Firmware update files. 20 USING YOUR KVM SWITCH Connecting Computers 1. Connect the custom flash cable (DB25 male-to prevent ...not be adjusted. Please contact Belkin Tech Support if you prepared for 10 seconds, before switching to update the particular firmware. This computer must run Windows XP, 2000, NT, 95, 98, or Me. 2. Updating Firmware To update your Switch. USING YOUR KVM SWITCH AutoScan Mode Pressing the AutoScan...


