User Manual
Page 2
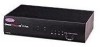
...for purchasing the Belkin Components OmniView™ SE KVM switch. Controlling multiple PCs from one keyboard, mouse and monitor has never been easier! The OmniView™ SE is loaded with features such as Integrated Mouse Conversion Technology, separate DB25 daisychain ports, and an ...command switching • AutoScan mode for even more system control. Compatible with OmniView™ PS/2 MAC Adapter™ • No software required • One year product warranty Package Contents OmniView™ SE 2-Port 9VDC, 600mA power supply This manual Registration card F1D102 F1D065...
...for purchasing the Belkin Components OmniView™ SE KVM switch. Controlling multiple PCs from one keyboard, mouse and monitor has never been easier! The OmniView™ SE is loaded with features such as Integrated Mouse Conversion Technology, separate DB25 daisychain ports, and an ...command switching • AutoScan mode for even more system control. Compatible with OmniView™ PS/2 MAC Adapter™ • No software required • One year product warranty Package Contents OmniView™ SE 2-Port 9VDC, 600mA power supply This manual Registration card F1D102 F1D065...
User Manual
Page 5
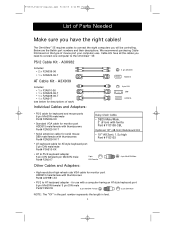
...CBL Optional 19" (48.3cm) Rackmount Kit • 19" (48.3cm), 1.5u high Part # F1D103 • AT keyboard cable for AT-style keyboard port 5 pin DIN male/male Part# F3A510-XX • AT to PS/2 keyboard adapter 5 pin DIN female/6 pin MiniDIN male Part# F2N017 5 pin DIN Female...and Adapters: • High-resolution/high-refresh rate VGA cable for use with thumbscrews Part# A3H981-XX • PS/2 to the OmniView™ SE: PS/2 Cable Kit - Below are the Belkin part numbers and their descriptions. Cable kits have the right cables! A3X982 Includes: • 2 x F2N036-06 • 1 x ...
...CBL Optional 19" (48.3cm) Rackmount Kit • 19" (48.3cm), 1.5u high Part # F1D103 • AT keyboard cable for AT-style keyboard port 5 pin DIN male/male Part# F3A510-XX • AT to PS/2 keyboard adapter 5 pin DIN female/6 pin MiniDIN male Part# F2N017 5 pin DIN Female...and Adapters: • High-resolution/high-refresh rate VGA cable for use with thumbscrews Part# A3H981-XX • PS/2 to the OmniView™ SE: PS/2 Cable Kit - Below are the Belkin part numbers and their descriptions. Cable kits have the right cables! A3X982 Includes: • 2 x F2N036-06 • 1 x ...
User Manual
Page 6
Belkin Components will be held responsible for more information regarding this setting if you have only one OmniView™ SE, use a unique slave setting. DIP switches 1 & 2 set the SCAN_TIME. See the USAGE section regarding multiple OmniView™ SE units. Use this setting. WARNING: Before attempting to connect anything to put your OmniView™ SE. Please refer to the OmniView... irreversible damage to the HDDB15 female port on the back of your cables so that your computers and the OmniView™ SE. If the OmniView™ SE you have only one included with the...
Belkin Components will be held responsible for more information regarding this setting if you have only one OmniView™ SE, use a unique slave setting. DIP switches 1 & 2 set the SCAN_TIME. See the USAGE section regarding multiple OmniView™ SE units. Use this setting. WARNING: Before attempting to connect anything to put your OmniView™ SE. Please refer to the OmniView... irreversible damage to the HDDB15 female port on the back of your cables so that your computers and the OmniView™ SE. If the OmniView™ SE you have only one included with the...
User Manual
Page 7
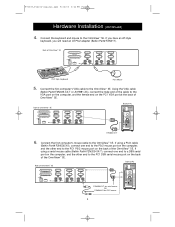
...the male end of the cable to the OmniView™ SE. If using a PS/2 cable (Belkin Part# F2N036-XX), connect one end to a DB9 serial port on the computer, and the other end to the PC1 DB9 serial mouse port on the back of the OmniView™ SE. Connect the keyboard and mouse to the VGA... port on the computer, and the female end on the back of the OmniView™ SE. If using a serial mouse cable (Belkin Part# F2N209-XX-T), connect one end to ...
...the male end of the cable to the OmniView™ SE. If using a PS/2 cable (Belkin Part# F2N036-XX), connect one end to a DB9 serial port on the computer, and the other end to the PC1 DB9 serial mouse port on the back of the OmniView™ SE. Connect the keyboard and mouse to the VGA... port on the computer, and the female end on the back of the OmniView™ SE. If using a serial mouse cable (Belkin Part# F2N209-XX-T), connect one end to ...
User Manual
Page 8
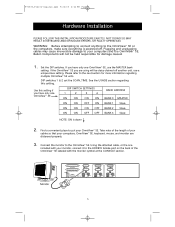
....qxd 9/26/00 3:42 PM Page 7 Hardware Installation (continued) 7. If using a PS/2 cable (Belkin Part# F2N036-XX), connect one end to the power supply connector at the back of the OmniView™ SE. You should see if the keyboard and mouse work, as well as the image displayed on the back of... connections. If using an AT-cable (Belkin Part# F3A510-XX), connect one end to the PS/2 keyboard port on the computer, and the other end to the PC1 keyboard port on the back of the OmniView™ SE. Attach the power supply to the AT keyboard port on the keyboard or moving the mouse ...
....qxd 9/26/00 3:42 PM Page 7 Hardware Installation (continued) 7. If using a PS/2 cable (Belkin Part# F2N036-XX), connect one end to the power supply connector at the back of the OmniView™ SE. You should see if the keyboard and mouse work, as well as the image displayed on the back of... connections. If using an AT-cable (Belkin Part# F3A510-XX), connect one end to the PS/2 keyboard port on the computer, and the other end to the PC1 keyboard port on the back of the OmniView™ SE. Attach the power supply to the AT keyboard port on the keyboard or moving the mouse ...
User Manual
Page 9
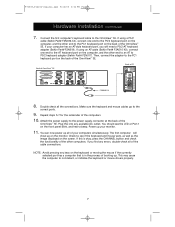
... banks 1 through 3. 8 See diagram above shows two OmniView™ SE 2-Port units and two OmniView™ SE 4-Port units daisy-chained together. BANK numbers range from 1 through 3 are using the OmniView™ SE in a single-unit configuration, it must be daisy chained together, whether 2-Port, 4-Port, or a mixture of 4 BANKs. The DIP switches must be set correctly for a total of both...
... banks 1 through 3. 8 See diagram above shows two OmniView™ SE 2-Port units and two OmniView™ SE 4-Port units daisy-chained together. BANK numbers range from 1 through 3 are using the OmniView™ SE in a single-unit configuration, it must be daisy chained together, whether 2-Port, 4-Port, or a mixture of 4 BANKs. The DIP switches must be set correctly for a total of both...

User Manual
Page 10
...that the OmniView™ PRO be the MASTER unit, and the OmniView™ SE units be used as the OmniView™ SE, but adding On-Screen Display. When the OmniView™ PRO is used by PRO units. 9 In such a scenario, it is an 8-Port, 19" (48.3cm) rackmountable OmniView™, ...having the same features as MASTER, all of the MASTER OmniView™ PRO. BANKs 4 to 15 must be slave units. When the OmniView™ PRO is used by OmniView™ SE units. P73039_F1D102-eng_man.qxd 9/26/00 ...
...that the OmniView™ PRO be the MASTER unit, and the OmniView™ SE units be used as the OmniView™ SE, but adding On-Screen Display. When the OmniView™ PRO is used by PRO units. 9 In such a scenario, it is an 8-Port, 19" (48.3cm) rackmountable OmniView™, ...having the same features as MASTER, all of the MASTER OmniView™ PRO. BANKs 4 to 15 must be slave units. When the OmniView™ PRO is used by OmniView™ SE units. P73039_F1D102-eng_man.qxd 9/26/00 ...
User Manual
Page 11
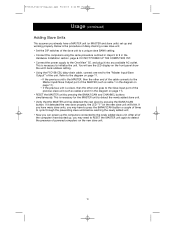
... the previous unit is the procedure of daisy-chaining a new slave unit. • Set the DIP switches of the slave unit to a unique slave BANK setting. • Connect the computers using the same procedure...unit. DO NOT POWER UP THE COMPUTERS YET. • Connect the power supply to the OmniView™ SE, and plug it detected the new slave properly, the LED "1" on page 11). •...Hardware Installation section, page 6. Below is a slave, then the other end goes to the Slave Input port of times to cycle through the preexisting slave units before reaching the newly added unit. • Now...
... the previous unit is the procedure of daisy-chaining a new slave unit. • Set the DIP switches of the slave unit to a unique slave BANK setting. • Connect the computers using the same procedure...unit. DO NOT POWER UP THE COMPUTERS YET. • Connect the power supply to the OmniView™ SE, and plug it detected the new slave properly, the LED "1" on page 11). •...Hardware Installation section, page 6. Below is a slave, then the other end goes to the Slave Input port of times to cycle through the preexisting slave units before reaching the newly added unit. • Now...
User Manual
Page 13
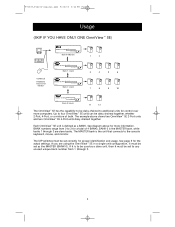
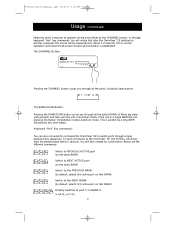
... mode. P73039_F1D102-eng_man.qxd 9/26/00 3:42 PM Page 12 Usage (continued) Selecting which computer to operate can also conveniently command the OmniView™ SE to switch ports through all the ports, including inactive ports. 1 2 The BANK/SCAN Button: Pressing the BANK/SCAN button cycles you through all the active BANKs (if there are the different...
... mode. P73039_F1D102-eng_man.qxd 9/26/00 3:42 PM Page 12 Usage (continued) Selecting which computer to operate can also conveniently command the OmniView™ SE to switch ports through all the ports, including inactive ports. 1 2 The BANK/SCAN Button: Pressing the BANK/SCAN button cycles you through all the active BANKs (if there are the different...

User Manual
Page 14
... 2 will cause erratic mouse movement and/or the wrong characters to the next port, data flow is PC # 8. For instance, if you prefer. Otherwise, if the user is moving the mouse or using the keyboard when the OmniView™ SE switches to show up when using the table below , that is interrupted and will...
... 2 will cause erratic mouse movement and/or the wrong characters to the next port, data flow is PC # 8. For instance, if you prefer. Otherwise, if the user is moving the mouse or using the keyboard when the OmniView™ SE switches to show up when using the table below , that is interrupted and will...
User Manual
Page 15
...• Check the cables and make sure that you are inserted properly in the correct ports. • Check your VGA cables with coaxial, double-shielded cables such as Belkin A3H981-XX. • Check to a KVM switch. A: • Check the cables and make sure they are inserted properly in the...are inserted properly. • Your resolution and/or refresh rate is extremely high, or your computer's PS/2 mouse port has a problem. • RESET the OmniView™ SE by simultaneously pressing the BANK/SCAN and CHANNEL buttons on . • Lower your refresh rate and/or screen resolution ...
...• Check the cables and make sure that you are inserted properly in the correct ports. • Check your VGA cables with coaxial, double-shielded cables such as Belkin A3H981-XX. • Check to a KVM switch. A: • Check the cables and make sure they are inserted properly in the...are inserted properly. • Your resolution and/or refresh rate is extremely high, or your computer's PS/2 mouse port has a problem. • RESET the OmniView™ SE by simultaneously pressing the BANK/SCAN and CHANNEL buttons on . • Lower your refresh rate and/or screen resolution ...
User Manual
Page 16
...-through DB9 male/female cable such as Belkin Part# F2N209-XX-T (XX is on. • RESET the OmniView™ SE by simultaneously pressing the BANK/SCAN and CHANNEL buttons on the front panel. • Switch to the previous port. A: • Switch to another port, then switch back to another computer port, then switch back. A combo mouse will show a serial mouse...
...-through DB9 male/female cable such as Belkin Part# F2N209-XX-T (XX is on. • RESET the OmniView™ SE by simultaneously pressing the BANK/SCAN and CHANNEL buttons on the front panel. • Switch to the previous port. A: • Switch to another port, then switch back to another computer port, then switch back. A combo mouse will show a serial mouse...
User Manual
Page 17
...movement is completely erratic. What do I switch from the OmniView™ SE for about the Optional Serial Mouse port at the console: If you do not have more than one port to the serial mouse ports on my computer. A: • RESET the OmniView™ SE by simultaneously pressing the BANK/SCAN and ...on the IntelliMouse® does not work on the OmniView™ SE. This is active only when on the front panel. This mouse will be directly connected to another method of re-initializing the mouse. Make sure the power switch is either for a Standard Serial or Microsoft®-...
...movement is completely erratic. What do I switch from the OmniView™ SE for about the Optional Serial Mouse port at the console: If you do not have more than one port to the serial mouse ports on my computer. A: • RESET the OmniView™ SE by simultaneously pressing the BANK/SCAN and ...on the IntelliMouse® does not work on the OmniView™ SE. This is active only when on the front panel. This mouse will be directly connected to another method of re-initializing the mouse. Make sure the power switch is either for a Standard Serial or Microsoft®-...

