
User Manual
Page 1
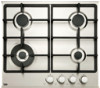
Built-in Hob User Manual HIMW 64225 S
Built-in Hob User Manual HIMW 64225 S
User Manual
Page 2
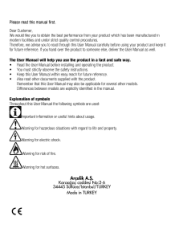
... read other models. Warning for hot surfaces. Dear Customer, We would like you hand over the product to obtain the best performance from your product which has been manufactured in a fast and safe way. • Read the User Manual before installing and operating the product. • You must strictly observe the safety instructions. • Keep this User Manual carefully before using your...
... read other models. Warning for hot surfaces. Dear Customer, We would like you hand over the product to obtain the best performance from your product which has been manufactured in a fast and safe way. • Read the User Manual before installing and operating the product. • You must strictly observe the safety instructions. • Keep this User Manual carefully before using your...
User Manual
Page 3
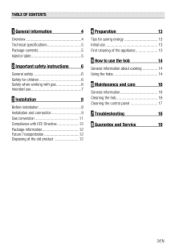
... 13 Technical specifications 5 Initial use 13 Package contents 5 First cleaning of the appliance 13 Injector table 5 E Important safety instructions IM How to use the hob 6 General information about cooking 14 14 General safety 6 Using the hobs 14 Safety for children Safety when working with gas Intended use 6 6 6 Maintenance and care 16 7 General information 16 M Installation Before installation 8 Cleaning the hob 16 Cleaning the control panel 17 8 Installation and connection 9 M Troubleshooting 18 Gas conversion 11 Compliance...
... 13 Technical specifications 5 Initial use 13 Package contents 5 First cleaning of the appliance 13 Injector table 5 E Important safety instructions IM How to use the hob 6 General information about cooking 14 14 General safety 6 Using the hobs 14 Safety for children Safety when working with gas Intended use 6 6 6 Maintenance and care 16 7 General information 16 M Installation Before installation 8 Cleaning the hob 16 Cleaning the control panel 17 8 Installation and connection 9 M Troubleshooting 18 Gas conversion 11 Compliance...
User Manual
Page 5
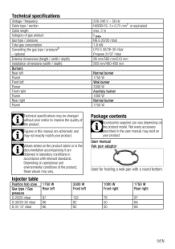
... dimensions (height / width / depth) Installation dimensions (width / depth) Burners Rear left Power Front left 132 92 92 1000 W Front right 78 50 50 1750 W Rear right 97 66 66 5/EN Depending on the product model. User manual Vok pan adaptor Used for hosting a wok pan with relevant standards. Figures in this manual are obtained in laboratory conditions in the documentation accompanying it are schematic...
... dimensions (height / width / depth) Installation dimensions (width / depth) Burners Rear left Power Front left 132 92 92 1000 W Front right 78 50 50 1750 W Rear right 97 66 66 5/EN Depending on the product model. User manual Vok pan adaptor Used for hosting a wok pan with relevant standards. Figures in this manual are obtained in laboratory conditions in the documentation accompanying it are schematic...
User Manual
Page 6
... INSTRUCTIONS Safety when working with water! See Troubleshooting, page 18. • Never wash down . • Do not place any repairs or modifications. Children should be supervised to prevent them to the installation, ensure that the local distribution conditions (nature of the gas and gas pressure) and the adjustment of electric shock! • Never use the product when your dishes. Alcohol evaporates at high...
... INSTRUCTIONS Safety when working with water! See Troubleshooting, page 18. • Never wash down . • Do not place any repairs or modifications. Children should be supervised to prevent them to the installation, ensure that the local distribution conditions (nature of the gas and gas pressure) and the adjustment of electric shock! • Never use the product when your dishes. Alcohol evaporates at high...
User Manual
Page 7
... be installed and connected in What to the relevant requirements regarding ^•I DANGER Do not use or handling telephone numbers and safety measures in very small doses. Open doors and windows. 3. If you are secured by its manufacturer or when necessary. • Clean the gas burners regularly. Use a telephone outside the house. 5.1 If you have door or gates that the kitchen...
... be installed and connected in What to the relevant requirements regarding ^•I DANGER Do not use or handling telephone numbers and safety measures in very small doses. Open doors and windows. 3. If you are secured by its manufacturer or when necessary. • Clean the gas burners regularly. Use a telephone outside the house. 5.1 If you have door or gates that the kitchen...
User Manual
Page 8
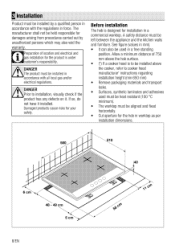
...; Prior to cooker hood manufacturer' instructions regarding installation height (min 650 mm) • Remove packaging materials and transport locks. • Surfaces, synthetic laminates and adhesives used in accordance with the regulations in force. A safety distance must be left between the appliance and the kitchen walls and furniture. Allow a minimum distance of location and electrical and gas installation for installation in worktop as per installation dimensions. 580 10 40...
...; Prior to cooker hood manufacturer' instructions regarding installation height (min 650 mm) • Remove packaging materials and transport locks. • Surfaces, synthetic laminates and adhesives used in accordance with the regulations in force. A safety distance must be left between the appliance and the kitchen walls and furniture. Allow a minimum distance of location and electrical and gas installation for installation in worktop as per installation dimensions. 580 10 40...
User Manual
Page 9
... risk of electric shock, short circuit or fire! • Connection must be located in a kitchen, kitchen/diner or a bed-sitting room, but not in cable diagram. Do not install this instruction may be installed. The product's warranty period starts only after correct installation. Otherwise, there is no window or door available for room ventilation, an extra ventilation must comply with a minimum contact clearance of...
... risk of electric shock, short circuit or fire! • Connection must be located in a kitchen, kitchen/diner or a bed-sitting room, but not in cable diagram. Do not install this instruction may be installed. The product's warranty period starts only after correct installation. Otherwise, there is no window or door available for room ventilation, an extra ventilation must comply with a minimum contact clearance of...

User Manual
Page 10
... unprofessional repairs! There is equipped for natural gas (NG). Route the power cable so that the skirting sections on cable clamping component. 4. Gas connection Ag DANGER •v Product can secure your hob to the counter by forming bends at the outlet of explosion or toxication due to the main body with a screwdriver. 3. Remove burners, burner caps and grills on a flat surface. 3. Insert the power...
... unprofessional repairs! There is equipped for natural gas (NG). Route the power cable so that the skirting sections on cable clamping component. 4. Gas connection Ag DANGER •v Product can secure your hob to the counter by forming bends at the outlet of explosion or toxication due to the main body with a screwdriver. 3. Remove burners, burner caps and grills on a flat surface. 3. Insert the power...
User Manual
Page 11
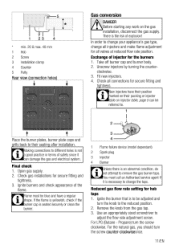
...'s gas type, change the taps. Unscrew injectors by turning the counter- New injectors have a regular shape. ou must be blue and have their position marked on their seating after installation. Remove the knob from the gas tap. 3. Check gas installations for hob taps 1. Ignite the burner that is to be referred to. 2 t Place the burner plates, burner plate caps and grills back to adjust the flow rate adjustment screw. Use an...
...'s gas type, change the taps. Unscrew injectors by turning the counter- New injectors have a regular shape. ou must be blue and have their position marked on their seating after installation. Remove the knob from the gas tap. 3. Check gas installations for hob taps 1. Ignite the burner that is to be referred to. 2 t Place the burner plates, burner plate caps and grills back to adjust the flow rate adjustment screw. Use an...
User Manual
Page 12
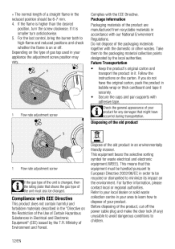
... type of gas tap used in your product. Package information Packaging materials of the product are manufactured from recyclable materials in bubble wrap or thick cardboard and tape it securely. • Secure the caps and pan supports with the domestic or other wastes. Check the general ...flame is smaller turn the screw clockwise. Compliance with the EEE Directive. Dispose of the old product in your area to learn how to be changed. For the last control, bring the burner both to high-flame and reduced positions and check whether the flame is changed, then he rating ...
... type of gas tap used in your product. Package information Packaging materials of the product are manufactured from recyclable materials in bubble wrap or thick cardboard and tape it securely. • Secure the caps and pan supports with the domestic or other wastes. Check the general ...flame is smaller turn the screw clockwise. Compliance with the EEE Directive. Dispose of the old product in your area to learn how to be changed. For the last control, bring the burner both to high-flame and reduced positions and check whether the flame is changed, then he rating ...

User Manual
Page 13
... cover, energy consumption may increase 4 times. • Select the burner which may result in an ecological way, and to save energy: • Defrost frozen dishes before cooking them. • Use pots/pans with a cloth. 13/EN Remove all packaging materials. 2. Always select the correct pot size for your appliance in shattering of the pot to clean the oven door glass...
... cover, energy consumption may increase 4 times. • Select the burner which may result in an ecological way, and to save energy: • Defrost frozen dishes before cooking them. • Use pots/pans with a cloth. 13/EN Remove all packaging materials. 2. Always select the correct pot size for your appliance in shattering of the pot to clean the oven door glass...

User Manual
Page 14
.... Gas cooking • Size of it to do not put covers of food in saucepans and pans. Adjust it . Turning off (upper) position. 1 4/EN Such vessels should not be used on cooking zones. Do not put plastic and aluminum vessels on . Adjust the gas flames so that their handles are switched on it. Large flame symbol indicates the highest cooking power and small flame symbol indicates the lowest cooking symbol. Turn it...
.... Gas cooking • Size of it to do not put covers of food in saucepans and pans. Adjust it . Turning off (upper) position. 1 4/EN Such vessels should not be used on cooking zones. Do not put plastic and aluminum vessels on . Adjust the gas flames so that their handles are switched on it. Large flame symbol indicates the highest cooking power and small flame symbol indicates the lowest cooking symbol. Turn it...
User Manual
Page 15
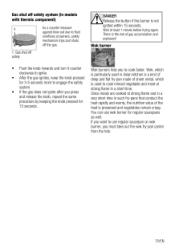
... 1 minute before trying again. Gas shut off safety system (in models with thermic component) As a counter measure against blow out due to cook faster. Wok burner • Push the knob inwards and turn it counter clockwise to ignite. • After the gas ignites, keep the knob pressed for 3-5 seconds more to use wok burner for 15 seconds. Wok burners help you press and release the knob, repeat the same procedure by...
... 1 minute before trying again. Gas shut off safety system (in models with thermic component) As a counter measure against blow out due to cook faster. Wok burner • Push the knob inwards and turn it counter clockwise to ignite. • After the gas ignites, keep the knob pressed for 3-5 seconds more to use wok burner for 15 seconds. Wok burners help you press and release the knob, repeat the same procedure by...
User Manual
Page 16
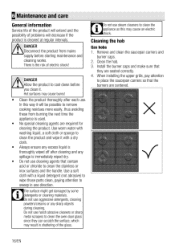
... used. • No special cleaning agents are required for cleaning the product. When installing the upper grills, pay attention to remove cooking residues more easily, thus avoiding these from mains supply before you clean it. Hot surfaces may cause an electric shock. Do not use . 6 Maintenance and care General information Service life of the product will extend and the possibility of the glass. Cleaning the hob Gas hobs 1. Install the burner caps...
... used. • No special cleaning agents are required for cleaning the product. When installing the upper grills, pay attention to remove cooking residues more easily, thus avoiding these from mains supply before you clean it. Hot surfaces may cause an electric shock. Do not use . 6 Maintenance and care General information Service life of the product will extend and the possibility of the glass. Cleaning the hob Gas hobs 1. Install the burner caps...

User Manual
Page 17
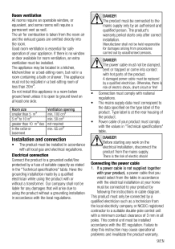
Cleaning the control panel Clean the control panel and knobs with a damp cloth and wipe them dry. Control panel may get damaged! 1 2 1 Knob 2 Sealing element Do not remove the sealing elements under the knobs for cleaning. 17/EN Do not remove the control buttons/knobs to clean the control panel.
Cleaning the control panel Clean the control panel and knobs with a damp cloth and wipe them dry. Control panel may get damaged! 1 2 1 Knob 2 Sealing element Do not remove the sealing elements under the knobs for cleaning. 17/EN Do not remove the control buttons/knobs to clean the control panel.
User Manual
Page 18
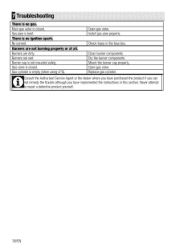
... gas valve. Clean burner components. Open gas valve. Troubleshooting There is no ignition spark. There is empty (when using LPG). Burners are not burning properly or at all. Install gas pipe properly. Dry the burner components. Replace gas cylinder. 0 Consult the Authorised Service Agent or the dealer where you have purchased the product if you can not remedy the trouble although you have implemented the instructions in the fuse box. Never...
... gas valve. Clean burner components. Open gas valve. Troubleshooting There is no ignition spark. There is empty (when using LPG). Burners are not burning properly or at all. Install gas pipe properly. Dry the burner components. Replace gas cylinder. 0 Consult the Authorised Service Agent or the dealer where you have purchased the product if you can not remedy the trouble although you have implemented the instructions in the fuse box. Never...
User Manual
Page 19
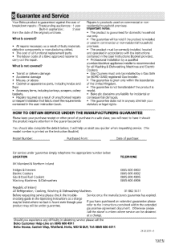
..., or abuse. • Cabinet or appearance parts, including knobs and flaps • Accessory items, including ice trays, scrapers, cutlery baskets, • Repairs required as a result of unauthorised repairs or inexpert installation that fails to carry out the repair. 8 Guarantee and Service Your Beko product is guaranteed against the cos: of breakdown repairs Freestanding appliances : 1 year Built-in the user instruction book. it should also...
..., or abuse. • Cabinet or appearance parts, including knobs and flaps • Accessory items, including ice trays, scrapers, cutlery baskets, • Repairs required as a result of unauthorised repairs or inexpert installation that fails to carry out the repair. 8 Guarantee and Service Your Beko product is guaranteed against the cos: of breakdown repairs Freestanding appliances : 1 year Built-in the user instruction book. it should also...

User Manual
Page 20
Beko plc Beko House Caxton Way Watford Herts WD18 8UF Tel: 0845 600 4911 Printed in Turkey Part no: 185.924580 Rev: AA/ 14.06.2012
Beko plc Beko House Caxton Way Watford Herts WD18 8UF Tel: 0845 600 4911 Printed in Turkey Part no: 185.924580 Rev: AA/ 14.06.2012