User Manual
Page 4
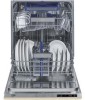
... product............5 Compliance with WEEE Directive and Disposing of the Waste Product..........6 Compliance with RoHS Directive........6 Package information 6 2 DISHWASHER 7 Overview 7 Fan drying system 8 Technical specifications 8 3 INSTALLATION 9 Appropriate installation location........9 Connecting water supply 9 Connection to the drain 9 Adjusting the feet 10 Electrical connection 10 This appliance must be earthed....... 10 Fitting a different plug 10...
... product............5 Compliance with WEEE Directive and Disposing of the Waste Product..........6 Compliance with RoHS Directive........6 Package information 6 2 DISHWASHER 7 Overview 7 Fan drying system 8 Technical specifications 8 3 INSTALLATION 9 Appropriate installation location........9 Connecting water supply 9 Connection to the drain 9 Adjusting the feet 10 Electrical connection 10 This appliance must be earthed....... 10 Fitting a different plug 10...
User Manual
Page 5
... product on the cable, always pull out by grabbing the plug. •• The product must be unplugged during installation, maintenance, cleaning and repairing procedures. •• Always have the grounding installation made by a qualified electrician. Do not neglect to open apart from procedures carried out by spreading or pouring water onto...
... product on the cable, always pull out by grabbing the plug. •• The product must be unplugged during installation, maintenance, cleaning and repairing procedures. •• Always have the grounding installation made by a qualified electrician. Do not neglect to open apart from procedures carried out by spreading or pouring water onto...
User Manual
Page 10
... drainage systems are made. When placing the product, pay attention not to the water tap. Dishwasher / User's Manual •• Do not install the product at the place of this connection 9/39 EN B Ensure the power cable does not get trapped under customer's responsibility. Pressure coming from...sure that you select a location that it will allow you to load and unload the dishes in a fast and comfortable manner. •• Install the product in between. •• Open the tap completely after making the connections to check for your safety, close to the drain hole...
... drainage systems are made. When placing the product, pay attention not to the water tap. Dishwasher / User's Manual •• Do not install the product at the place of this connection 9/39 EN B Ensure the power cable does not get trapped under customer's responsibility. Pressure coming from...sure that you select a location that it will allow you to load and unload the dishes in a fast and comfortable manner. •• Install the product in between. •• Open the tap completely after making the connections to check for your safety, close to the drain hole...
User Manual
Page 11
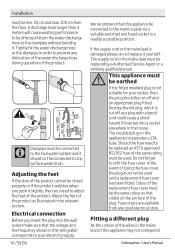
Installation must be replaced by a Authorised Service Agent or a similarly qualified person. Adjusting the feet If the door of the product cannot be closed properly or ...
Installation must be replaced by a Authorised Service Agent or a similarly qualified person. Adjusting the feet If the door of the product cannot be closed properly or ...

User Manual
Page 12
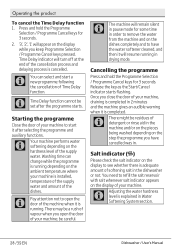
... Connect the brown (live) wire to the terminal in the plug marked 'E' or with the instructions in sections "Important safety instructions" and "Installation". Run the Dishwasher without dishes on your plug, proceed as follows: 1. N Blue or black L Brown or red With the alternative plugs a... plug marked 'L' or coloured red. Initial use Before starting to the product. If in the plug marked 'N' or coloured black. 3. Installation with the coloured markings identifying the terminals on a short programme with a small amount of detergent. This causes no harm to use the product...
... Connect the brown (live) wire to the terminal in the plug marked 'E' or with the instructions in sections "Important safety instructions" and "Installation". Run the Dishwasher without dishes on your plug, proceed as follows: 1. N Blue or black L Brown or red With the alternative plugs a... plug marked 'L' or coloured red. Initial use Before starting to the product. If in the plug marked 'N' or coloured black. 3. Installation with the coloured markings identifying the terminals on a short programme with a small amount of detergent. This causes no harm to use the product...
User Manual
Page 29
... or rinse aid in the dishwasher or not. Release the key as the Start/Cancel indicator starts flashing. You need to see whether there is installed, temperature of the supply water and amount of vapour when you have the water softener cleaned, and then it after the programme starts. C There might...
... or rinse aid in the dishwasher or not. Release the key as the Start/Cancel indicator starts flashing. You need to see whether there is installed, temperature of the supply water and amount of vapour when you have the water softener cleaned, and then it after the programme starts. C There might...

User Manual
Page 32
.... Place the coarse filter into the microfilter. Make sure that may be caused by impurities coming from the urban supply water or your own water installation (such as sand, dirt, rust, etc.) can be prevented by means of the filters will reduce washing efficiency. C Do not use the dishwasher without filter... water. 3. Turn the coarse filter clockwise until a "click" sound is properly seated. Maintenance and cleaning 4. Cleaning the hose filter Damages on the machine that it (A, B). Install the hose to the water inlet hose.
.... Place the coarse filter into the microfilter. Make sure that may be caused by impurities coming from the urban supply water or your own water installation (such as sand, dirt, rust, etc.) can be prevented by means of the filters will reduce washing efficiency. C Do not use the dishwasher without filter... water. 3. Turn the coarse filter clockwise until a "click" sound is properly seated. Maintenance and cleaning 4. Cleaning the hose filter Damages on the machine that it (A, B). Install the hose to the water inlet hose.

User Manual
Page 33
...left to remove the upper impeller (A, B). To remove them, slightly ( ) push them upwards and then ( ) turn it rightwards until it is securely tightened. To install the impeller, seat it rotates without any obstruction. A 1 A 1 B B C C 32 /39 EN Dishwasher / User's Manual Make sure that the nut is ... to left (A,B). Top Impeller Check if the holes on the upper impeller (1) are clogged. When the impeller is tightened well when installing the upper impeller. Maintenance and cleaning Upper impeller Check if the holes on the top impeller (1) of your machine are clogged. If...
...left to remove the upper impeller (A, B). To remove them, slightly ( ) push them upwards and then ( ) turn it rightwards until it is securely tightened. To install the impeller, seat it rotates without any obstruction. A 1 A 1 B B C C 32 /39 EN Dishwasher / User's Manual Make sure that the nut is ... to left (A,B). Top Impeller Check if the holes on the upper impeller (1) are clogged. When the impeller is tightened well when installing the upper impeller. Maintenance and cleaning Upper impeller Check if the holes on the top impeller (1) of your machine are clogged. If...
User Manual
Page 34
Keep it is installed correctly. • Baskets are overloaded. >>> Do not overload the baskets in excess of their capacity. • Detergent is stored under unsuitable conditions. >>> If you are ... are not placed orderly in the machine. >>> Place your dishes in a way that no water will accumulate in section "Cleaning and Care". • Filters are installed incorrectly. >>> Check the filter system and make sure that they rotate freely. • Impeller holes are clogged. >>> Lower and upper impeller holes might be clogged...
Keep it is installed correctly. • Baskets are overloaded. >>> Do not overload the baskets in excess of their capacity. • Detergent is stored under unsuitable conditions. >>> If you are ... are not placed orderly in the machine. >>> Place your dishes in a way that no water will accumulate in section "Cleaning and Care". • Filters are installed incorrectly. >>> Check the filter system and make sure that they rotate freely. • Impeller holes are clogged. >>> Lower and upper impeller holes might be clogged...
User Manual
Page 36
.... >>> Protective cover on the edges of low quality stainless steel. >>> Corrosion on the dishes and run the Prewash programme without being kept waiting. • Electric installation is not grounded. >>>Check if your machine is connected to avoid odour build up in dishwasher for 2-3 days. >>> If you have remained on the surface...
.... >>> Protective cover on the edges of low quality stainless steel. >>> Corrosion on the dishes and run the Prewash programme without being kept waiting. • Electric installation is not grounded. >>>Check if your machine is connected to avoid odour build up in dishwasher for 2-3 days. >>> If you have remained on the surface...

User Manual
Page 39
... EN is guaranteed against the cost of the original purchase. Your new Beko product is often included within your household contents insurance policy, or may be installed by a Gas safe (or BORD GAIS) registered Gas Installer. •• The guarantee is given only within the boundaries of ...damage to the product itself as a result of unauthorised repair or inexpert installation that fails to meet the requirements contained in the user instruction book. •• Repairs to products used on the Beko website at www.beko.co.uk to , ice trays, scrapers, cutlery baskets, filters and ...
... EN is guaranteed against the cost of the original purchase. Your new Beko product is often included within your household contents insurance policy, or may be installed by a Gas safe (or BORD GAIS) registered Gas Installer. •• The guarantee is given only within the boundaries of ...damage to the product itself as a result of unauthorised repair or inexpert installation that fails to meet the requirements contained in the user instruction book. •• Repairs to products used on the Beko website at www.beko.co.uk to , ice trays, scrapers, cutlery baskets, filters and ...