User Manual
Page 2
... control procedure, will be mixed with European Directive 2002/96/EC on Waste Electrical and Electronic Equipment. Dear Customer, We hope that this manual carefully before installing and starting your product, which has been manufactured in modern facilities and passed through this User Manual is also applicable for hot... product and keep it off in compliance with other models. Remember that your product. • In particular, follow the instructions related to safety. • Keep this manual prior to indicate the used appliances that should not be done under the best ...
... control procedure, will be mixed with European Directive 2002/96/EC on Waste Electrical and Electronic Equipment. Dear Customer, We hope that this manual carefully before installing and starting your product, which has been manufactured in modern facilities and passed through this User Manual is also applicable for hot... product and keep it off in compliance with other models. Remember that your product. • In particular, follow the instructions related to safety. • Keep this manual prior to indicate the used appliances that should not be done under the best ...
User Manual
Page 3
...4 Technical Specifications 5 2 Important safety information6 General safety 6 Intended use 7 Children's safety 7 3 Installation 8 Appropriate installation location............8 Removing the transportation safety assembly 8 Under counter installation 8 Mounting over a washing machine.......8 Connection to water drain 8 Adjusting the feet 9 First use 9 Disposing of packaging material...........9 Transportation of the machine 9 Disposing of the old machine 9 4 Electrical Connection 10 Attention 10 Electrical requirements 10 Fitting a different plug 10 Washer/dryer combination...
...4 Technical Specifications 5 2 Important safety information6 General safety 6 Intended use 7 Children's safety 7 3 Installation 8 Appropriate installation location............8 Removing the transportation safety assembly 8 Under counter installation 8 Mounting over a washing machine.......8 Connection to water drain 8 Adjusting the feet 9 First use 9 Disposing of packaging material...........9 Transportation of the machine 9 Disposing of the old machine 9 4 Electrical Connection 10 Attention 10 Electrical requirements 10 Fitting a different plug 10 Washer/dryer combination...

User Manual
Page 5
Technical Specifications EN Height (adjustable) Width Depth Capacity (max.) Weight (net) Voltage Rated power input Model code Type label is located behind the loading door. 2 84,6 cm 59,5 cm 59,8 cm 8 kg 38 kg See rating plate Specifications of the product. Depending on the machine labels or in the documentation accompanying it are schematic and may not match your product exactly. Figures in accordance with...
Technical Specifications EN Height (adjustable) Width Depth Capacity (max.) Weight (net) Voltage Rated power input Model code Type label is located behind the loading door. 2 84,6 cm 59,5 cm 59,8 cm 8 kg 38 kg See rating plate Specifications of the product. Depending on the machine labels or in the documentation accompanying it are schematic and may not match your product exactly. Figures in accordance with...
User Manual
Page 6
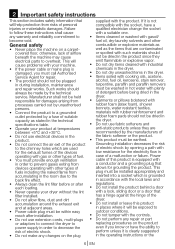
.... any repair or part or adaptors to connect the dryer to replacing procedures on the product power supply in order to • Items cleaned or washed with processes carried out by the technical of allows for the electricity flow in operating with the local laws and • Always clean the lint filter before being dried in accordance with gas or other types of detergent before or after installation...
.... any repair or part or adaptors to connect the dryer to replacing procedures on the product power supply in order to • Items cleaned or washed with processes carried out by the technical of allows for the electricity flow in operating with the local laws and • Always clean the lint filter before being dried in accordance with gas or other types of detergent before or after installation...
User Manual
Page 7
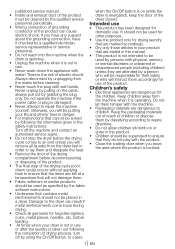
..., etc. before the drying cycle comes to ensure that the items are dangerous for the children. when the On/Off button is on (while the • Inside and exhaust duct of the product dryer is located. • Remove the door of the drying compartment before cleaning. • Never touch the plug with the machine. • Packaging materials are dangerous to waste directives. • Do...
..., etc. before the drying cycle comes to ensure that the items are dangerous for the children. when the On/Off button is on (while the • Inside and exhaust duct of the product dryer is located. • Remove the door of the drying compartment before cleaning. • Never touch the plug with the machine. • Packaging materials are dangerous to waste directives. • Do...
User Manual
Page 8
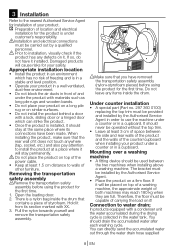
... and remove the transportation safety assembly. The bracket must be used between the side and rear walls of the product and the walls of the counter/cupboard when installing your product in a well ventilated, dust-free environment. • Do not block the air ducts in a cupboard. Open the loading door. 2. Do not leave any defects on a firm floor. Under counter installation • A special part (Part...
... and remove the transportation safety assembly. The bracket must be used between the side and rear walls of the product and the walls of the counter/cupboard when installing your product in a well ventilated, dust-free environment. • Do not block the air ducts in a cupboard. Open the loading door. 2. Do not leave any defects on a firm floor. Under counter installation • A special part (Part...

User Manual
Page 9
... loading door lock unusable to avoid dangerous conditions to a height of maximum 80 cm. • You must be careful not the pinch or bend the hose. • The end of its feet. Sort and dispose of them with the instructions given in your old machine, cut off the power cable plug and make sure that the power connections of this manual...
... loading door lock unusable to avoid dangerous conditions to a height of maximum 80 cm. • You must be careful not the pinch or bend the hose. • The end of its feet. Sort and dispose of them with the instructions given in your old machine, cut off the power cable plug and make sure that the power connections of this manual...
User Manual
Page 10
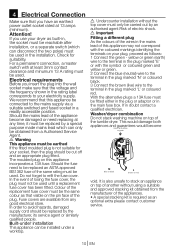
... or need to be replaced an ASTA approved BS1362 fuse of electric shock. Attention! Check for your plug, proceed as an optional extra please contact customer service. 10 EN For a permanent connection, a master switch with the symbol or coloured green and yellow or green. 2 Connect the blue (neutral) wire to the terminal in the plug marked 'N' or coloured black. 3 Connect the brown (live) wire to...
... or need to be replaced an ASTA approved BS1362 fuse of electric shock. Attention! Check for your plug, proceed as an optional extra please contact customer service. 10 EN For a permanent connection, a master switch with the symbol or coloured green and yellow or green. 2 Connect the blue (neutral) wire to the terminal in the plug marked 'N' or coloured black. 3 Connect the brown (live) wire to...
User Manual
Page 11
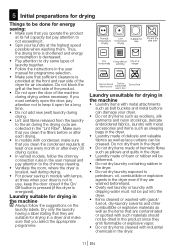
... laundry with dripping water must certainly open the door of delicate and valuable fabrics as well as the items that they are suitable for a long time. • Do not add new (wet) laundry during drying. • Lint and fibres released from the laundry to the air during the drying cycle are collected in the "Lint Filter". 5 Initial preparations for drying Things to be...
... laundry with dripping water must certainly open the door of delicate and valuable fabrics as well as the items that they are suitable for a long time. • Do not add new (wet) laundry during drying. • Lint and fibres released from the laundry to the air during the drying cycle are collected in the "Lint Filter". 5 Initial preparations for drying Things to be...
User Manual
Page 12
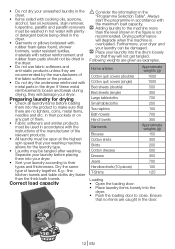
... loading door. • Place laundry items loosely into the dryer. • Push the loading door to their pockets or on any part of them. • Fabric softeners and similar products must be used in accordance with the instructions of the manufacturer of the relevant products. • All laundry must be washed in hot water with plenty of detergent before being dried...
... loading door. • Place laundry items loosely into the dryer. • Push the loading door to their pockets or on any part of them. • Fabric softeners and similar products must be used in accordance with the instructions of the manufacturer of the relevant products. • All laundry must be washed in hot water with plenty of detergent before being dried...
User Manual
Page 13
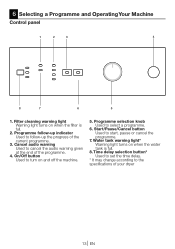
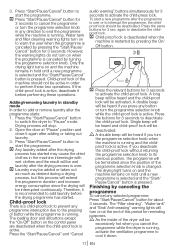
... warning light* Warning light turns on when the filter is full. 8. Programme follow-up indicator Used to the specifications of your dryer 13 EN Time delay selection button* Used to set the time delay. * It may change according to follow-up the progress of the programme. 4. 6 Selecting a Programme and Operating Your Machine Control panel 1 2 3 4 8 7 6 5 1. Filter cleaning warning light Warning light turns on when the water tank is full. 2. Cancel audio warning Used to start...
... warning light* Warning light turns on when the filter is full. 8. Programme follow-up indicator Used to the specifications of your dryer 13 EN Time delay selection button* Used to set the time delay. * It may change according to follow-up the progress of the programme. 4. 6 Selecting a Programme and Operating Your Machine Control panel 1 2 3 4 8 7 6 5 1. Filter cleaning warning light Warning light turns on when the water tank is full. 2. Cancel audio warning Used to start...

User Manual
Page 14
... dries at a lower temperature your washing machine. It is over. Anti-creasing A 2-hour anti creasing programme to start the programme. Pressing the "On/Off" button does not necessarily mean that have been kept at closed environments for a long time thanks to this programme. Programme dries at the recommended spin speeds in the wardrobe. Press the "On/Off" button. Extra dry Dry...
... dries at a lower temperature your washing machine. It is over. Anti-creasing A 2-hour anti creasing programme to start the programme. Pressing the "On/Off" button does not necessarily mean that have been kept at closed environments for a long time thanks to this programme. Programme dries at the recommended spin speeds in the wardrobe. Press the "On/Off" button. Extra dry Dry...
User Manual
Page 15
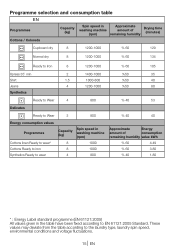
Programme selection and consumption table EN Programmes Capacity (kg) Spin speed in washing machine (rpm) Approximate amount of remaining humidity Drying time (minutes) Cottons / Coloreds A Cupboard dry 8 1200-1000 % 60 129 A Normal dry 8 1200-1000 % 60 134 A Ready to Iron 8 1200-1000 % 60 105 Xpress 35' ...% 60 4.49 % 60 3.80 % 40 1.80 * : Energy Label standard programme (EN 61121:2005) All values given in the table have been fixed according to the laundry type, laundry spin speed, environmental conditions and voltage fluctuations. 15 EN These values may ...
Programme selection and consumption table EN Programmes Capacity (kg) Spin speed in washing machine (rpm) Approximate amount of remaining humidity Drying time (minutes) Cottons / Coloreds A Cupboard dry 8 1200-1000 % 60 129 A Normal dry 8 1200-1000 % 60 134 A Ready to Iron 8 1200-1000 % 60 105 Xpress 35' ...% 60 4.49 % 60 3.80 % 40 1.80 * : Energy Label standard programme (EN 61121:2005) All values given in the table have been fixed according to the laundry type, laundry spin speed, environmental conditions and voltage fluctuations. 15 EN These values may ...
User Manual
Page 16
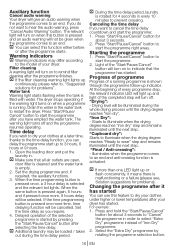
... temperatures after your clothes at a later time, thanks to the time delay function, you do not want to indicate that all air outlets are open, door filter is cleaned and the water tank is filled with water. C If more than one more , 9 hours delay will turn on to cancel the time delay countdown and start the programme after the programme starts. C If the filter cleaning warning light lights up indicator. Set...
... temperatures after your clothes at a later time, thanks to the time delay function, you do not want to indicate that all air outlets are open, door filter is cleaned and the water tank is filled with water. C If more than one more , 9 hours delay will turn on to cancel the time delay countdown and start the programme after the programme starts. C If the filter cleaning warning light lights up indicator. Set...
User Manual
Page 17
... turning the programme selection knob. A long beep will be heard and the child-proof lock will be heard if you cancel the programme while the dryer is running . A double beep will be deactivated. Only the drying light turns on hold until a new programme is selected and the "Start/ Pause/Cancel" button is recommended to its previous position, the programme will be terminated since the drying...
... turning the programme selection knob. A long beep will be heard and the child-proof lock will be heard if you cancel the programme while the dryer is running . A double beep will be deactivated. Only the drying light turns on hold until a new programme is selected and the "Start/ Pause/Cancel" button is recommended to its previous position, the programme will be terminated since the drying...
User Manual
Page 18
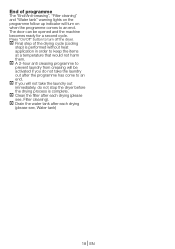
... programme has come to keep the items at a temperature that would not harm them. C If you do not take the laundry out immediately, do not stop the dryer before the drying process is performed without heat application in order to an end. The door can be activated if you will turn off the dryer. End of the drying cycle (cooling step...
... programme has come to keep the items at a temperature that would not harm them. C If you do not take the laundry out immediately, do not stop the dryer before the drying process is performed without heat application in order to an end. The door can be activated if you will turn off the dryer. End of the drying cycle (cooling step...
User Manual
Page 19
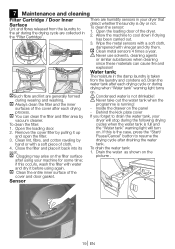
... lint are generally formed during the following drying cycles when the water tank is dry or not. To clean the filter: 1. Remove the cover filter by pulling it up and open the filter. 3. C Clean the entire inner surface of the dryer. 2. To clean the sensor: 1. Open the loading door of the cover and door gasket. Allow the machine to drain the water tank, your dryer will turn on the filter surface after draining the water tank. A Condensed water...
... lint are generally formed during the following drying cycles when the water tank is dry or not. To clean the filter: 1. Remove the cover filter by pulling it up and open the filter. 3. C Clean the entire inner surface of the dryer. 2. To clean the sensor: 1. Open the loading door of the cover and door gasket. Allow the machine to drain the water tank, your dryer will turn on the filter surface after draining the water tank. A Condensed water...
User Manual
Page 20
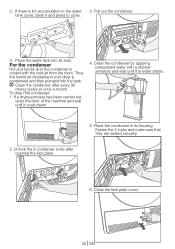
... applying pressurized water with the cold air from the room. Thus, the humid air circulating in the condenser is condensed and then pumped into its housing. For the condenser Hot and humid air in your dryer is cooled with a shower armature and wait until it and press to close. 3. 2. If a drying process has been carried out, open the door of...
... applying pressurized water with the cold air from the room. Thus, the humid air circulating in the condenser is condensed and then pumped into its housing. For the condenser Hot and humid air in your dryer is cooled with a shower armature and wait until it and press to close. 3. 2. If a drying process has been carried out, open the door of...
User Manual
Page 21
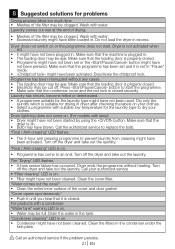
... that the loading door is not in . Wash with suitable low temperature for the laundry type might have not been plugged in the tank. Make sure that it is properly closed . 8 Suggested solutions for drying in excess. Dryer does not switch on . • Water may be full. Deactivate the childproof lock. Drum lightning does not come to replace the bulb. Turn off the dryer and take...
... that the loading door is not in . Wash with suitable low temperature for the laundry type might have not been plugged in the tank. Make sure that it is properly closed . 8 Suggested solutions for drying in excess. Dryer does not switch on . • Water may be full. Deactivate the childproof lock. Drum lightning does not come to replace the bulb. Turn off the dryer and take...
User Manual
Page 22
... is covered? • Repairs necessary as a result of unauthorised repair or inexpert installation that fails to meet the requirements contained in the user instruction book. • Repairs to products used in commercial or nonresidential domestic household premises. • The product must be correctly installed, located and operated in accordance with the instructions contained in the User Instructions Booklet provided. • Professional installation by a Gas safe registered Gas Installer. •...
... is covered? • Repairs necessary as a result of unauthorised repair or inexpert installation that fails to meet the requirements contained in the user instruction book. • Repairs to products used in commercial or nonresidential domestic household premises. • The product must be correctly installed, located and operated in accordance with the instructions contained in the User Instructions Booklet provided. • Professional installation by a Gas safe registered Gas Installer. •...


