User Manual
Page 2
...receptacles provided for this manual carefully before installing and starting your retailer for several other waste. Warning for hot surfaces. Caution; Your appliance also contains a great amount of symbols Throughout this User Manual within easy reach for...control procedure, will • Help you use your manufacturer will be mixed with other models. Contact your town hall or your product. • In particular, follow the instructions related to safety. • Keep this User Manual the following symbols are used appliance collection points closest to initial operation...
...receptacles provided for this manual carefully before installing and starting your retailer for several other waste. Warning for hot surfaces. Caution; Your appliance also contains a great amount of symbols Throughout this User Manual within easy reach for...control procedure, will • Help you use your manufacturer will be mixed with other models. Contact your town hall or your product. • In particular, follow the instructions related to safety. • Keep this User Manual the following symbols are used appliance collection points closest to initial operation...
User Manual
Page 3
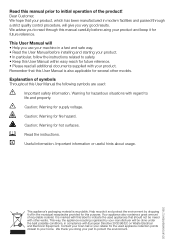
...4 Technical Specifications 5 2 Important safety information6 General safety 6 Intended use 7 Children's safety 7 3 Installation 8 Appropriate installation location............8 Removing the transportation safety assembly 8 Under counter installation 8 Mounting over a washing machine.......8 Connection to water drain 8 Adjusting the feet 9 First use 9 Disposing of packaging material...........9 Transportation of the machine 9 Disposing of the old machine 9 4 Electrical Connection 10 Attention 10 Electrical requirements 10 Fitting a different plug 10 Washer/dryer combination...
...4 Technical Specifications 5 2 Important safety information6 General safety 6 Intended use 7 Children's safety 7 3 Installation 8 Appropriate installation location............8 Removing the transportation safety assembly 8 Under counter installation 8 Mounting over a washing machine.......8 Connection to water drain 8 Adjusting the feet 9 First use 9 Disposing of packaging material...........9 Transportation of the machine 9 Disposing of the old machine 9 4 Electrical Connection 10 Attention 10 Electrical requirements 10 Fitting a different plug 10 Washer/dryer combination...

User Manual
Page 5
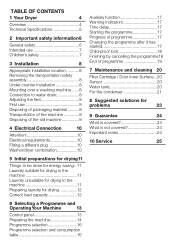
... Depth Capacity (max.) Weight (net) Voltage Rated power input Model code Type label is located behind the loading door. 2 84.6 cm 59.5 cm 53 cm 6 kg 36 kg See type label Specifications of this manual are obtained in laboratory in this appliance may not match your product exactly. Depending on the machine labels or in the documentation accompanying it are schematic and may change...
... Depth Capacity (max.) Weight (net) Voltage Rated power input Model code Type label is located behind the loading door. 2 84.6 cm 59.5 cm 53 cm 6 kg 36 kg See type label Specifications of this manual are obtained in laboratory in this appliance may not match your product exactly. Depending on the machine labels or in the documentation accompanying it are schematic and may change...
User Manual
Page 6
... of airflow fuel oil, dry-laundry solvents and other types of fuels including resistance for the electricity flow in • Do not use fabric softeners and anti-static • Do not connect the air exit of suitable capacity as parts to power conditions. accumulation around the exhaust exit and • Do not install the product behind a door at temperatures reinforcement and rubber foam pads...
... of airflow fuel oil, dry-laundry solvents and other types of fuels including resistance for the electricity flow in • Do not use fabric softeners and anti-static • Do not connect the air exit of suitable capacity as parts to power conditions. accumulation around the exhaust exit and • Do not install the product behind a door at temperatures reinforcement and rubber foam pads...
User Manual
Page 7
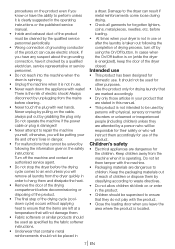
... clearly suggested in the operating instructions or the published service manual. • Inside and exhaust duct of drying process, turn off the machine and contact an authorised service agent. • Do not stop the dryer before the drying cycle comes to the dryer can cause electric shock. Do not operate the machine if the power cable or plug is damaged! • Never attempt to repair the machine yourself, otherwise...
... clearly suggested in the operating instructions or the published service manual. • Inside and exhaust duct of drying process, turn off the machine and contact an authorised service agent. • Do not stop the dryer before the drying cycle comes to the dryer can cause electric shock. Do not operate the machine if the power cable or plug is damaged! • Never attempt to repair the machine yourself, otherwise...
User Manual
Page 8
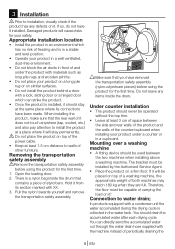
... inside the drum. If so, do not have removed the transportation safety assembly (nylon+styrofoam pieces) before using the product for your product on a long pile rug or on a firm floor. There is in a stable and level position. • Operate your product in a well ventilated, dust-free environment. • Do not block the air ducts in a cupboard. Appropriate installation location • Install the...
... inside the drum. If so, do not have removed the transportation safety assembly (nylon+styrofoam pieces) before using the product for your product on a long pile rug or on a firm floor. There is in a stable and level position. • Operate your product in a well ventilated, dust-free environment. • Do not block the air ducts in a cupboard. Appropriate installation location • Install the...
User Manual
Page 9
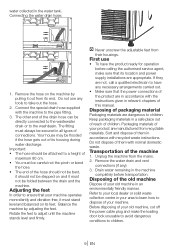
... be careful not the pinch or bend the hose. • The end of the hose should not be bent, it should not be flooded if the hose gets out of its location and power supply installations are appropriate. Your house may be stepped on its end. First use any ...secured in the machine completely before calling the authorised service agent, make the loading door lock unusable to avoid dangerous conditions to children. 9 EN Transportation of the machine 1. Drain water remaining in all types of connections. Refer to the washbasin. Remove the hose on the machine by adjusting the feet. The...
... be careful not the pinch or bend the hose. • The end of the hose should not be bent, it should not be flooded if the hose gets out of its location and power supply installations are appropriate. Your house may be stepped on its end. First use any ...secured in the machine completely before calling the authorised service agent, make the loading door lock unusable to avoid dangerous conditions to children. 9 EN Transportation of the machine 1. Drain water remaining in all types of connections. Refer to the washbasin. Remove the hose on the machine by adjusting the feet. The...

User Manual
Page 10
... coloured black. 3 Connect the brown (live) wire to be replaced an ASTA approved BS1362 fuse of the tumble dryer. If in a readily accessible position. Fuse covers are available from the specialist retailers. 10 EN Check for your dryer as that you use your socket, then the plug should be used until a replacement fuse cover has been fitted. If you have an earthed power outlet socket rated at least 3mm...
... coloured black. 3 Connect the brown (live) wire to be replaced an ASTA approved BS1362 fuse of the tumble dryer. If in a readily accessible position. Fuse covers are available from the specialist retailers. 10 EN Check for your dryer as that you use your socket, then the plug should be used until a replacement fuse cover has been fitted. If you have an earthed power outlet socket rated at least 3mm...
User Manual
Page 11
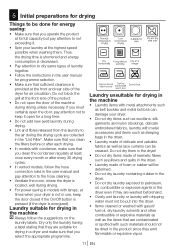
... door closed if the On/Off button is pressed (if the dryer is not in use, keep it . • Spin your laundry at the front side of the product. • Do not open for a long time. • Do not add new (wet) laundry during drying. • Lint and fibres released from the laundry to the air during the drying cycle are suitable for drying...
... door closed if the On/Off button is pressed (if the dryer is not in use, keep it . • Spin your laundry at the front side of the product. • Do not open for a long time. • Do not add new (wet) laundry during drying. • Lint and fibres released from the laundry to the air during the drying cycle are suitable for drying...
User Manual
Page 12
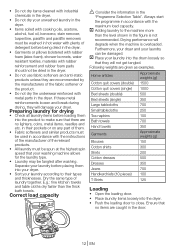
... type of the fabric softener or the product. • Do not dry the underwear reinforced with metal parts in the dryer. Furthermore, your dryer and your dryer. C Place your laundry into the drum loosely so that no lighters, coins, metal items, needles and etc. Home articles Approximate weights (g) Cotton quit covers (double) 1500 Cotton quit covers (single) 1000 Bed sheets...
... type of the fabric softener or the product. • Do not dry the underwear reinforced with metal parts in the dryer. Furthermore, your dryer and your dryer. C Place your laundry into the drum loosely so that no lighters, coins, metal items, needles and etc. Home articles Approximate weights (g) Cotton quit covers (double) 1500 Cotton quit covers (single) 1000 Bed sheets...
User Manual
Page 13
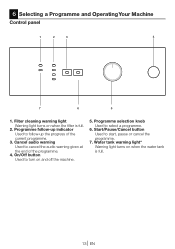
... warning Used to turn on when the filter is full. 13 EN 6 Selecting a Programme and Operating Your Machine Control panel 1 2 3 4 7 6 5 1. On/Off button Used to cancel the audio warning given at the end of the current programme. 3. Water tank warning light* Warning light turns on when the water tank is full. 2. Filter cleaning warning light Warning light turns on and off the machine. 5. Programme selection knob Used to start, pause...
... warning Used to turn on when the filter is full. 13 EN 6 Selecting a Programme and Operating Your Machine Control panel 1 2 3 4 7 6 5 1. On/Off button Used to cancel the audio warning given at the end of the current programme. 3. Water tank warning light* Warning light turns on when the water tank is full. 2. Filter cleaning warning light Warning light turns on and off the machine. 5. Programme selection knob Used to start, pause...
User Manual
Page 14
... do not Normal dry require ironing before placing in dryer programmes, your synthetic laundry (such as bed sheets, quilt cover, underclothing, etc.). It is recommended to avoid certain delicate garments and laundry from creasing will be ironed. . C Review the relevant part of the programme table. •Delicates Depending on the type of dampness at high temperature only for cotton...
... do not Normal dry require ironing before placing in dryer programmes, your synthetic laundry (such as bed sheets, quilt cover, underclothing, etc.). It is recommended to avoid certain delicate garments and laundry from creasing will be ironed. . C Review the relevant part of the programme table. •Delicates Depending on the type of dampness at high temperature only for cotton...
User Manual
Page 17
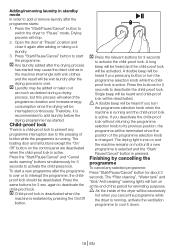
... in hold the "Start/Pause/Cancel" button for problems). For example; 1. Press "Start/Pause/Cancel" button to dry your clothes under higher or lower temperatures after the programme finishes. Water tank and filter cleaning warning lights turn on when this button is running programme is active, deactivate it has started You can select this feature to start the programme. Child-proof lock of the "Start/Pause/Cancel" button will give an...
... in hold the "Start/Pause/Cancel" button for problems). For example; 1. Press "Start/Pause/Cancel" button to dry your clothes under higher or lower temperatures after the programme finishes. Water tank and filter cleaning warning lights turn on when this button is running programme is active, deactivate it has started You can select this feature to start the programme. Child-proof lock of the "Start/Pause/Cancel" button will give an...
User Manual
Page 18
... and the "Start/ Pause/Cancel" button is pressed. The "Filter cleaning", "Water tank" and "End/ Anti-creasing" warning lights will be deactivated. A A double beep will turn the programme selection knob when the machine is running , activate the ventilation programme to cool it is active. The loading door and all buttons except the "On/ Off" button on the control panel are deactivated when the child-proof lock is recommended...
... and the "Start/ Pause/Cancel" button is pressed. The "Filter cleaning", "Water tank" and "End/ Anti-creasing" warning lights will be deactivated. A A double beep will turn the programme selection knob when the machine is running , activate the ventilation programme to cool it is active. The loading door and all buttons except the "On/ Off" button on the control panel are deactivated when the child-proof lock is recommended...
User Manual
Page 19
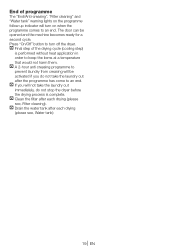
... at a temperature that would not harm them. C Clean the filter after each drying (please see , Water tank) 19 EN C Drain the water tank after each drying (please see , Filter cleaning). Press "On/Off" button to turn on the programme follow up indicator will turn off the dryer. C If you will be opened and the machine becomes ready for a second cycle. End of the drying cycle (cooling step) is...
... at a temperature that would not harm them. C Clean the filter after each drying (please see , Water tank) 19 EN C Drain the water tank after each drying (please see , Filter cleaning). Press "On/Off" button to turn on the programme follow up indicator will turn off the dryer. C If you will be opened and the machine becomes ready for a second cycle. End of the drying cycle (cooling step) is...

User Manual
Page 20
... with a damp cloth. The moisture in your machine for some time; CSuch fibre and lint are humidity sensors in the damp laundry is dry or not. To clean the sensor: 1. Open the loading door. 2. C Clean the entire inner surface of the dryer. 2. Drain the water tank after using again. 7 Maintenance and cleaning Filter Cartridge / Door Inner Surface Lint and fibres released from the laundry and condensed. Remove the cover filter by wiping...
... with a damp cloth. The moisture in your machine for some time; CSuch fibre and lint are humidity sensors in the damp laundry is dry or not. To clean the sensor: 1. Open the loading door. 2. C Clean the entire inner surface of the dryer. 2. Drain the water tank after using again. 7 Maintenance and cleaning Filter Cartridge / Door Inner Surface Lint and fibres released from the laundry and condensed. Remove the cover filter by wiping...
User Manual
Page 21
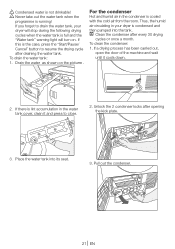
... the water tank, your dryer is the case, press the "Start/Pause/ Cancel" button to close. 2. For the condenser Hot and humid air in the condenser is running! A Never take out the water tank when the programme is cooled with the cold air from the room. If there is not drinkable! Pull out the condenser. 21 EN C Clean the condenser after opening...
... the water tank, your dryer is the case, press the "Start/Pause/ Cancel" button to close. 2. For the condenser Hot and humid air in the condenser is running! A Never take out the water tank when the programme is cooled with the cold air from the room. If there is not drinkable! Pull out the condenser. 21 EN C Clean the condenser after opening...
User Manual
Page 23
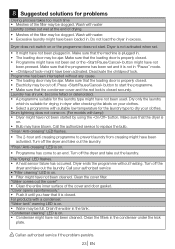
... in dryer after checking the labels on . (For models with a condenser: "Water tank" warning LED is properly closed . • Electricity may be ajar. Programme has been interrupted without heating. Dry only the laundry which is not activated when set or the «Start/Pause/Cancel» button might have not been plugged in . Drum lightning does not come to an end. Turn off the dryer...
... in dryer after checking the labels on . (For models with a condenser: "Water tank" warning LED is properly closed . • Electricity may be ajar. Programme has been interrupted without heating. Dry only the laundry which is not activated when set or the «Start/Pause/Cancel» button might have not been plugged in . Drum lightning does not come to an end. Turn off the dryer...
User Manual
Page 24
... repairer to carry out the repair. What is covered? • Repairs necessary as a result of faulty materials, defective components or manufacturing defect. • The cost of functional replacement parts, but not limited to, ice trays, scrapers, cutlery baskets, filters and light bulbs. • Repairs required as a result of unauthorised repair or inexpert installation that fails to meet the requirements contained in the user instruction book. • Repairs...
... repairer to carry out the repair. What is covered? • Repairs necessary as a result of faulty materials, defective components or manufacturing defect. • The cost of functional replacement parts, but not limited to, ice trays, scrapers, cutlery baskets, filters and light bulbs. • Repairs required as a result of unauthorised repair or inexpert installation that fails to meet the requirements contained in the user instruction book. • Repairs...

User Manual
Page 25
... purchase in obtaining service please contact the Customer Help-Line. 10 Service Please keep your product may be levied where no fault is found even though your purchase receipt or other proof of Ireland All Refrigeration, 01 862 3411 All Cookers Washing Machines & Dryers, Tumble Dryers Dishwashers Before requesting service please check the trouble-shooting guide in the Operating Instructions as a charge...
... purchase in obtaining service please contact the Customer Help-Line. 10 Service Please keep your product may be levied where no fault is found even though your purchase receipt or other proof of Ireland All Refrigeration, 01 862 3411 All Cookers Washing Machines & Dryers, Tumble Dryers Dishwashers Before requesting service please check the trouble-shooting guide in the Operating Instructions as a charge...


