User Manual
Page 3
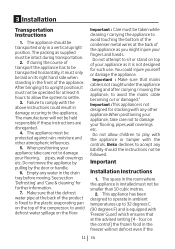
... 3 Installation 11 Transportation Instructions 11 Important 11 Installation Instructions 11 Replacing The Interior Light Bulb ....13 Reversing The Doors 14 Reversing the doors 16 4 Before operating 17 Final Check 17 5 Using your refrigerator 18 Temperature Control And Adjustment 18 Suggested Arrangement Of Food In The Fridge/Freezer 19 Storing Frozen Food 20 Freezing Fresh Food 20 Making Ice Cubes 20 Defrosting 21 Door Open Alarm 22 Water Dispenser 23 *optional 23 6 Maintenance and cleaning 25 7 Do's and Don'ts 26 Problem...
... 3 Installation 11 Transportation Instructions 11 Important 11 Installation Instructions 11 Replacing The Interior Light Bulb ....13 Reversing The Doors 14 Reversing the doors 16 4 Before operating 17 Final Check 17 5 Using your refrigerator 18 Temperature Control And Adjustment 18 Suggested Arrangement Of Food In The Fridge/Freezer 19 Storing Frozen Food 20 Freezing Fresh Food 20 Making Ice Cubes 20 Defrosting 21 Door Open Alarm 22 Water Dispenser 23 *optional 23 6 Maintenance and cleaning 25 7 Do's and Don'ts 26 Problem...
User Manual
Page 4
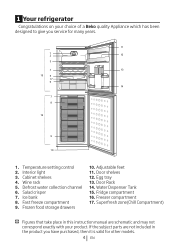
Ice bank 8. Freezer compartment 17. Cabinet shelves 4. Door shelves 12. Water Dıspenser Tank 15. Interior light 3. Salad crisper 7. Fast freeze compartment 9. Egg tray 13. 1 Your refrigerator Congratulations on your product. Door Rack 14. Wine rack 5. If the subject parts are schematic and may not correspond exactly with your choice of a Beko quality Appliance which has been designed to give you have purchased, then it is valid...
Ice bank 8. Freezer compartment 17. Cabinet shelves 4. Door shelves 12. Water Dıspenser Tank 15. Interior light 3. Salad crisper 7. Fast freeze compartment 9. Egg tray 13. 1 Your refrigerator Congratulations on your product. Door Rack 14. Wine rack 5. If the subject parts are schematic and may not correspond exactly with your choice of a Beko quality Appliance which has been designed to give you have purchased, then it is valid...

User Manual
Page 5
... in the insulation switching on 5 EN suitable location. contains non CFC / HFC • If transported horizontally leave to natural substances in the cooling system stand upright for information on to allow compressor oil to settle (Called cyclopentane) which is appliance to the among the latest range electricity supply until introduced is left in use. At Beko, the care and protection...
... in the insulation switching on 5 EN suitable location. contains non CFC / HFC • If transported horizontally leave to natural substances in the cooling system stand upright for information on to allow compressor oil to settle (Called cyclopentane) which is appliance to the among the latest range electricity supply until introduced is left in use. At Beko, the care and protection...

User Manual
Page 6
... plug remains readily • This appliance can accessible. above and persons • Failure to carefully compartments of read these instructions in a safe clear of experience and guarantee period. Cleaning and user maintenance shall not be used by the manufacturer. 6 the hazards involved. • To obtain the best • Do not damage the possible performance refrigerant circuit. and trouble free...
... plug remains readily • This appliance can accessible. above and persons • Failure to carefully compartments of read these instructions in a safe clear of experience and guarantee period. Cleaning and user maintenance shall not be used by the manufacturer. 6 the hazards involved. • To obtain the best • Do not damage the possible performance refrigerant circuit. and trouble free...
User Manual
Page 7
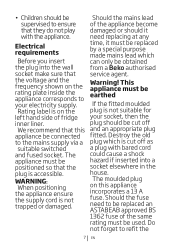
... the plug is accessible. house. The moulded plug on this and an appropriate plug appliance be connected fitted. the voltage and the frequency shown on the plug is on the rating plate inside the appliance corresponds to Warning! If the fitted moulded Rating label is not suitable for left hand side of fridge your electricity supply. Should the fuse need replacing at any Electrical requirements...
... the plug is accessible. house. The moulded plug on this and an appropriate plug appliance be connected fitted. the voltage and the frequency shown on the plug is on the rating plate inside the appliance corresponds to Warning! If the fitted moulded Rating label is not suitable for left hand side of fridge your electricity supply. Should the fuse need replacing at any Electrical requirements...
User Manual
Page 11
... evaporating pan on the top of the appliance. 3 Installation Transportation Instructions 1. The manufacturer will not defrost even if the 11 EN When positioning your appliance take care not to operate in the front of the compressor, to avoid defrost water spillage on its right hand side when standing in ambient temperatures up to settle. 3. Make sure that the defrost water pipe at the advised setting...
... evaporating pan on the top of the appliance. 3 Installation Transportation Instructions 1. The manufacturer will not defrost even if the 11 EN When positioning your appliance take care not to operate in the front of the compressor, to avoid defrost water spillage on its right hand side when standing in ambient temperatures up to settle. 3. Make sure that the defrost water pipe at the advised setting...
User Manual
Page 12
... charging transformers/power supplies or Lithium-Ironbattery operated products adjacent to the compressor as required. The two front feet can be located on the back of the compressor. (See diagram) Gently remove the plug from the receptacle. Refer to cleaning and care section to prepare your appliance for use.A special receptacle is in the receptacle provided to avoid transit damage. If installed next to...
... charging transformers/power supplies or Lithium-Ironbattery operated products adjacent to the compressor as required. The two front feet can be located on the back of the compressor. (See diagram) Gently remove the plug from the receptacle. Refer to cleaning and care section to prepare your appliance for use.A special receptacle is in the receptacle provided to avoid transit damage. If installed next to...

User Manual
Page 13
... recesses to locate the front two lugs. 4. Switch off at the socket outlet and pull out the mains plug. If the bulb works, replace the light cover by inserting the rear lug and pushing up to prise off each side. 3. Replace the bulb with a new 15 watt (max) screw cap (SES) bulb. 5. Use a flat tipped screwdriver to remove the light diffuser cover by ensuring it useful to remove shelves for...
... recesses to locate the front two lugs. 4. Switch off at the socket outlet and pull out the mains plug. If the bulb works, replace the light cover by inserting the rear lug and pushing up to prise off each side. 3. Replace the bulb with a new 15 watt (max) screw cap (SES) bulb. 5. Use a flat tipped screwdriver to remove the light diffuser cover by ensuring it useful to remove shelves for...
User Manual
Page 15
...) 13. Using the screws and plastic plugs supplied in the installation kit inside the fridge, fit handles to lower hinge hole on the left hand side feet on the left hand side middle hinge pin bushing/door stopper part is closed and then fit the right screw after opening the door for locations) 15 EN left hand side. (18),(19) 20. Locate and re-fit upper door to settle before switching on...
...) 13. Using the screws and plastic plugs supplied in the installation kit inside the fridge, fit handles to lower hinge hole on the left hand side feet on the left hand side middle hinge pin bushing/door stopper part is closed and then fit the right screw after opening the door for locations) 15 EN left hand side. (18),(19) 20. Locate and re-fit upper door to settle before switching on...
User Manual
Page 17
.... 9. The feet have been adjusted for perfect levelling. 2. This is open the fridge interior light will be warm to operation of the cabinet. 3. Clean the interior as they may cause the cooling system to non-frost free appliances. The liquid and gases sealed within the refrigeration system may feel warm. When the freezer reaches the desired temperature the freezer fan will hear a noise as the compressor starts up. Set the setting half way...
.... 9. The feet have been adjusted for perfect levelling. 2. This is open the fridge interior light will be warm to operation of the cabinet. 3. Clean the interior as they may cause the cooling system to non-frost free appliances. The liquid and gases sealed within the refrigeration system may feel warm. When the freezer reaches the desired temperature the freezer fan will hear a noise as the compressor starts up. Set the setting half way...
User Manual
Page 18
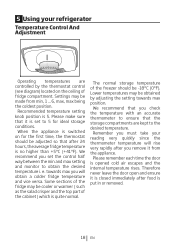
... immediately after you set to the desired temperature. Remember you must take your refrigerator Temperature Control And Adjustment Operating temperatures are kept to 5 for the first time, the thermostat should be adjusted so that you will rise very rapidly after food is put in or removed. 18 EN Settings may be made from the appliance. Recommended temperature setting knob position is opened cold air escapes and the...
... immediately after you set to the desired temperature. Remember you must take your refrigerator Temperature Control And Adjustment Operating temperatures are kept to 5 for the first time, the thermostat should be adjusted so that you will rise very rapidly after food is put in or removed. 18 EN Settings may be made from the appliance. Recommended temperature setting knob position is opened cold air escapes and the...

User Manual
Page 19
... flavoured water ices should be cleaned and stored in the crisper bins. 5. Allow hot food and beverages to avoid contamination. Therefore wrap pineapples, melons, cucumbers, tomatoes and similar produce in polythene bags and place on the shelf. Meat, sausages, cold cuts. 3. Making, storing ice cubes. 5. Small bottles, cans, tubes. 9. Do not allow to come into contact with cooked food to cool...
... flavoured water ices should be cleaned and stored in the crisper bins. 5. Allow hot food and beverages to avoid contamination. Therefore wrap pineapples, melons, cucumbers, tomatoes and similar produce in polythene bags and place on the shelf. Meat, sausages, cold cuts. 3. Making, storing ice cubes. 5. Small bottles, cans, tubes. 9. Do not allow to come into contact with cooked food to cool...

User Manual
Page 20
... Take special care not to rotate the temperature control. Making Ice Cubes Fill the ice - cube tray 3/4 full with the handle of the freezer. Note: If freshly made ice cubes are all removable. 12. Make sure you avoid defrosting food or food juices drip onto other ...power failure do not open the door. If the failure is located. 11. This can be stored in 24 h which is 4 kg (8.8 lb) Placing warm food into the freezer compartment causes the refrigeration compressor to put it in the freezer as quickly as possible. Loosen frozen trays with water and place it in size...
... Take special care not to rotate the temperature control. Making Ice Cubes Fill the ice - cube tray 3/4 full with the handle of the freezer. Note: If freshly made ice cubes are all removable. 12. Make sure you avoid defrosting food or food juices drip onto other ...power failure do not open the door. If the failure is located. 11. This can be stored in 24 h which is 4 kg (8.8 lb) Placing warm food into the freezer compartment causes the refrigeration compressor to put it in the freezer as quickly as possible. Loosen frozen trays with water and place it in size...
User Manual
Page 21
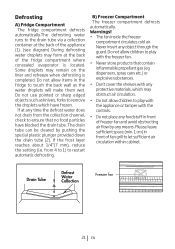
... dispensers, spray cans etc.) or explosive substances. • Don't cover the shelves with any means. Never insert any foodstuff in front of freezer fan and avoid obstructing air flow by pushing the special plastic plunger provided down the drain tube (2). Defrosting A) Fridge Compartment The fridge compartment defrosts automatically.The defrosting water runs to the drain tube via a collection container at the back of the appliance (1). (see diagram) During defrosting water...
... dispensers, spray cans etc.) or explosive substances. • Don't cover the shelves with any means. Never insert any foodstuff in front of freezer fan and avoid obstructing air flow by pushing the special plastic plunger provided down the drain tube (2). Defrosting A) Fridge Compartment The fridge compartment defrosts automatically.The defrosting water runs to the drain tube via a collection container at the back of the appliance (1). (see diagram) During defrosting water...

User Manual
Page 24
... , make sure that the seal is 2.2 liters (3.8 pints); Important: Components of the water tank. Place the water tank to their original places. Otherwise, water leakage may occur. When replacing it regularly. • Capacity of the water dispenser with a rigid glass. Remove the water tank and clean with warm and clean water. Water tray Water that the parts removed (if any) during cleaning are using the water dispenser accumulates in the spillage tray. Take the water valve...
... , make sure that the seal is 2.2 liters (3.8 pints); Important: Components of the water tank. Place the water tank to their original places. Otherwise, water leakage may occur. When replacing it regularly. • Capacity of the water dispenser with a rigid glass. Remove the water tank and clean with warm and clean water. Water tray Water that the parts removed (if any) during cleaning are using the water dispenser accumulates in the spillage tray. Take the water valve...

User Manual
Page 25
... completely. • To remove the freezer flap door, first open the door 3" and then gently pull it off. If you switch off , remove all food, clean it and leave the door ajar. • Any dust that the special plastic container (drain tray) at the back of the appliance which is not going to be used for cleaning. • Use luke warm water to clean the cabinet of...
... completely. • To remove the freezer flap door, first open the door 3" and then gently pull it off. If you switch off , remove all food, clean it and leave the door ajar. • Any dust that the special plastic container (drain tray) at the back of the appliance which is not going to be used for cleaning. • Use luke warm water to clean the cabinet of...

User Manual
Page 26
... in small portions to run and cause excessive ice formation. Clean your fridge compartment. Leave lettuce, cabbage, parsley and cauliflower on vegetables and wipe off any air is wrapped to the freezer as soon as it fresh. Do- Wrap bread well to "Best Before", "Use by" etc. Don't-... periods as long as possible. Don't- Wrap fish and offal in your appliance regularly (See "Cleaning and Care") Do- Defrost food in to avoid it cool down first. Leave the door open for freezing in the same container. Don't- Do- Don't- Do- Do- Put liquid-filled bottles or...
... in small portions to run and cause excessive ice formation. Clean your fridge compartment. Leave lettuce, cabbage, parsley and cauliflower on vegetables and wipe off any air is wrapped to the freezer as soon as it fresh. Do- Wrap bread well to "Best Before", "Use by" etc. Don't-... periods as long as possible. Don't- Wrap fish and offal in your appliance regularly (See "Cleaning and Care") Do- Defrost food in to avoid it cool down first. Leave the door open for freezing in the same container. Don't- Do- Don't- Do- Do- Put liquid-filled bottles or...
User Manual
Page 27
...; New plug is wired correctly if you avoid defrosting food or food juices drip onto other food. Don't- Close the freezer door before placing the compartment cover in any 24 hours) when freezing fresh food. Freeze fizzy drinks. Give children ice-cream and water ices direct from the freezer with wet hands. Don't- Don't- Problem Solvıng If the appliance does not operate when switched on...
...; New plug is wired correctly if you avoid defrosting food or food juices drip onto other food. Don't- Close the freezer door before placing the compartment cover in any 24 hours) when freezing fresh food. Freeze fizzy drinks. Give children ice-cream and water ices direct from the freezer with wet hands. Don't- Don't- Problem Solvıng If the appliance does not operate when switched on...

User Manual
Page 28
.... • C abinet or appearance parts, including control knobs, aps, handles or container lids. • Accessories or consumable items including but not limited to, ice trays, scrapers, cutlery baskets, lters and light bulbs. • Repairs required as a result of unauthorised repair or inexpert installation that fails to meet the requirements contained in the user instruction book. • Repairs to products used in anyway diminish your...
.... • C abinet or appearance parts, including control knobs, aps, handles or container lids. • Accessories or consumable items including but not limited to, ice trays, scrapers, cutlery baskets, lters and light bulbs. • Repairs required as a result of unauthorised repair or inexpert installation that fails to meet the requirements contained in the user instruction book. • Repairs to products used in anyway diminish your...
User Manual
Page 29
... Refrigeration 01 862 3411 All Cookers Washing Machines & Dishwashers Beforere questing service please check the trouble-shooting guide in the Operating Instructions as a charge may still be obtainedat a charge. it will need to have purchased an extended guarantee please refer to the appliance) Model No: Obtaining service please contact Beko Costumer Help-Line. If you when requesting service. (The model number is printed on the Rating...
... Refrigeration 01 862 3411 All Cookers Washing Machines & Dishwashers Beforere questing service please check the trouble-shooting guide in the Operating Instructions as a charge may still be obtainedat a charge. it will need to have purchased an extended guarantee please refer to the appliance) Model No: Obtaining service please contact Beko Costumer Help-Line. If you when requesting service. (The model number is printed on the Rating...

