User Manual
Page 2
... appliance to the electricity supply until all the parts and accessories are potentially flammable if exposed to observe these instructions in an unheated, cold room. (E.g.: garage, conservatory, annex, shed, out-house etc.) See Installation Instructions on page 4 for further information. • To obtain the best possible performance and trouble free operation from failure Freezing capacity fresh food - PERFORMANCE Energy efficiency class Energy consumption -
... appliance to the electricity supply until all the parts and accessories are potentially flammable if exposed to observe these instructions in an unheated, cold room. (E.g.: garage, conservatory, annex, shed, out-house etc.) See Installation Instructions on page 4 for further information. • To obtain the best possible performance and trouble free operation from failure Freezing capacity fresh food - PERFORMANCE Energy efficiency class Energy consumption -
User Manual
Page 3
CONTENTS PAGE SAFETY FIRST / ELECTRICAL REQUIREMENTS 3 TRANSPORTATION INSTRUCTIONS 4 INSTALLATION INSTRUCTIONS 4 GETTING TO KNOW YOUR COMBI BEKO FRIDGE / FREEZER 6 REVERSING THE DOOR 7 SUGGESTED ARRANGEMENT OF FOOD IN THE FRIDGE/FREEZER 8 TEMPERATURE ADJUSTMENT 9 BEFORE OPERATING 9 STORING FROZEN FOOD 9 FREEZING FRESH FOOD 10 MAKING ICE CUBES 10 DEFROSTING 10 REPLACING THE INTERIOR LIGHT BULB 11 CLEANING AND CARE 12 DO'S AND DON'TS 13 ENERGY SAVING TIPS 14 PROBLEM SOLVING 14 GUARANTEE DETAILS 15 HOW TO OBTAIN SERVICE 16 2
CONTENTS PAGE SAFETY FIRST / ELECTRICAL REQUIREMENTS 3 TRANSPORTATION INSTRUCTIONS 4 INSTALLATION INSTRUCTIONS 4 GETTING TO KNOW YOUR COMBI BEKO FRIDGE / FREEZER 6 REVERSING THE DOOR 7 SUGGESTED ARRANGEMENT OF FOOD IN THE FRIDGE/FREEZER 8 TEMPERATURE ADJUSTMENT 9 BEFORE OPERATING 9 STORING FROZEN FOOD 9 FREEZING FRESH FOOD 10 MAKING ICE CUBES 10 DEFROSTING 10 REPLACING THE INTERIOR LIGHT BULB 11 CLEANING AND CARE 12 DO'S AND DON'TS 13 ENERGY SAVING TIPS 14 PROBLEM SOLVING 14 GUARANTEE DETAILS 15 HOW TO OBTAIN SERVICE 16 2

User Manual
Page 4
... need to be replaced an ASTA approved BS 1362 fuse of the same rating must not be obtained from any good electrical store. Fuse covers are available from a BEKO Authorised Service Agent. Colour of fridge inner liner. IMPORTANT! We recommend that this appliance is on the left hand side of the replacement fuse cover must be cut off and an appropriate plug...
... need to be replaced an ASTA approved BS 1362 fuse of the same rating must not be obtained from any good electrical store. Fuse covers are available from a BEKO Authorised Service Agent. Colour of fridge inner liner. IMPORTANT! We recommend that this appliance is on the left hand side of the replacement fuse cover must be cut off and an appropriate plug...
User Manual
Page 5
...;Defrosting" and „Care & cleaning" for which the manufacturer will cause your appliance as it must only be followed. BEKO plc declines to accept any water in an unheated/cold room (eg: conservatory/annex/ shed/garage etc) then the appliance will not operate causing the freezer compartment to comply with the controls. This fridge freezer has been designed to operate in ambient temperatures...
...;Defrosting" and „Care & cleaning" for which the manufacturer will cause your appliance as it must only be followed. BEKO plc declines to accept any water in an unheated/cold room (eg: conservatory/annex/ shed/garage etc) then the appliance will not operate causing the freezer compartment to comply with the controls. This fridge freezer has been designed to operate in ambient temperatures...

User Manual
Page 6
... electricity supply until all the packing and transit protectors have been removed including polystyrene block(s) inserted between the compressor motor and the cabinet (see diagram). 5. defrost fridge. 7. The fridge/freezer should be adjusted as in firm contact with the appliance rotating 1/4 turn to prepare your appliance for use. Refer to cleaning and care section to the condenser at the back of feet avoids excessive vibration and noise...
... electricity supply until all the packing and transit protectors have been removed including polystyrene block(s) inserted between the compressor motor and the cabinet (see diagram). 5. defrost fridge. 7. The fridge/freezer should be adjusted as in firm contact with the appliance rotating 1/4 turn to prepare your appliance for use. Refer to cleaning and care section to the condenser at the back of feet avoids excessive vibration and noise...
User Manual
Page 7
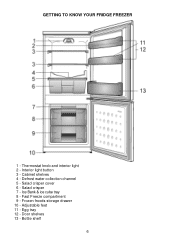
Fast Freeze compartment 9 - Salad crisper cover 6 - Ice Bank & ice cube tray 8 - Thermostat knob and interior light 2 - Egg tray 12 - Defrost water collection channel 5 - Adjustable feet 11 - Door shelves 13 - Interior light button 3 - GETTING TO KNOW YOUR FRIDGE FREEZER 1 - Cabinet shelves 4 - Frozen froods storage drawer 10 - Salad crisper 7 - Bottle shelf 6
Fast Freeze compartment 9 - Salad crisper cover 6 - Ice Bank & ice cube tray 8 - Thermostat knob and interior light 2 - Egg tray 12 - Defrost water collection channel 5 - Adjustable feet 11 - Door shelves 13 - Interior light button 3 - GETTING TO KNOW YOUR FRIDGE FREEZER 1 - Cabinet shelves 4 - Frozen froods storage drawer 10 - Salad crisper 7 - Bottle shelf 6
User Manual
Page 8
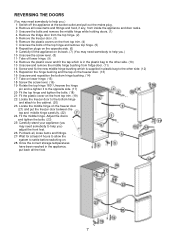
... the freezer door between the top and middle hinge carefully. (22) 24- Screw the screw level. (16) 19- Locate the middle hinge on its back. (7) (You may need somebody to help you) adjust the front feet. 26- Remove the freezer door. (3) 6- Fit the middle hinge. Carefully stand your appliance (you may need somebody to help you.) 1- REVERSING THE DOORS (You may need somebody to help you.) 10- Switch off lower hinge...
... the freezer door between the top and middle hinge carefully. (22) 24- Screw the screw level. (16) 19- Locate the middle hinge on its back. (7) (You may need somebody to help you) adjust the front feet. 26- Remove the freezer door. (3) 6- Fit the middle hinge. Carefully stand your appliance (you may need somebody to help you.) 1- REVERSING THE DOORS (You may need somebody to help you.) 10- Switch off lower hinge...
User Manual
Page 9
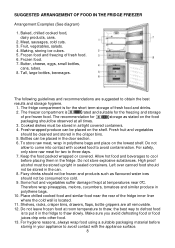
... fridge inner liner where the cold wall is located. 11. Keep the food packed wrapped or covered. Place chilled cooked food and similar food near 0°C. Make sure you avoid defrosting food or food juices drip onto other food. 13. Tall, large bottles, beverages. Shelves, racks, crisper bins, drawers, flaps, bottle grippers are suggested to avoid contamination. Meat, sausages, cold cuts. 3. Making, storing ice...
... fridge inner liner where the cold wall is located. 11. Keep the food packed wrapped or covered. Place chilled cooked food and similar food near 0°C. Make sure you avoid defrosting food or food juices drip onto other food. 13. Tall, large bottles, beverages. Shelves, racks, crisper bins, drawers, flaps, bottle grippers are suggested to avoid contamination. Meat, sausages, cold cuts. 3. Making, storing ice...
User Manual
Page 10
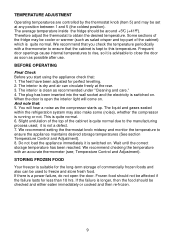
... levelling. 2. We recommend setting the thermostat knob midway and monitor the temperature to obtain the desired temperature. TEMPERATURE ADJUSTMENT Operating temperatures are controlled by the thermostat knob (Item 5) and may be used ; And note that the cabinet is advisable to this temperature. This is open the door. If there is a power failure, do not open the interior light will hear a noise as salad crisper and top part of the fridge may also make some (noise...
... levelling. 2. We recommend setting the thermostat knob midway and monitor the temperature to obtain the desired temperature. TEMPERATURE ADJUSTMENT Operating temperatures are controlled by the thermostat knob (Item 5) and may be used ; And note that the cabinet is advisable to this temperature. This is open the door. If there is a power failure, do not open the interior light will hear a noise as salad crisper and top part of the fridge may also make some (noise...

User Manual
Page 11
... handle of the refrigeration compartment. DEFROSTING A) Fridge compartment The fridge compartment defrosts automatically. The quality of the fridge compartment where a concealed evaporator is frozen solid. This can be cleared with water and place it is best preserved when it in 24 h. The defrost water runs to remove the droplets which have blocked the drain tube. If the frost layer reaches about 1/4'' (7 mm), reduce the setting (i.e. cube tray...
... handle of the refrigeration compartment. DEFROSTING A) Fridge compartment The fridge compartment defrosts automatically. The quality of the fridge compartment where a concealed evaporator is frozen solid. This can be cleared with water and place it is best preserved when it in 24 h. The defrost water runs to remove the droplets which have blocked the drain tube. If the frost layer reaches about 1/4'' (7 mm), reduce the setting (i.e. cube tray...
User Manual
Page 12
... switch on . Use a flat tipped screwdriver to remove the light diffuser cover by ensuring it useful to remove shelves for defrosting. If the light still fails to locate the front two lugs. 4. First check that the bulb hasn't worked loose by inserting the blade in the freezer to speed up to work , proceed as follows. 1. Replace the bulb with a new 15 watt (max) screw cap (SES) bulb. 5. Do not use hairdryers, electrical...
... switch on . Use a flat tipped screwdriver to remove the light diffuser cover by ensuring it useful to remove shelves for defrosting. If the light still fails to locate the front two lugs. 4. First check that the bulb hasn't worked loose by inserting the blade in the freezer to speed up to work , proceed as follows. 1. Replace the bulb with a new 15 watt (max) screw cap (SES) bulb. 5. Do not use hairdryers, electrical...
User Manual
Page 13
... the instructions below: • Switch off . Removal of the appliance, should be used for cleaning. 3. To remove the freezer flap door, first open the door 3" and then gently pull it out completely. 13. Make sure that you want to remove the tray to clean the cabinet of time, switch it off the appliance at all times. Any dust that no water enters the temperature control box. 6. To remove a freezer drawer, pull...
... the instructions below: • Switch off . Removal of the appliance, should be used for cleaning. 3. To remove the freezer flap door, first open the door 3" and then gently pull it out completely. 13. Make sure that you want to remove the tray to clean the cabinet of time, switch it off the appliance at all times. Any dust that no water enters the temperature control box. 6. To remove a freezer drawer, pull...
User Manual
Page 14
... and make the appliance more costly to run and cause excessive ice formation. Keep food for freezing in the fridge to "Best Before" and "Use by" etc. Wrap all food in polythene bags. Do- Don't- Don't- Exceed the maximum freezing loads (3 kg in its place. Don't- Close the freezer door before placing the compartment cover in any air is thoroughly clean before...
... and make the appliance more costly to run and cause excessive ice formation. Keep food for freezing in the fridge to "Best Before" and "Use by" etc. Wrap all food in polythene bags. Do- Don't- Don't- Exceed the maximum freezing loads (3 kg in its place. Don't- Close the freezer door before placing the compartment cover in any air is thoroughly clean before...
User Manual
Page 15
... door (s) of fridge and freezer compartments with an accurate thermometer and lower the thermostat setting (towards 1) if necessary. 2- Ensure your appliance open longer than 5 degrees C), then the energy saving will be made as an ice pack to the socket, plug in another appliance). • The fuse has blown/circuit breaker has tripped/main distribution switch has been turned off. • The temperature control...
... door (s) of fridge and freezer compartments with an accurate thermometer and lower the thermostat setting (towards 1) if necessary. 2- Ensure your appliance open longer than 5 degrees C), then the energy saving will be made as an ice pack to the socket, plug in another appliance). • The fuse has blown/circuit breaker has tripped/main distribution switch has been turned off. • The temperature control...
User Manual
Page 16
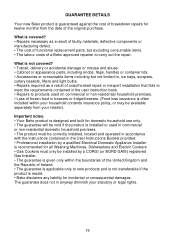
... may be installed by a qualified Electrical Domestic Appliance Installer is covered? • Repairs necessary as a result of the original purchase. GUARANTEE DETAILS Your new Beko product is guaranteed against the cost of breakdown repairs for twelve months from the date of unauthorised repair or inexpert installation that fails to meet the requirements contained in the user instruction book. • Repairs to products used in...
... may be installed by a qualified Electrical Domestic Appliance Installer is covered? • Repairs necessary as a result of the original purchase. GUARANTEE DETAILS Your new Beko product is guaranteed against the cost of breakdown repairs for twelve months from the date of unauthorised repair or inexpert installation that fails to meet the requirements contained in the user instruction book. • Repairs to products used in...
User Manual
Page 17
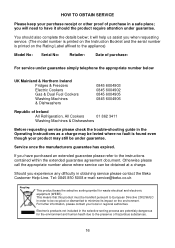
... difficulty in obtaining service please contact the Beko Customer Help-Line. Otherwise please call the appropriate number above where service can be under guarantee. Electronic products not included in the Operating Instructions as a charge may still be obtained at a charge. you will help us assist you when requesting service. (The model number is printed on the Instruction Booklet and the serial number is found...
... difficulty in obtaining service please contact the Beko Customer Help-Line. Otherwise please call the appropriate number above where service can be under guarantee. Electronic products not included in the Operating Instructions as a charge may still be obtained at a charge. you will help us assist you when requesting service. (The model number is printed on the Instruction Booklet and the serial number is found...


